---
File: /pages/configuration/custom-auth/auth-token.mdx
---
import Layout from '@/layouts/DefaultGuideLayout'
export const meta = {
title: 'Custom Generic Auth Token',
description:
'Configure a custom auth token',
subtitle:
'Learn how to setup your custom auth token',
}
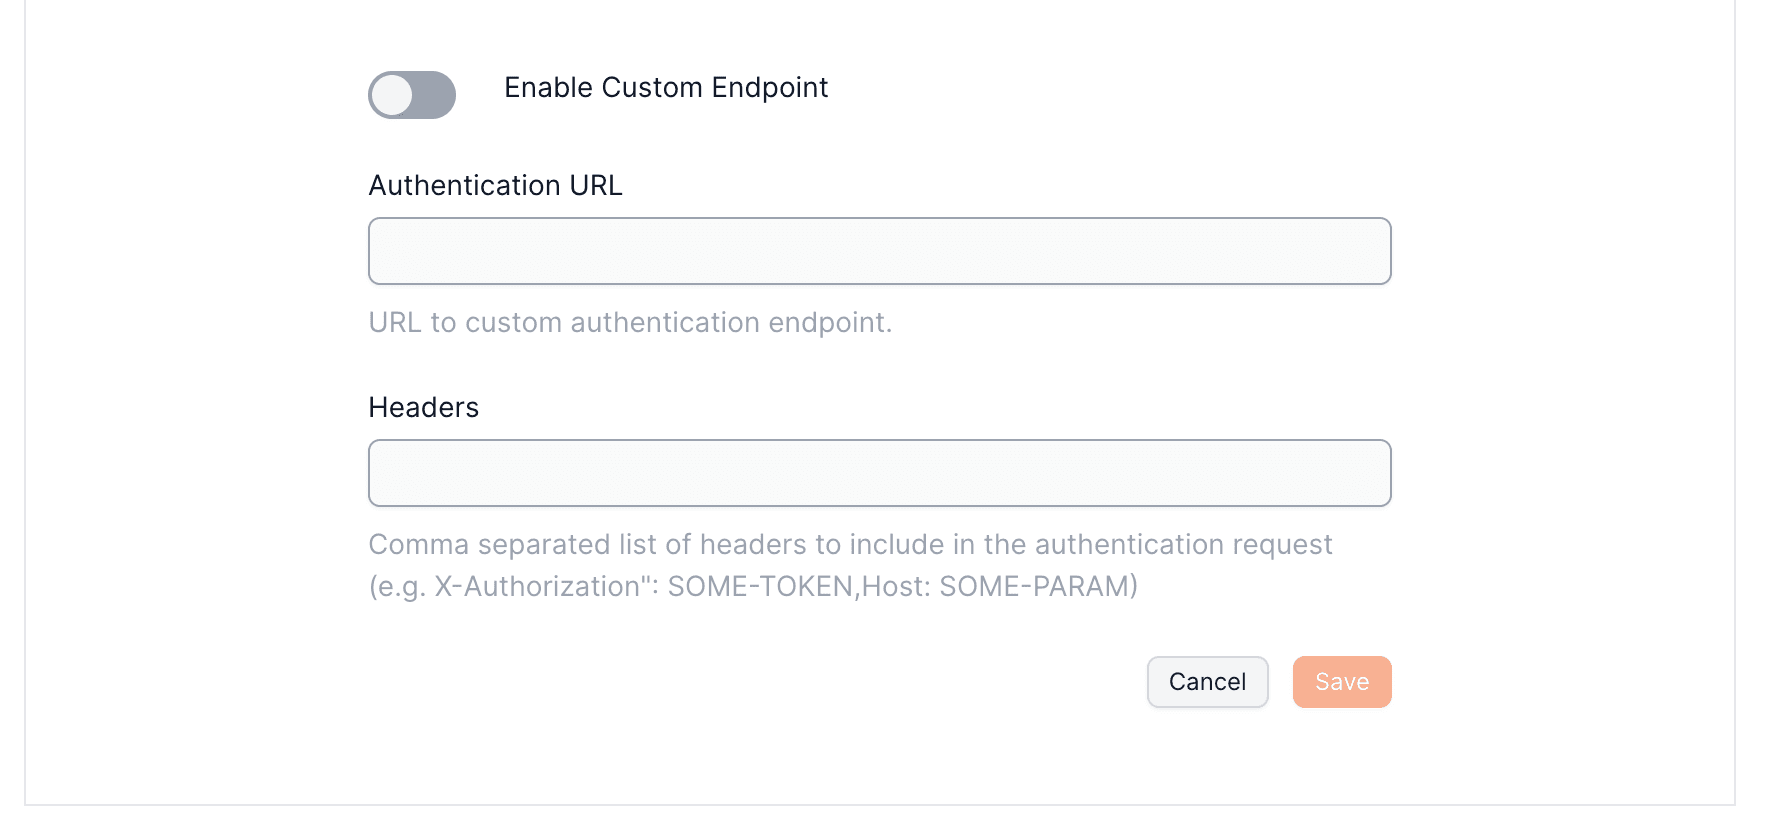
Generic authentication serves as an alternative for those utilizing their own authentication server. This method accommodates various authentication types not currently supported, such as `Discord`, `Twitter`, `GitHub`, or bespoke systems.
Essential steps and requirements for generic authentication through an endpoint include:
- Post-login, generate a public identifier to recognize the user.
- Relay this identifier to the embedded signer to initiate wallet creation.
- An endpoint you provide will be contacted to confirm the user's identity, upon which we'll create a wallet if the information is valid.
You'll need to supply an endpoint for identity verification.
Additional headers for request authentication can be passed and will accompany every verification request to your endpoint.
## Authenticating Users with Generic Authentication
### Configure your server
Within the server that handles auhentication requests, you'll need to implement an endpoint responsible for verifying the user's identity. This endpoint should accept a `POST` request with a JSON body containing the `payload` field, which corresponds to the user's public identifier.
```json
{
"payload": "public_identifier" // you can put any data you want here (as long as it's a string)
}
```
After returning a JSON response, the SDK will create a wallet for the user if the response is valid. The response should contain the following fields:
```json
{
"userId": "unique_user_id", // A unique identifier for the user, used for wallet identification if no email is provided
"email": "user_email" // optional
}
```
### Set up your provider
To set up your Custom Authentication with Openfort, visit your [dashboard provider settings](https://dashboard.openfort.io/players/auth/providers).
export const Page = ({ children }) =>
export default Page
---
File: /pages/configuration/custom-auth/oidc-token.mdx
---
import Layout from '@/layouts/DefaultGuideLayout'
export const meta = {
title: 'Custom OIDC compatible Auth',
description:
'Configure a custom OIDC compatible auth',
subtitle:
'Learn how to setup your custom OIDC compatible auth',
}
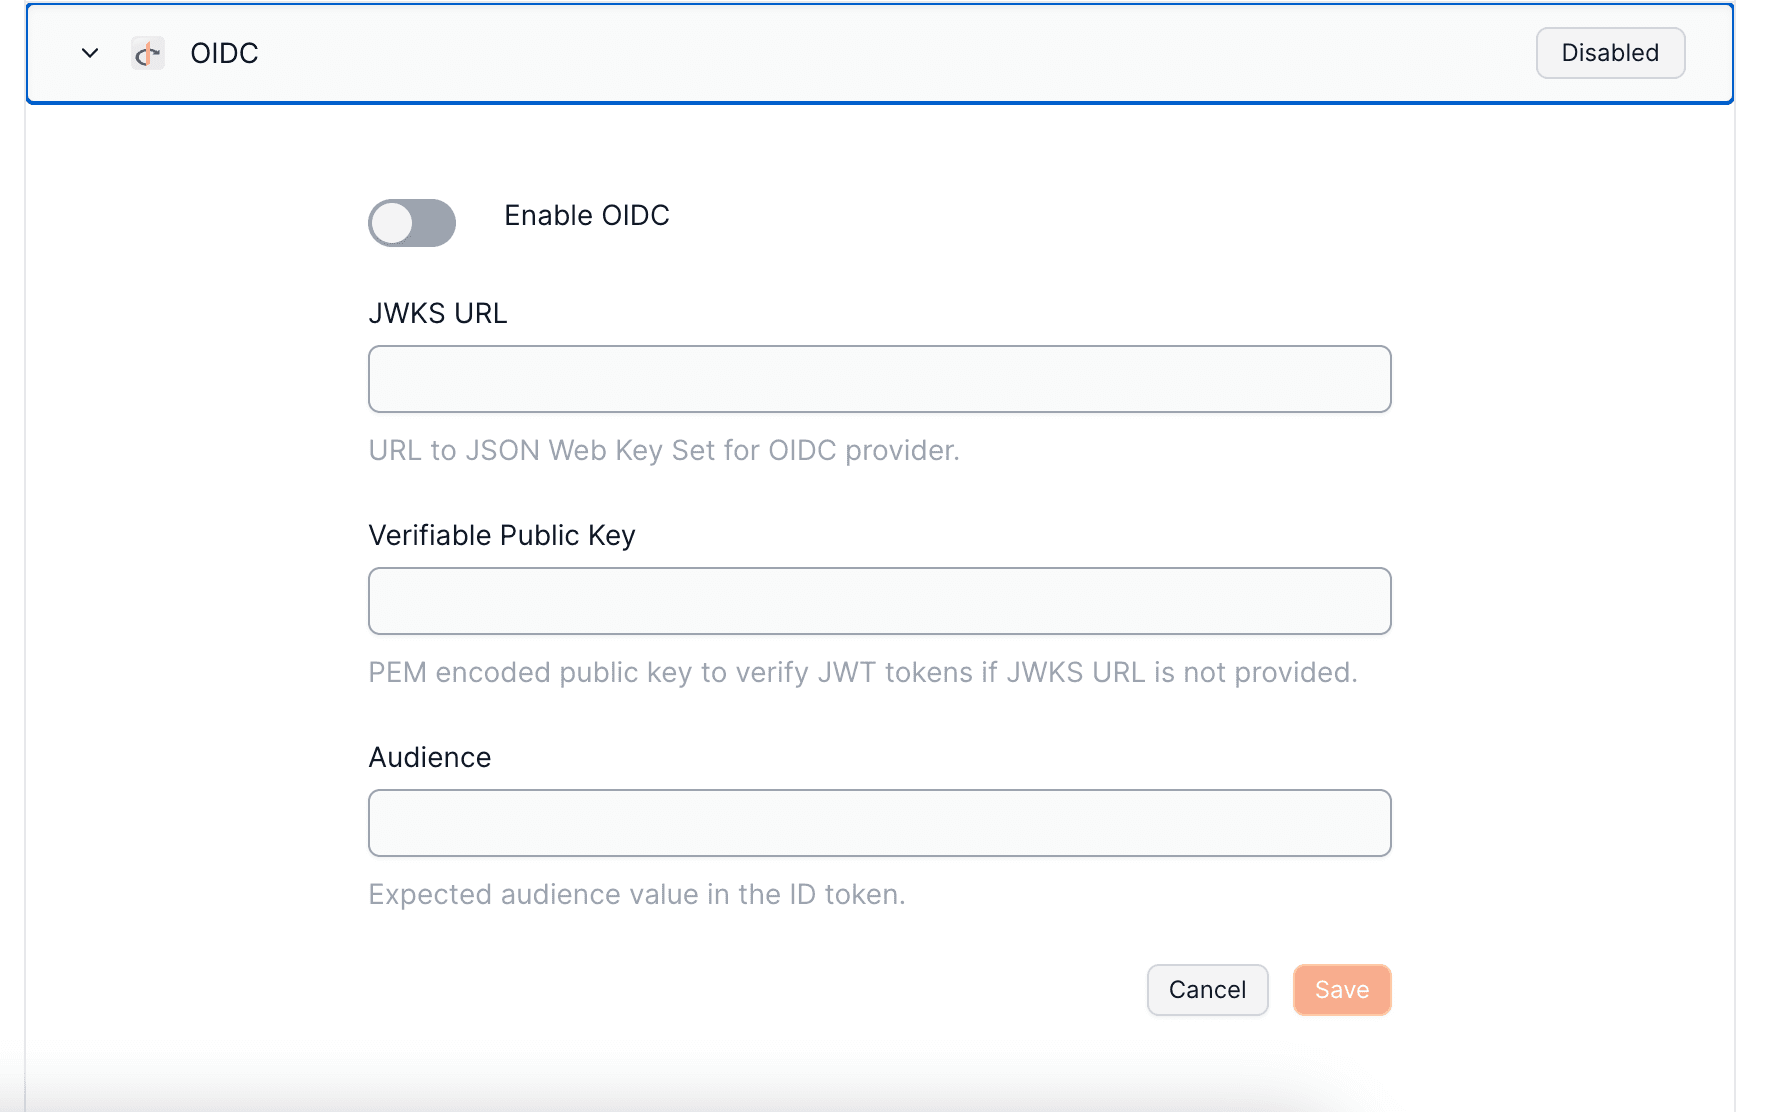
OIDC authentication setup is a viable choice when leveraging an external authentication provider such as `Auth0`, `Cognito`, etc., that offers JWK publication for token authenticity verification.
An OIDC authentication framework employs a public-private key pair, utilizing the private key to sign authentication tokens. The public key is made accessible via a public URL in JWKS format, typically found at `https://{domain}.com/.well-known/jwks.json`. When a user logs in, an idToken, a JWT, is produced and signed with the private key, following OIDC specifications for token field requirements. This JWT is then used within the embedded signer to create a user wallet.
The verification of the JWT against the public key confirms its authenticity, allowing wallet generation based on the subject (user identifier) within the idToken.
Input Requirements:
- JWKS File URL (public key): Validates the token's authentic signature.
- idToken's `aud` value: Confirms that the intended recipient of the token is correct.
## Authenticating Users with OIDC-Compatible Authentication
### Set up your provider
To set up your OIDC Authentication with Openfort, visit your [dashboard provider settings](https://dashboard.openfort.io/players/auth/providers).
export const Page = ({ children }) =>
export default Page
---
File: /pages/configuration/custom-auth/telegram-mini-app.mdx
---
import Layout from '@/layouts/DefaultGuideLayout'
export const meta = {
id: 'Integrate wallet in your Telegram mini-app',
title: 'Seamless login with Telegram mini-app',
description: 'Learn how you can integrate EVM wallet in your Telegam mini-app',
subtitle: 'Integrate wallet in your Telegram mini-app',
}
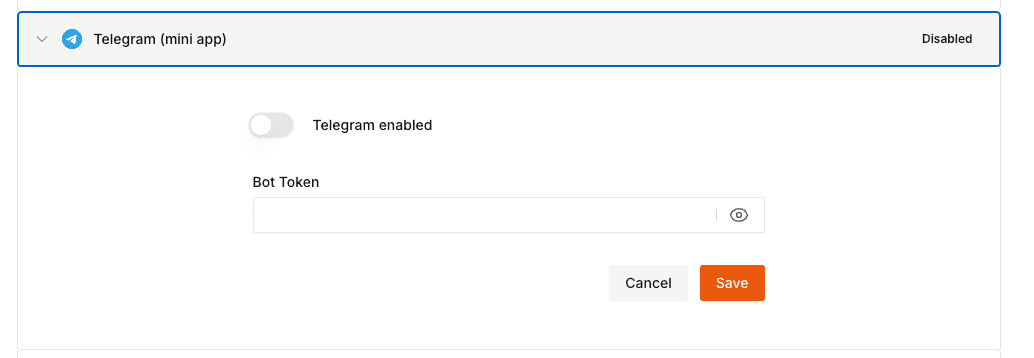
You can integrate Openfort to enable login directly from within a Telegram bot or Telegram mini-app.
## Configuration
Follow [this guide](https://core.telegram.org/bots/tutorial#obtain-your-bot-token) to create a telegram bot. After creating a Telegram bot, you must set your domain using the `/setdomain` command in the `@BotFather` chat. You will need to provide the following to Openfort via the Openfort Dashboard upon completion:
- Bot token
The `telegramMiniApp`, uses the signed `initDataRaw` from the `telegramSDK` available in the mini app as third party authentication. It does not have any kind of refresh token since Telegram is in charge of issuing new authentications. This method can be used directly from the mini app without requiring interaction with the user as he is already authenticated with the mini app.
Since you need to set your bot's allowed domain you'll need to use a tunneling tool for local development such as [ngrok](https://ngrok.com/).
## Samples
{'Learn how integrate with our mini-app sample'}
export const Page = ({ children }) =>
export default Page
---
File: /pages/configuration/external-auth/accelbyte.mdx
---
import Layout from '@/layouts/DefaultGuideLayout'
export const meta = {
title: 'AccelByte Auth',
description: 'Learn how to integrate AccelByte Cloud authentication with your Openfort game application.',
subtitle: 'Configure AccelByte Authentication for your game services'
}
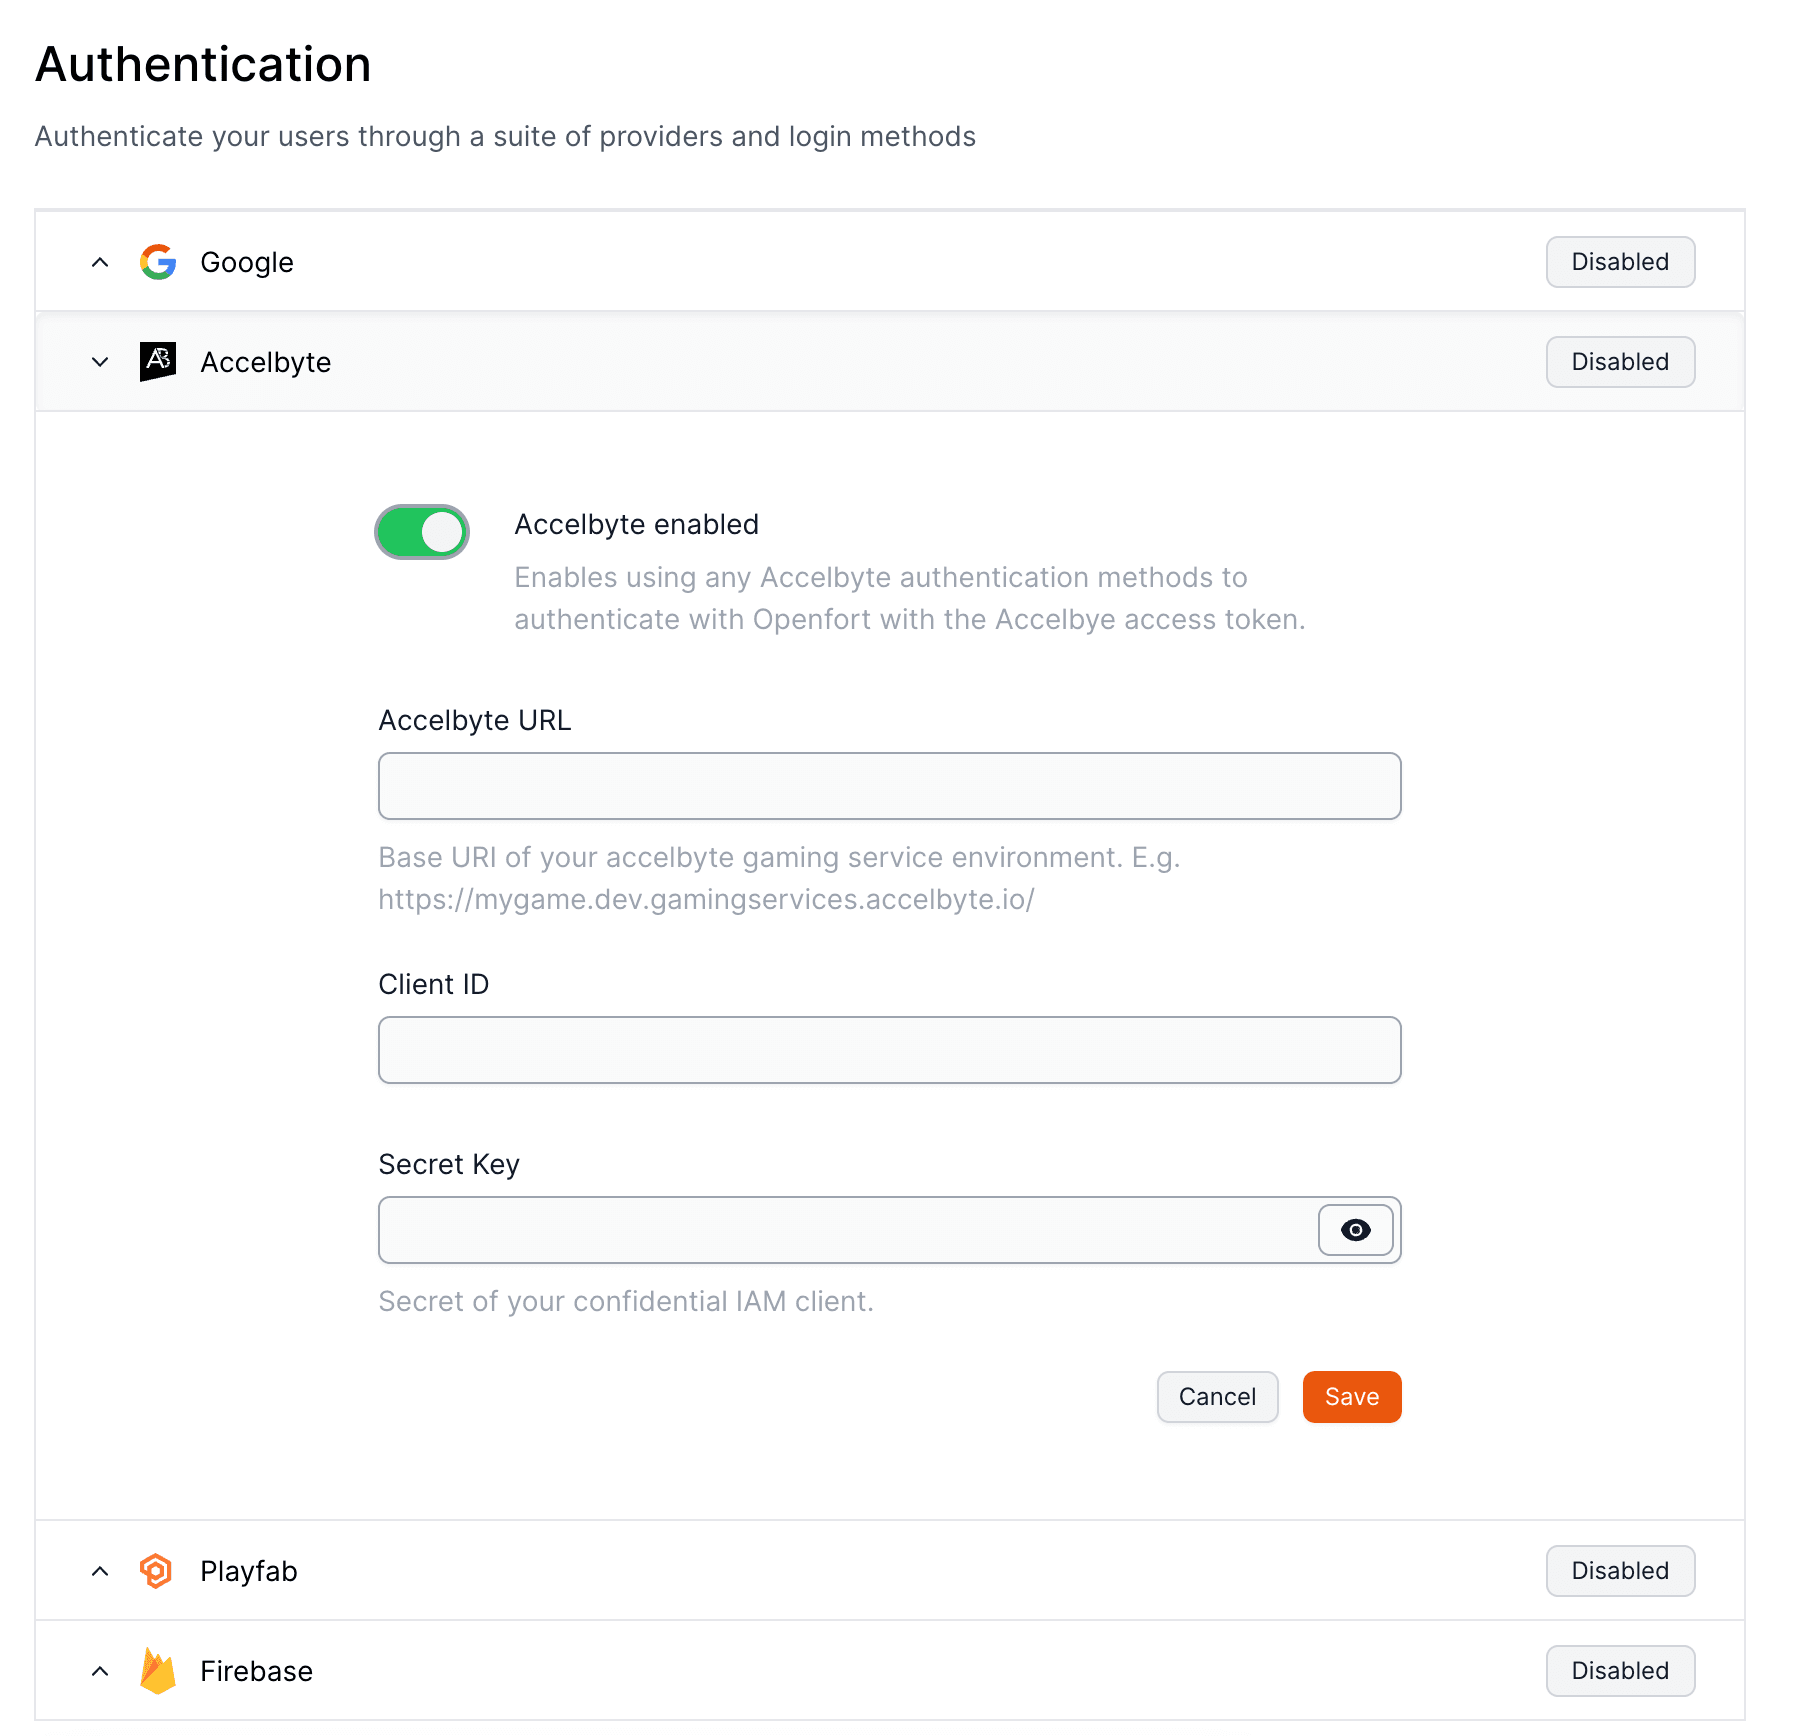
AccelByte offers robust backend services for building and operating online games, featuring scalable cloud infrastructure, matchmaking, and cross-platform player accounts.
Their solutions focus on enhancing multiplayer experiences while providing developers with the flexibility to customize game services.
## Set up your provider
To set up Accelbyte to authenticate players with Openfort, visit your [dashboard provider settings](https://dashboard.openfort.io/players/auth/providers).
export const Page = ({ children }) =>
export default Page
---
File: /pages/configuration/external-auth/firebase.mdx
---
import Layout from '@/layouts/DefaultGuideLayout'
export const meta = {
title: 'Firebase Auth',
description: 'Learn how to integrate Firebase Authentication with Openfort for secure user management.',
subtitle: 'Configure Firebase Authentication in your Openfort application'
}
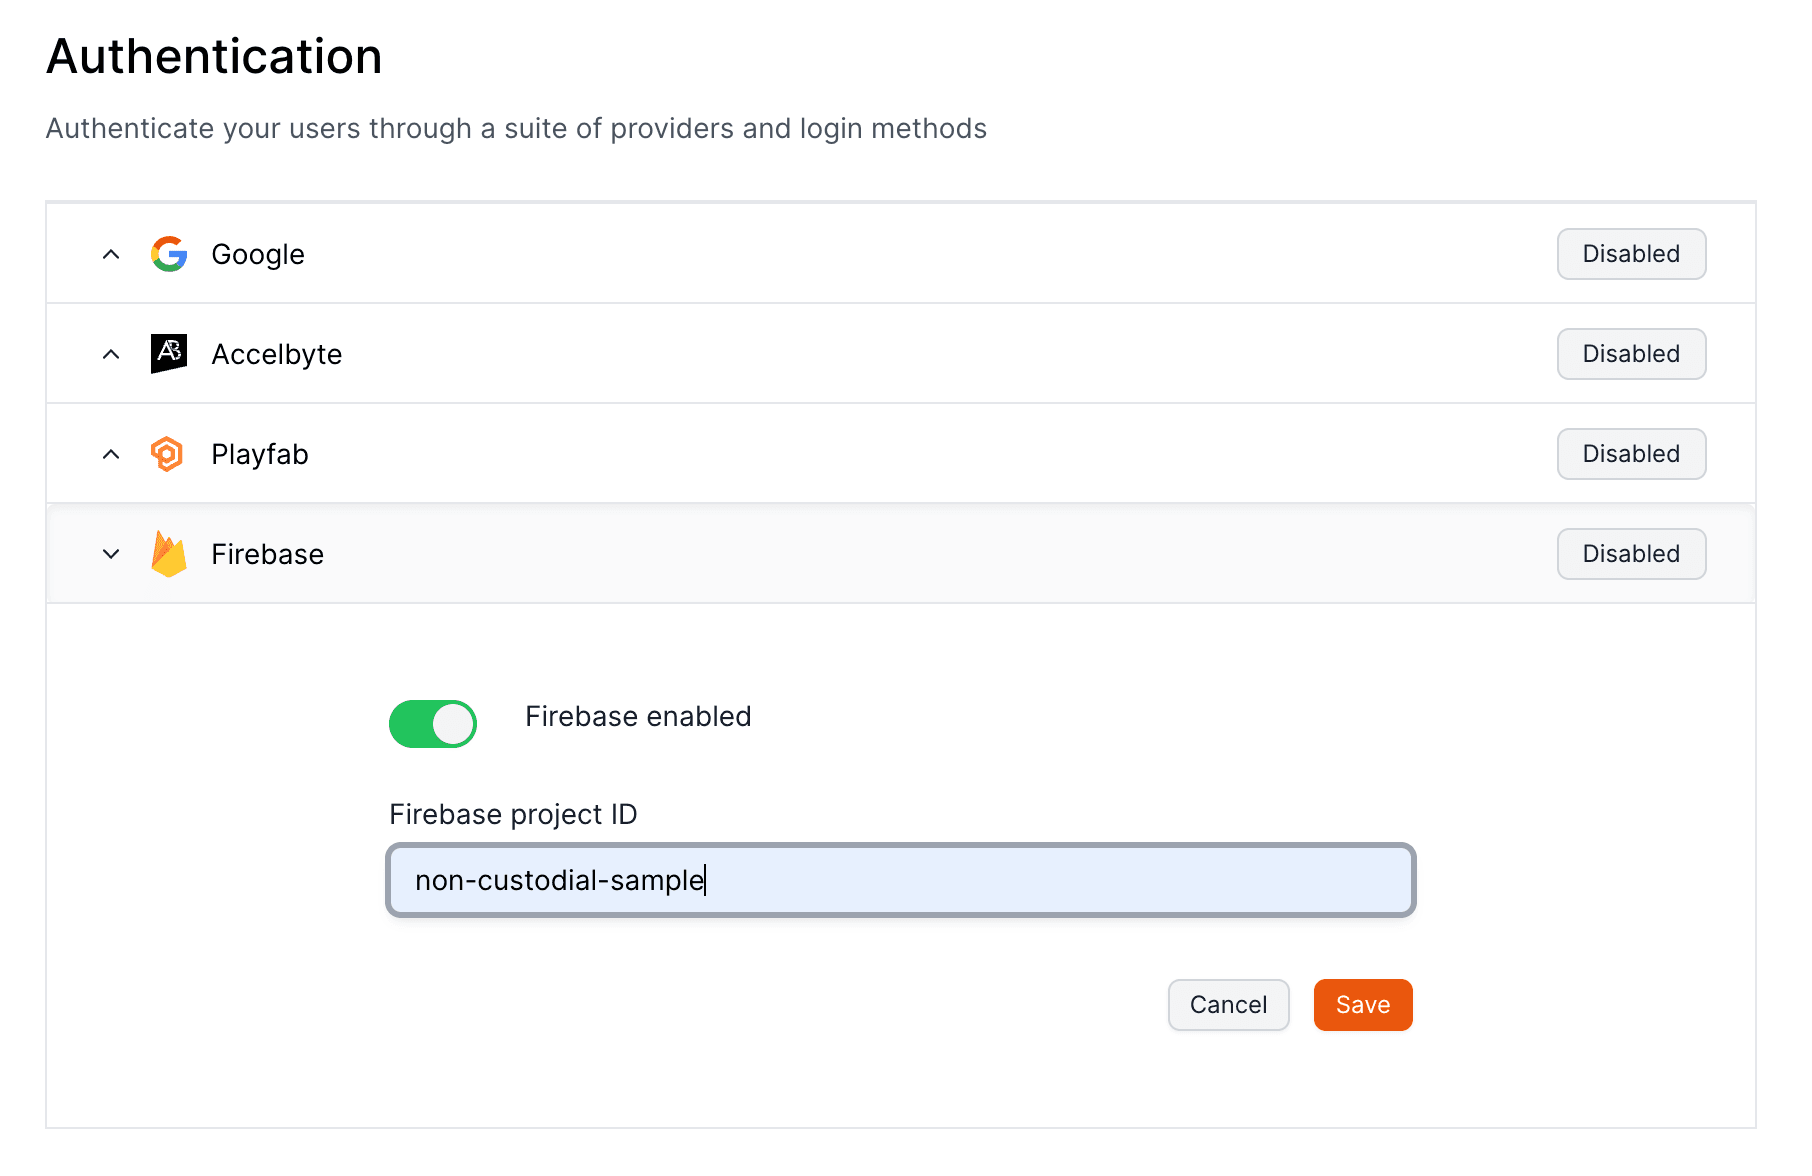
Firebase is a development platform from Google that provides a variety of tools and services to help developers build, improve, and grow their apps, with features such as databases, analytics, messaging, and crash reporting.
It emphasizes easy integration and real-time updates, enabling developers to create rich, collaborative experiences.
## Prerequisites
Head to your Project Settings in the Firebase Console and grab your Firebase Project ID.
## Set up your provider
To set up Firebase to authenticate players with Openfort, visit your [dashboard provider settings](https://dashboard.openfort.io/players/auth/providers).
export const Page = ({ children }) =>
export default Page
---
File: /pages/configuration/external-auth/lootlocker.mdx
---
import Layout from '@/layouts/DefaultGuideLayout'
export const meta = {
title: 'LootLocker Auth',
description: 'Integrate LootLocker authentication system with your Openfort game application.',
subtitle: 'Set up LootLocker Authentication for your game'
}
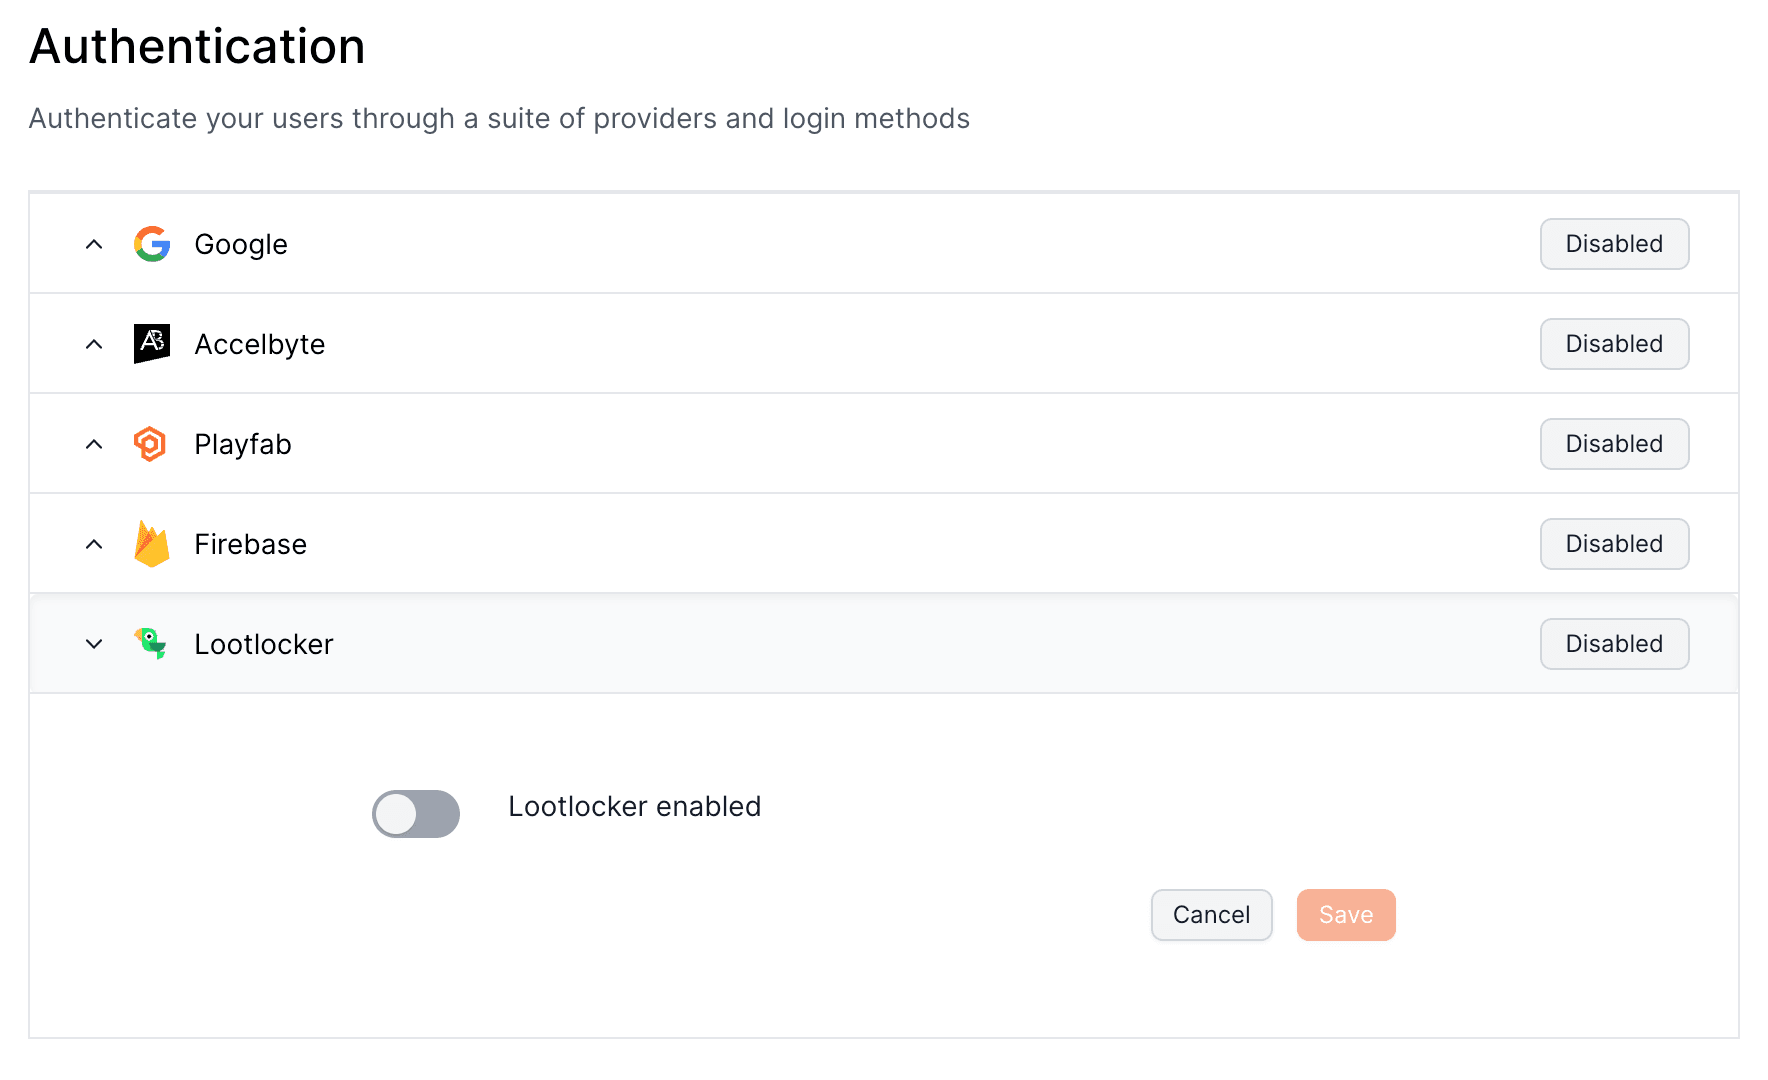
LootLocker offers robust backend services for building and operating online games, featuring scalable cloud infrastructure, matchmaking, and cross-platform player accounts.
Their solutions focus on enhancing multiplayer experiences while providing developers with the flexibility to customize game services.
## Set up your provider
To set up LootLocker to authenticate players with Openfort, visit your [dashboard provider settings](https://dashboard.openfort.io/players/auth/providers).
export const Page = ({ children }) =>
export default Page
---
File: /pages/configuration/external-auth/playfab.mdx
---
import Layout from '@/layouts/DefaultGuideLayout'
export const meta = {
title: 'PlayFab Auth',
description: 'Set up and integrate PlayFab authentication with your Openfort application.',
subtitle: 'Configure PlayFab Authentication for your game'
}
PlayFab provides a comprehensive suite of live game management services, including server hosting, data analytics, and liveOps utilities to streamline game development and monetization.
It is designed to empower developers with the tools needed to engage players and drive revenue, all while minimizing overhead and time to market.
## Prerequisites
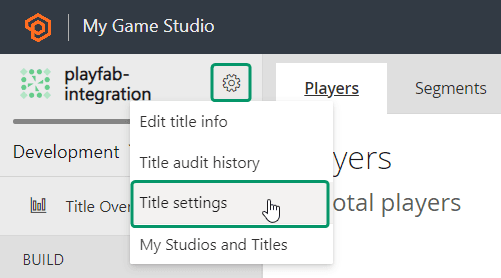
To set up your PlayFab authentication with Openfort, you'll need to get the `Project ID`.
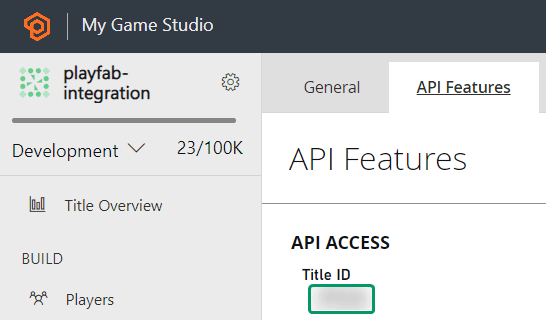
1. Visit the [PlayFab developer dashboard](https://developer.playfab.com/), select your title, and navigate to **_Settings wheel --> Title settings_**:
2. In the **_API Features_** section, copy your **_Title ID_**:
export const Page = ({ children }) =>
export default Page
---
File: /pages/configuration/external-auth/supabase.mdx
---
import Layout from '@/layouts/DefaultGuideLayout'
export const meta = {
title: 'Supabase Auth',
description: 'Learn how to integrate Supabase Authentication with your Openfort application.',
subtitle: 'Configure Supabase Authentication for your application'
}
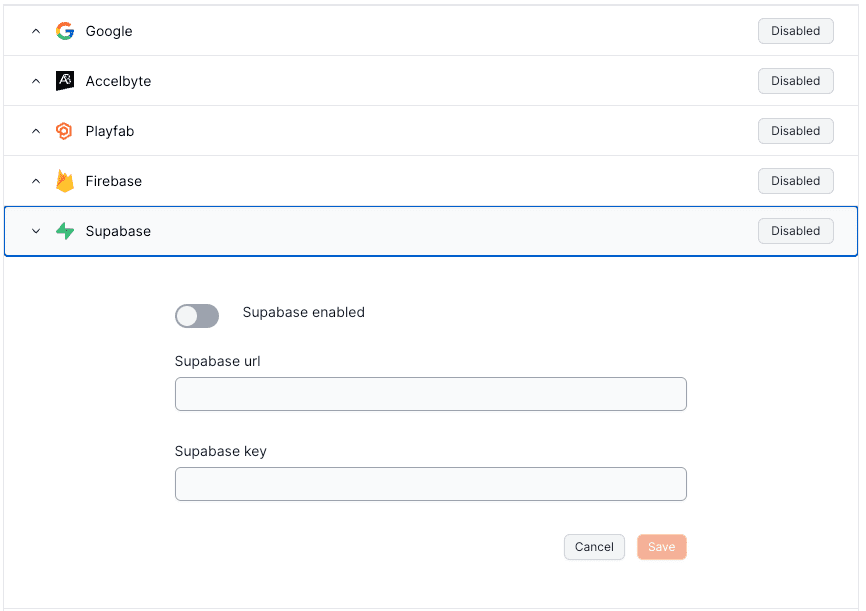
Supabase is an open-source alternative to Firebase. It provides a variety of tools and services to help with Postgres database, Authentication, instant APIs, Realtime, Functions, Storage and Vector embeddings.
## Prerequisites
Head to your Project Settings in the Supabase Console and grab your Project URL and anon API Key.
## Set up your provider
To set up Supabase to authenticate players with Openfort, visit your [dashboard provider settings](https://dashboard.openfort.io/players/auth/providers).
export const Page = ({ children }) =>
export default Page
---
File: /pages/configuration/password/custom-smtp.mdx
---
import Layout from '@/layouts/DefaultGuideLayout'
export const meta = {
id: 'auth',
title: 'Custom SMTP',
description: 'How to work with passwords in Openfort Auth',
}
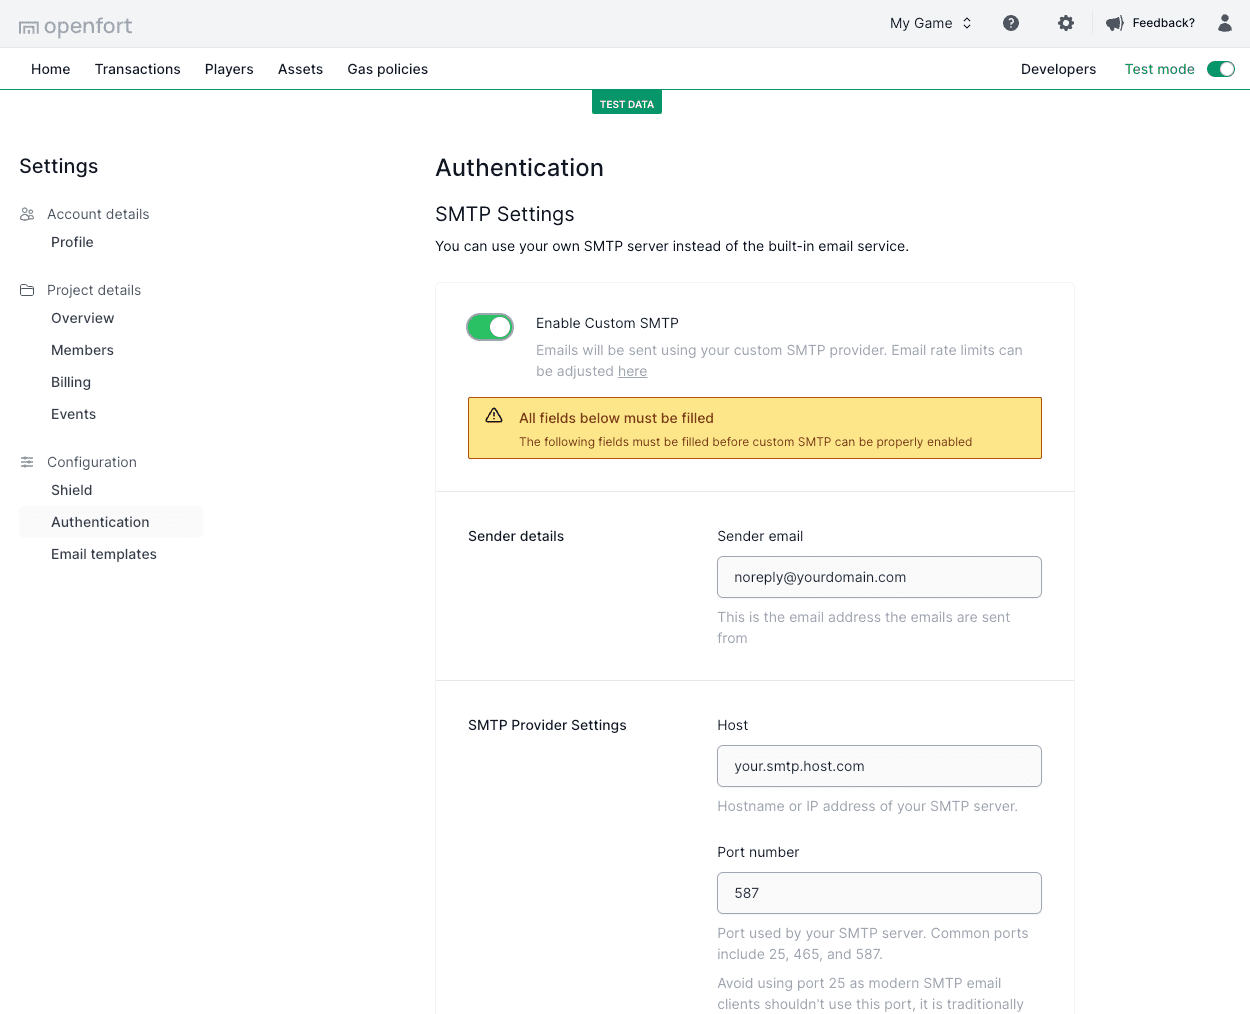
At present, you can trial the Openfort platform by sending up to **3** emails per hour via the built-in service. The default email service as a whole is offered on a best effort basis: we will do our best to maintain it and will review usage of the service on a regular basis to see if the email service should be continued.
As you progress toward production, you may find yourself wanting for a custom SMTP service in order to increase your limits. A custom SMTP server will allow you to set your own cap on the number of emails sent per hour.
Beyond rate limits, an SMTP server might also help with:
- Deliverability and Reputation Management
- Scalability
- Analytics and Tracking
- Compliance and Anti Spam measures
## How to set up SMTP
Head over to [Settings Page](https://dashboard.openfort.io/settings/configuration/auth) and hit "Enable Custom SMTP" under the SMTP Provider section.
Fill in fields below with the relevant details obtained from your custom SMTP provider:
### SMTP providers
You can use Openfort Auth with any major SMTP provider of your choosing. Some SMTP providers you could consider using are:
- [Twilio SendGrid](https://docs.sendgrid.com/for-developers/sending-email/integrating-with-the-smtp-api)
- [AWS SES](https://docs.aws.amazon.com/ses/latest/dg/send-email-smtp.html)
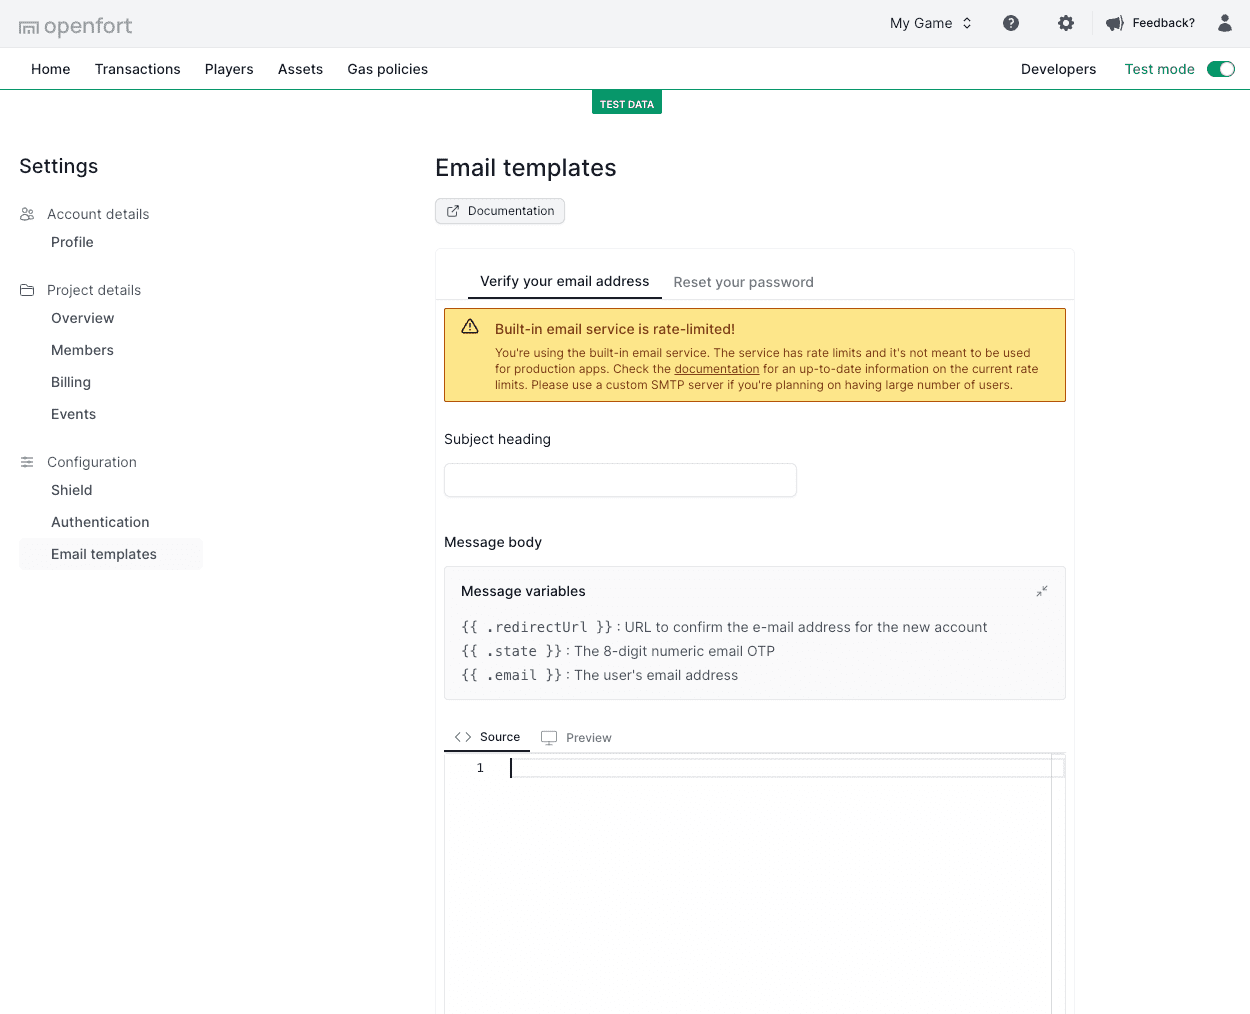
## Email templates
You can customize the email messages used for the authentication flows. You can edit the following email templates:
- Confirm signup
- Reset Password
## Terminology
The templating system provides the following variables for use:
| Name | Description |
| ------------------------ | ------------------------------------------------------------------------------------------------------------------------------------------------------------------------------------------------------------------------------------------------------------------------------------- |
| `{{ .state }}` | Contains a 6-digit One-Time-Password (OTP). |
| `{{ .email }}` | The user's email address. |
| `{{ .redirectUrl }}` | Contains the redirect URL to confirm the email address to a new account. |
## Editing email templates
Edit your email templates on the [Email Templates](https://dashboard.openfort.io/settings/configuration/templates) page. Below is an example for a verification of a sign up:
```
Subject: Confirm Reauthentication
Body:
Confirm reauthentication
Enter the code: {{ .state }}
```
export const Page = ({ children }) =>
export default Page
---
File: /pages/configuration/password/security.mdx
---
import Layout from '@/layouts/DefaultGuideLayout'
export const meta = {
id: 'auth',
title: 'Password-based Auth',
description: 'How to work with passwords in Openfort Auth',
}
You only need to enable this togle if you're developing an ecosystem wallets.
## Password security
A password is more secure if it is harder to guess or brute-force. In theory, a password is harder to guess if it is longer. It is also harder to guess if it uses a larger set of characters (for example, digits, lowercase and uppercase letters, and symbols).
This table shows the _minimum_ number of guesses that need to be tried to access a user's account:
| Required characters | Length | Guesses |
| -------------------------------------------- | ------ | ---------------- |
| Digits only | 8 | ~ 227 |
| Digits and letters | 8 | ~ 241 |
| Digits, lower and uppercase letters | 8 | ~ 248 |
| Digits, lower and uppercase letters, symbols | 8 | ~ 252 |
In reality though, passwords are not always generated at random. They often contain variations of names, words, dates, and common phrases. Malicious actors can use these properties to guess a password in fewer attempts.
There are hundreds of millions (and growing!) known passwords out there. Malicious actors can use these lists of leaked passwords to automate login attempts (known as credential stuffing) and steal or access sensitive user data.
### Password strength and leaked password protection
To help protect your users, Openfort Auth sets strength constrains of the passwords used on your project.
- Set a large minimum password length. Anything less than 8 characters is not recommended.
- Set the required characters that must appear at least once in a user's password. Use the strongest option of requiring digits, lowercase and uppercase letters, and symbols.
- Prevent the use of leaked passwords. Openfort Auth uses the open-source [HaveIBeenPwned.org Pwned Passwords API](https://haveibeenpwned.com/Passwords) to reject passwords that have been leaked and are known by malicious actors.
export const Page = ({ children }) =>
export default Page
---
File: /pages/configuration/social-login/auth-apple.mdx
---
import Layout from '@/layouts/DefaultGuideLayout'
export const meta = {
id: 'auth',
title: 'Login with Apple',
description: 'Use Sign in with Apple with Openfort',
}
Openfort Auth supports using [Sign in with Apple](https://developer.apple.com/sign-in-with-apple/) on the web and in native apps for iOS, macOS, watchOS or tvOS.
## Overview
To support Sign in with Apple, you need to configure the [Apple provider in the Openfort dashboard](https://dashboard.openfort.io/players/auth/providers) for your project.
There are three general ways to use Sign in with Apple, depending on the application you're trying to build:
- Sign in on the web or in web-based apps
- Using an OAuth flow initiated by Openfort Auth using the [Sign in with Apple REST API](https://developer.apple.com/documentation/sign_in_with_apple/sign_in_with_apple_rest_api).
- Sign in natively inside iOS, macOS, watchOS or tvOS apps using [Apple's Authentication Services](https://developer.apple.com/documentation/authenticationservices)
In some cases you're able to use the OAuth flow within web-based native apps such as with [React Native](https://reactnative.dev), [Expo](https://expo.dev) or other similar frameworks. It is best practice to use native Sign in with Apple capabilities on those platforms instead.
When developing with Expo, you can test Sign in with Apple via the Expo Go app, in all other cases you will need to obtain an [Apple Developer](https://developer.apple.com) account to enable the capability.
## Using the OAuth flow for web
Sign in with Apple's OAuth flow is designed for web or browser based sign in methods. It can be used on web-based apps as well as websites, though some users can benefit by using Sign in with Apple JS directly.
Behind the scenes, Openfort Auth uses the [REST APIs](https://developer.apple.com/documentation/sign_in_with_apple/sign_in_with_apple_rest_api) provided by Apple.
### Configuration
You will require the following information:
1. Your Apple Developer account's **Team ID**, which is an alphanumeric string of 10 characters that uniquely identifies the developer of the app. It's often accessible in the upper right-side menu on the Apple Developer Console.
2. Register email sources for _Sign in with Apple for Email Communication_ which can be found in the [Services](https://developer.apple.com/account/resources/services/list) section of the Apple Developer Console.
3. An **App ID** which uniquely identifies the app you are building. You can create a new App ID from the [Identifiers](https://developer.apple.com/account/resources/identifiers/list/bundleId) section in the Apple Developer Console (use the filter menu in the upper right side to see all App IDs). These usually are a reverse domain name string, for example `com.example.app`. Make sure you configure Sign in with Apple once you create an App ID in the Capabilities list. At this time Openfort Auth does not support Server-to-Server notification endpoints, so you should leave that setting blank. (In the past App IDs were referred to as _bundle IDs._)
4. A **Services ID** which uniquely identifies the web services provided by the app you registered in the previous step. You can create a new Services ID from the [Identifiers](https://developer.apple.com/account/resources/identifiers/list/serviceId) section in the Apple Developer Console (use the filter menu in the upper right side to see all Services IDs). These usually are a reverse domain name string, for example `com.example.app.web`.
5. Configure Website URLs for the newly created **Services ID**. The web domain you should use is the domain your Openfort project is hosted on. The redirect URL is `https://api.openfort.io/iam/v1/oauth/callback/apple`.
6. Create a signing **Key** in the [Keys](https://developer.apple.com/account/resources/authkeys/list) section of the Apple Developer Console. You can use this key to generate a secret key using the tool below, which is added to your Openfort project's Auth configuration. Make sure you safely store the `AuthKey_XXXXXXXXXX.p8` file. If you ever lose access to it, or make it public accidentally, revoke it from the Apple Developer Console and create a new one immediately. You will have to generate a new secret key using this file every 6 months, so make sure you schedule a recurring meeting in your calendar!
7. Finally, add the information you configured above to the [Apple provider configuration in the Openfort dashboard](https://dashboard.openfort.io/players/auth/providers).
Use this tool to generate a new Apple client secret. No keys leave your browser! Be aware that this tool does not currently work in Safari, so use Firefox or a Chrome-based browser instead.
## Using native sign in with Apple in Expo
When working with Expo, you can use the [Expo AppleAuthentication](https://docs.expo.dev/versions/latest/sdk/apple-authentication/) library to obtain an ID token that you can pass to openfort-js [`authenticateThirdParty` method](/docs/reference/openfort-js/classes/default.html#authenticateWithThirdPartyProvider).
When testing with Expo Go, the Expo App ID `host.exp.Exponent` will be used. Make sure to add this to the "Client IDs" list in your [Openfort dashboard Apple provider configuration](https://dashboard.openfort.io/players/auth/providers)!
Make sure you set up **Apple Native** under third party authentication providers.
1. Have an **App ID** which uniquely identifies the app you are building. You can create a new App ID from the [Identifiers](https://developer.apple.com/account/resources/identifiers/list/bundleId) section in the Apple Developer Console (use the filter menu in the upper right side to see all App IDs). These usually are a reverse domain name string, for example `com.example.app`. Make sure you configure Sign in with Apple for the App ID you created or already have, in the Capabilities list. At this time Openfort Auth does not support Server-to-Server notification endpoints, so you should leave that setting blank. (In the past App IDs were referred to as _bundle IDs._)
2. Register all of the App IDs that will be using your Openfort project in the [Apple provider configuration in the Openfort dashboard](https://dashboard.openfort.io/players/auth/providers) under _Client IDs_.
If you're building a native app only, you do not need to configure the OAuth settings.
export const Page = ({ children }) =>
export default Page
---
File: /pages/configuration/social-login/auth-discord.mdx
---
import Layout from '@/layouts/DefaultGuideLayout'
export const meta = {
id: 'auth',
title: 'Discord Login',
description: 'Integrate with Discord Login',
subtitle: 'Learn how to interact with Discord Login',
}
To enable Discord Auth for your project, you need to set up a Discord OAuth application and add the application credentials in the Openfort Dashboard.
## Overview
Setting up Discord logins for your application consists of 3 parts:
- Create and configure a Discord Project and App on the [Discord Developer Dashboard](https://discord.com/developers).
- Add your Discord API Key and API Secret Key to your [Openfort Project](https://dashboard.openfort.io/players/auth/providers).
- Add the login code to your [Openfort JS Client App](https://github.com/openfort-xyz/openfort-js).
### Configuration
**Access your Discord account**
- Go to [discord.com](https://discord.com/).
- Click on `Login` at the top right to log in.
- Once logged in, go to [discord.com/developers](https://discord.com/developers).
- callback URL: `https://api.openfort.io/iam/v1/oauth/callback/discord`
**Create a Discord application**
- Click on `New Application` at the top right.
- Enter the name of your application and click `Create`.
- Click on `OAuth2` under `Settings` in the left side panel.
- Click `Add Redirect` under `Redirects`.
- Type or paste your `callback URL` into the `Redirects` box.
- Click `Save Changes` at the bottom.
- Copy your `Client ID` and `Client Secret` under `Client information`.
**Add your Discord credentials into your Supabase project**

export const Page = ({ children }) =>
export default Page
---
File: /pages/configuration/social-login/auth-epic.mdx
---
import Layout from '@/layouts/DefaultGuideLayout'
export const meta = {
id: 'auth',
title: 'Epic Games Login',
description: 'Integrate with Epic Games Login',
subtitle: 'Learn how to interact with Epic Games Login',
}
To enable Epic Games Auth for your project, you need to set up a Epic Games OAuth application and add the application credentials in the Openfort Dashboard.
## Overview
Setting up Epic Games login for your application consists of 3 parts:
- Create and configure a Epic Project and App on the [Epic Developer Dashboard](https://dev.epicgames.com/portal/en-US/).
- Add your Epic API Key and API Secret Key to your [Openfort Project](https://dashboard.openfort.io/players/auth/providers).
- Add the login code to your [Openfort JS Client App](https://github.com/openfort-xyz/openfort-js).
### Configuration
1. Create an organization on Epic Games portal and create a new project.
2. Click on `Epic Account Services` and add a new applications:
- Verify your application website and privacy policy URL
- Save the API Key (client_id) and API Secret Key (client_secret) for later use.
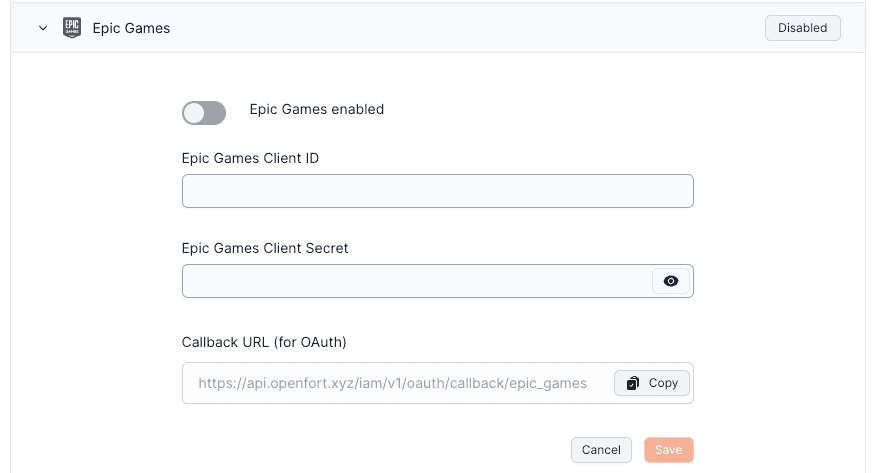
3. Set up Epic Games in Openfort:
- Go to the [Openfort dashboard](https://dashboard.openfort.io/players/auth/providers).
- Click on Epic Enabled to turn it ON.
- Enter the Epic Client ID and Epic Client Secret.
export const Page = ({ children }) =>
export default Page
---
File: /pages/configuration/social-login/auth-facebook.mdx
---
import Layout from '@/layouts/DefaultGuideLayout'
export const meta = {
id: 'auth',
title: 'Facebook Login',
description: 'Integrate with Facebook Login',
subtitle: 'Learn how to interact with Facebook Login',
}
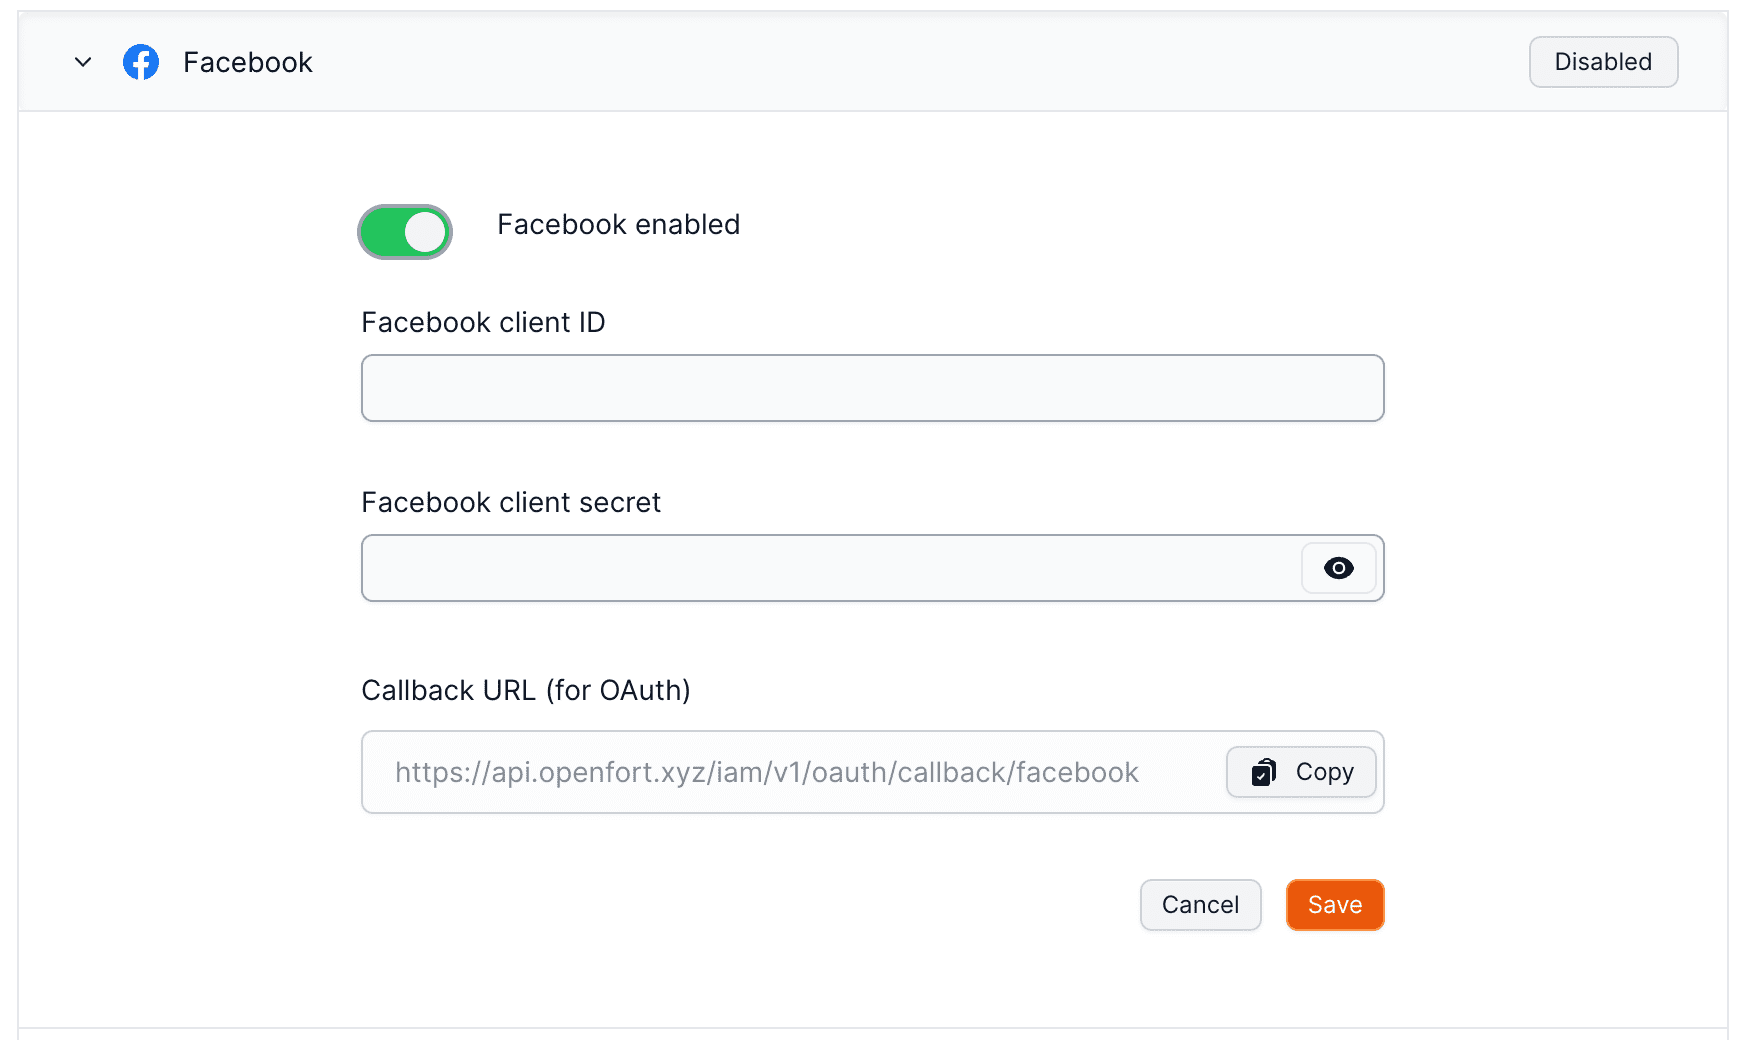
To enable Facebook Auth for your project, you need to set up a Facebook OAuth application and add the application credentials to your Openfort Dashboard.
## Overview
Setting up Facebook logins for your application consists of 3 parts:
- Create and configure a Facebook Application on the [Facebook Developers Site](https://developers.facebook.com/).
- Add your Facebook keys to your [Openfort Project](https://dashboard.openfort.io/players/auth/providers).
- Add the login code to your [Openfort JS Client App](https://github.com/openfort-xyz/openfort-js).
### Configuration
- Go to [developers.facebook.com](https://developers.facebook.com).
- Click on `Log In` at the top right to log in.
**Create a Facebook app**
- Click on `My Apps` at the top right.
- Click `Create App` near the top right.
- Select your app type and click `Continue`.
- Fill in your app information, then click `Create App`.
- This should bring you to the screen: `Add Products to Your App`. (Alternatively you can click on `Add Product` in the left sidebar to get to this screen.)
**Set up Facebook login for your Facebook app**
From the `Add Products to your App` screen:
- Click `Setup` under `Facebook Login`
- Skip the Quickstart screen, instead, in the left sidebar, click `Settings` under `Facebook Login`
- Enter your callback URI (`https://api.openfort.io/iam/v1/oauth/callback/facebook`) under `Valid OAuth Redirect URIs` on the `Facebook Login Settings` page
- Enter this in the `Valid OAuth Redirect URIs` box
- Click `Save Changes` at the bottom right
Be aware that you have to set the right use case permissions to enable Third party applications to read the email address. To do so:
Under `Build Your App`, click on `Use Cases` screen. From there, do the following steps:
- Click the Edit button in `Authentication and Account Creation` on the right side. This action will lead to the other page.
- `public_profile` is set by default, so make sure it and `email` have status of **Ready for testing** in the redirected page.
- If not, click the **Add** button in email on right side.
**Copy your Facebook app ID and secret**
- Click `Settings / Basic` in the left sidebar
- Copy your App ID from the top of the `Basic Settings` page
- Under `App Secret` click `Show` then copy your secret
- Make sure all required fields are completed on this screen.
**Enter your Facebook app ID and secret into your Supabase project**
export const Page = ({ children }) =>
export default Page
---
File: /pages/configuration/social-login/auth-google.mdx
---
import Layout from '@/layouts/DefaultGuideLayout'
export const meta = {
id: 'auth',
title: 'Google Login',
description: 'Integrate with Google Login',
subtitle: 'Learn how to interact with Google Login',
}
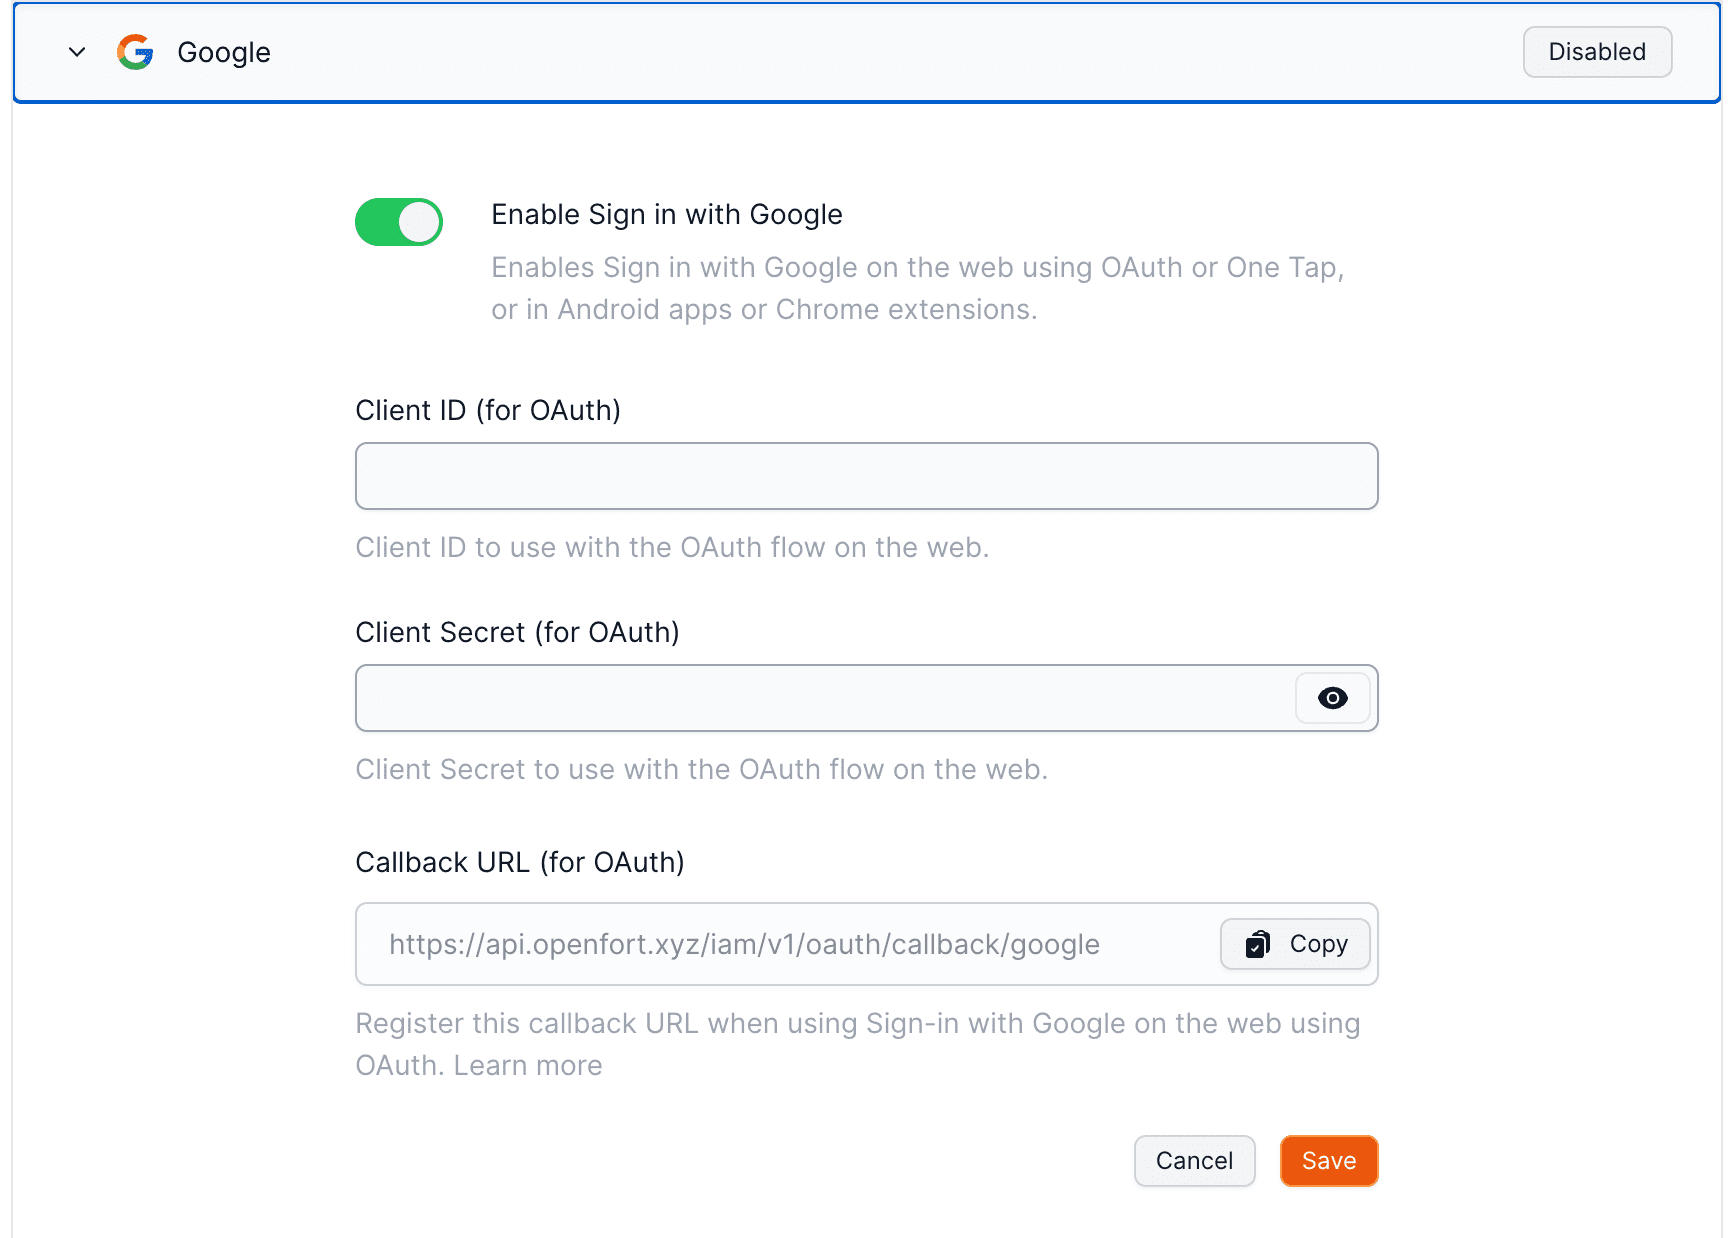
Openfort Auth supports Sign in with Google on the web, native Android applications and Chrome extensions.
## Overview
Setting up Twitter logins for your application consists of 3 parts:
- Create and configure a Google Project and App on the [Google Cloud Platform](https://console.cloud.google.com/home/dashboard).
- Add your Google API Key and API Secret Key to your [Openfort Project](https://dashboard.openfort.io/players/auth/providers).
- Add the login code to your [Openfort JS Client App](https://github.com/openfort-xyz/openfort-js).
### Google pre-built configuration
1. Go to the [API Credentials page](https://console.cloud.google.com/apis/credentials).
2. Click `Create credentials` and choose `OAuth Client ID`.
3. For application type, choose `Web application`.
4. Under **Authorized redirect URLs**, enter the callback URL from the [Openfort dashboard](https://dashboard.openfort.io/players/auth/providers). Expand the Google Auth Provider section to display it.
5. When you finish configuring your credentials, you will be shown your client ID and secret. Add these to the Google Auth Provider section of the Openfort Dashboard.
1. Configure OAuth credentials for your Google Cloud project in the [Credentials](https://console.cloud.google.com/apis/credentials) page of the console. When creating a new OAuth client ID, choose _Android_ or _iOS_ depending on the mobile operating system your app is built for.
- For Android, use the instructions on screen to provide the SHA-1 certificate fingerprint used to sign your Android app.
- You will have a different set of SHA-1 certificate fingerprint for testing locally and going to production. Make sure to add both to the Google Cloud Console. and add all of the Client IDs to Openfort dashboard.
- For iOS, use the instructions on screen to provide the app Bundle ID, and App Store ID and Team ID if the app is already published on the Apple App Store.
2. Configure the [OAuth Consent Screen](https://console.cloud.google.com/apis/credentials/consent). This information is shown to the user when giving consent to your app. In particular, make sure you have set up links to your app's privacy policy and terms of service.
3. Finally, add the client ID from step 1 in the [Google provider on the Openfort Dashboard](https://dashboard.openfort.io/players/auth/providers), under _Client IDs_.
Note that you do not have to configure the OAuth flow in the Openfort Dashboard in order to use native sign in.
Make sure you set up **Google Native** under third party authentication providers.
export const Page = ({ children }) =>
export default Page
---
File: /pages/configuration/social-login/auth-line.mdx
---
import Layout from '@/layouts/DefaultGuideLayout'
export const meta = {
id: 'auth',
title: 'LINE Login',
description: 'Integrate with LINE Login',
subtitle: 'Learn how to interact with LINE Login',
}
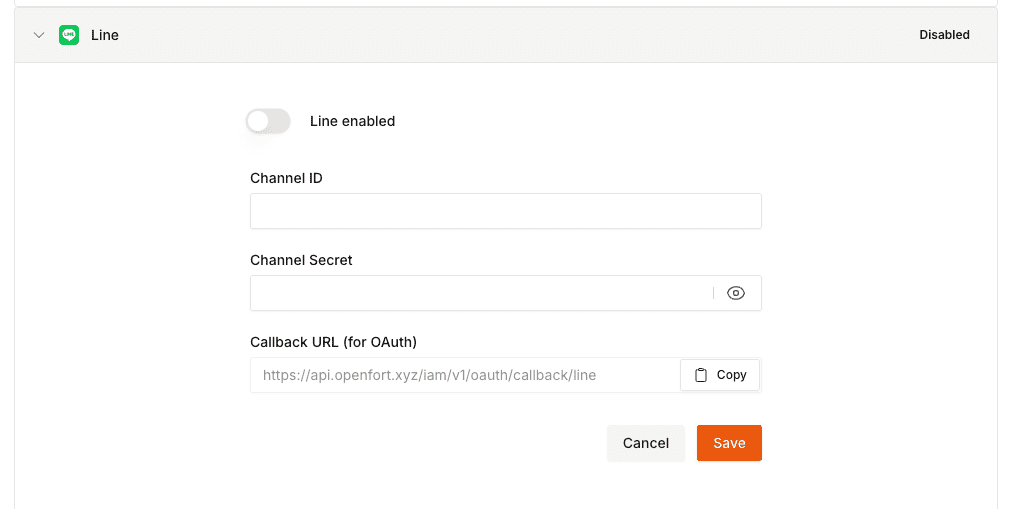
Integrate LINE Login into your web app (website) to make it easier for people to create an account and log in.
## Overview
Setting up LINE login for your application consists of 3 parts:
- Create and configure a LINE Project and App on the [LINE Dashboard](https://developers.line.biz/console/).
- Add your LINE `Channel ID` and `Channel Secret` to your [Openfort Project](https://dashboard.openfort.io/players/auth/providers).
- Add the login code to your [Openfort JS Client App](https://github.com/openfort-xyz/openfort-js).
export const Page = ({ children }) =>
export default Page
---
File: /pages/configuration/social-login/auth-telegram.mdx
---
import Layout from '@/layouts/DefaultGuideLayout'
export const meta = {
id: 'auth',
title: 'Telegram Login',
description: 'Integrate with Telegram Login',
subtitle: 'Learn how to interact with Telegram Login',
}
Openfort enables developers to quickly integrate Login with Telegram into their applications.
## Overview
There are two methods of authentication with Telegram. Telegram Auth requires the botUsername as an OAuth2 authentication flow with telegram, similarly to how you login with Google with an access/refresh token returned. This method goes through the screen you have seen with the [Continue with Telegram](https://core.telegram.org/widgets/login) button.
Openfort also enables seamless Telegram login directly from within a Telegram bot or within Telegram Mini-Apps! [Refer to this guide](/docs/configuration/custom-auth/telegram-mini-app).
### Configuration
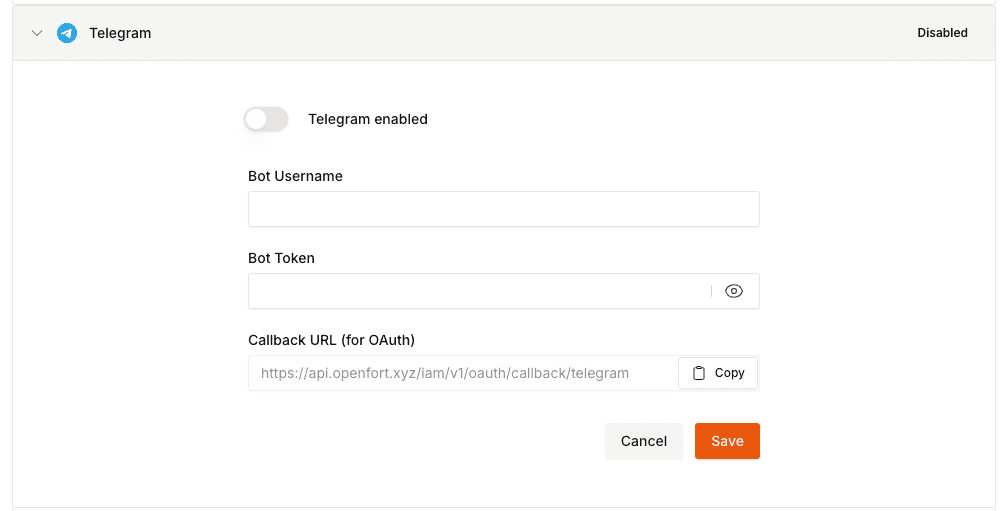
Start the conversation with [BotFather](https://t.me/botfather) and follow [this guide](https://core.telegram.org/bots/tutorial#obtain-your-bot-token) to create a telegram bot. You will need to provide the following to Openfort via the Openfort Dashboard upon completion:
- Bot token (Paste the token you recive from BotFather)
- Bot name (Paste the bot's username)
After creating a Telegram bot, you must set your domain using the `/setdomain` command in the `@BotFather` chat. Send this link 'https://oauth.openfort.xyz/telegram/callback'.
Telegram login requires developers to create a Telegram bot with a bot secret. This bot secret controls the Telegram bot and is also used as a symmetric key for authentication. Control over this key enables a developer to sign over authentication data, meaning compromise of this key puts your users (and their accounts) at risk.
**Securing this symmetric key is essential for the security of all of your app’s Telegram logins.**
export const Page = ({ children }) =>
export default Page
---
File: /pages/configuration/social-login/auth-twitter.mdx
---
import Layout from '@/layouts/DefaultGuideLayout'
export const meta = {
id: 'auth',
title: 'X (Twitter) Login',
description: 'Integrate with X Login',
subtitle: 'Learn how to interact with X Login',
}
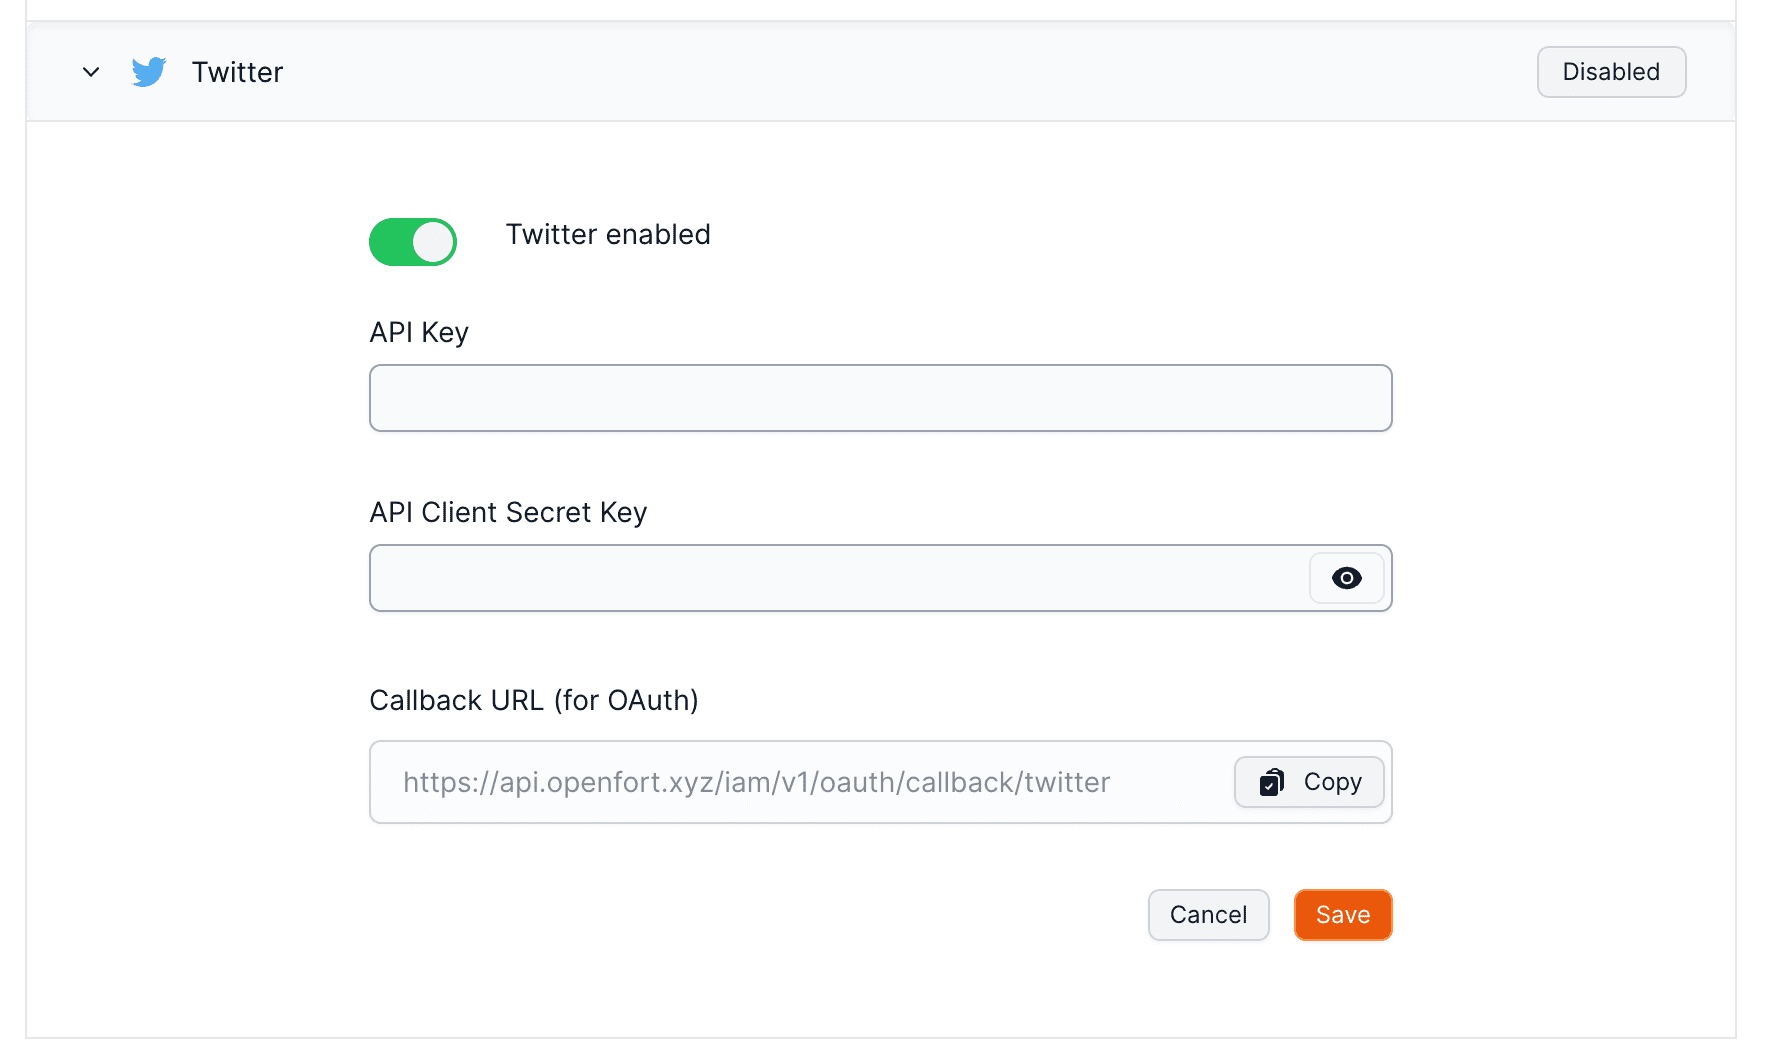
To enable Twitter Auth for your project, you need to set up a Twitter OAuth application and add the application credentials in the Openfort Dashboard.
## Overview
Setting up Twitter logins for your application consists of 3 parts:
- Create and configure a Twitter Project and App on the [Twitter Developer Dashboard](https://developer.twitter.com/en/portal/dashboard).
- Add your Twitter API Key and API Secret Key to your [Openfort Project](https://dashboard.openfort.io/players/auth/providers).
- Add the login code to your [Openfort JS Client App](https://github.com/openfort-xyz/openfort-js).
### Configuration
1. Create Project and App:
- Click "+ Create Project", enter project name, and select use case.
- Enter a project description and app name.
- Copy and save your API Key (client_id) and API Secret Key (client_secret).
2. Set Up App Settings:
- Click on "App settings".
- Go to "User authentication settings" and click "Set up".
3. Configure App Permissions:
- Turn ON "Request email from users".
- Select "Web App" as the Type of App.
- Enter Callback URL, Website URL, Terms of service URL, and Privacy policy URL.
4. Set up X in Openfort:
- Go to the [Openfort dashboard](https://dashboard.openfort.io/players/auth/providers).
- Click on Twitter Enabled to turn it ON.
- Enter the Twitter Client ID and Twitter Client Secret.
export const Page = ({ children }) =>
export default Page
---
File: /pages/configuration/api-keys.mdx
---
import Layout from '@/layouts/DefaultGuideLayout'
import ApiKeys from '@/common/guides/api-keys.mdx'
export const meta = {
id: 'auth',
title: 'API keys',
}
export const Page = ({ children }) =>
export default Page
---
File: /pages/configuration/dev.mdx
---
import Layout from '@/layouts/DefaultGuideLayout'
export const meta = {
title: 'Backend wallets',
}
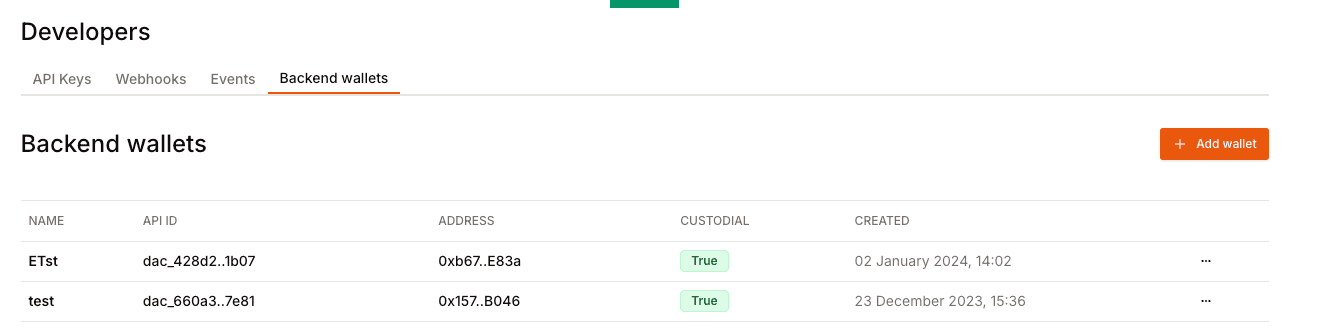
Backend wallets serve as an internal account for games and developers to manage assets and flows. The accounts are EOAs (Externally Owned Account).
There are [several use cases](/docs/products/server/wallet) for this:
- **Treasury Account**: Transferring assets on demand.
- **Minting Account**: Minting assets on demand.
- **Escrow Account**: Hold assets or tokens in an escrow between users and transferring them afterwards.
## Requisites
Developer account pay for gas using either:
- **Support [ERC-2771](https://eips.ethereum.org/EIPS/eip-2771) transactions**: The assets you want to escrow need to support [ERC-2771](https://eips.ethereum.org/EIPS/eip-2771) transactions (i.e. gasless).
- **Funding a backend wallet**: You need to fund your developer account with the chain's native token.
## Create a backend wallet
Head to the [backend wallet](https://dashboard.openfort.io/developers/wallets) page in your dashboard settings and click on `Add account`. By default, the backend wallets created with Openfort are custodial.
```ts server.ts
// Set your secret key. Remember to switch to your live secret key in production.
// See your keys here: https://dashboard.openfort.io/developers/configuration/api-keys
const Openfort = require('@openfort/openfort-node').default;
const openfort = new Openfort(YOUR_SECRET_KEY);
const settings = await openfort.settings.createDeveloperAccount({
name: 'Minting Account',
})
```
```bash command-line
curl https://api.openfort.io/v1/settings/developer_accounts \
-u "$YOUR_SECRET_KEY:" \
-d name= "Minting Account"
```
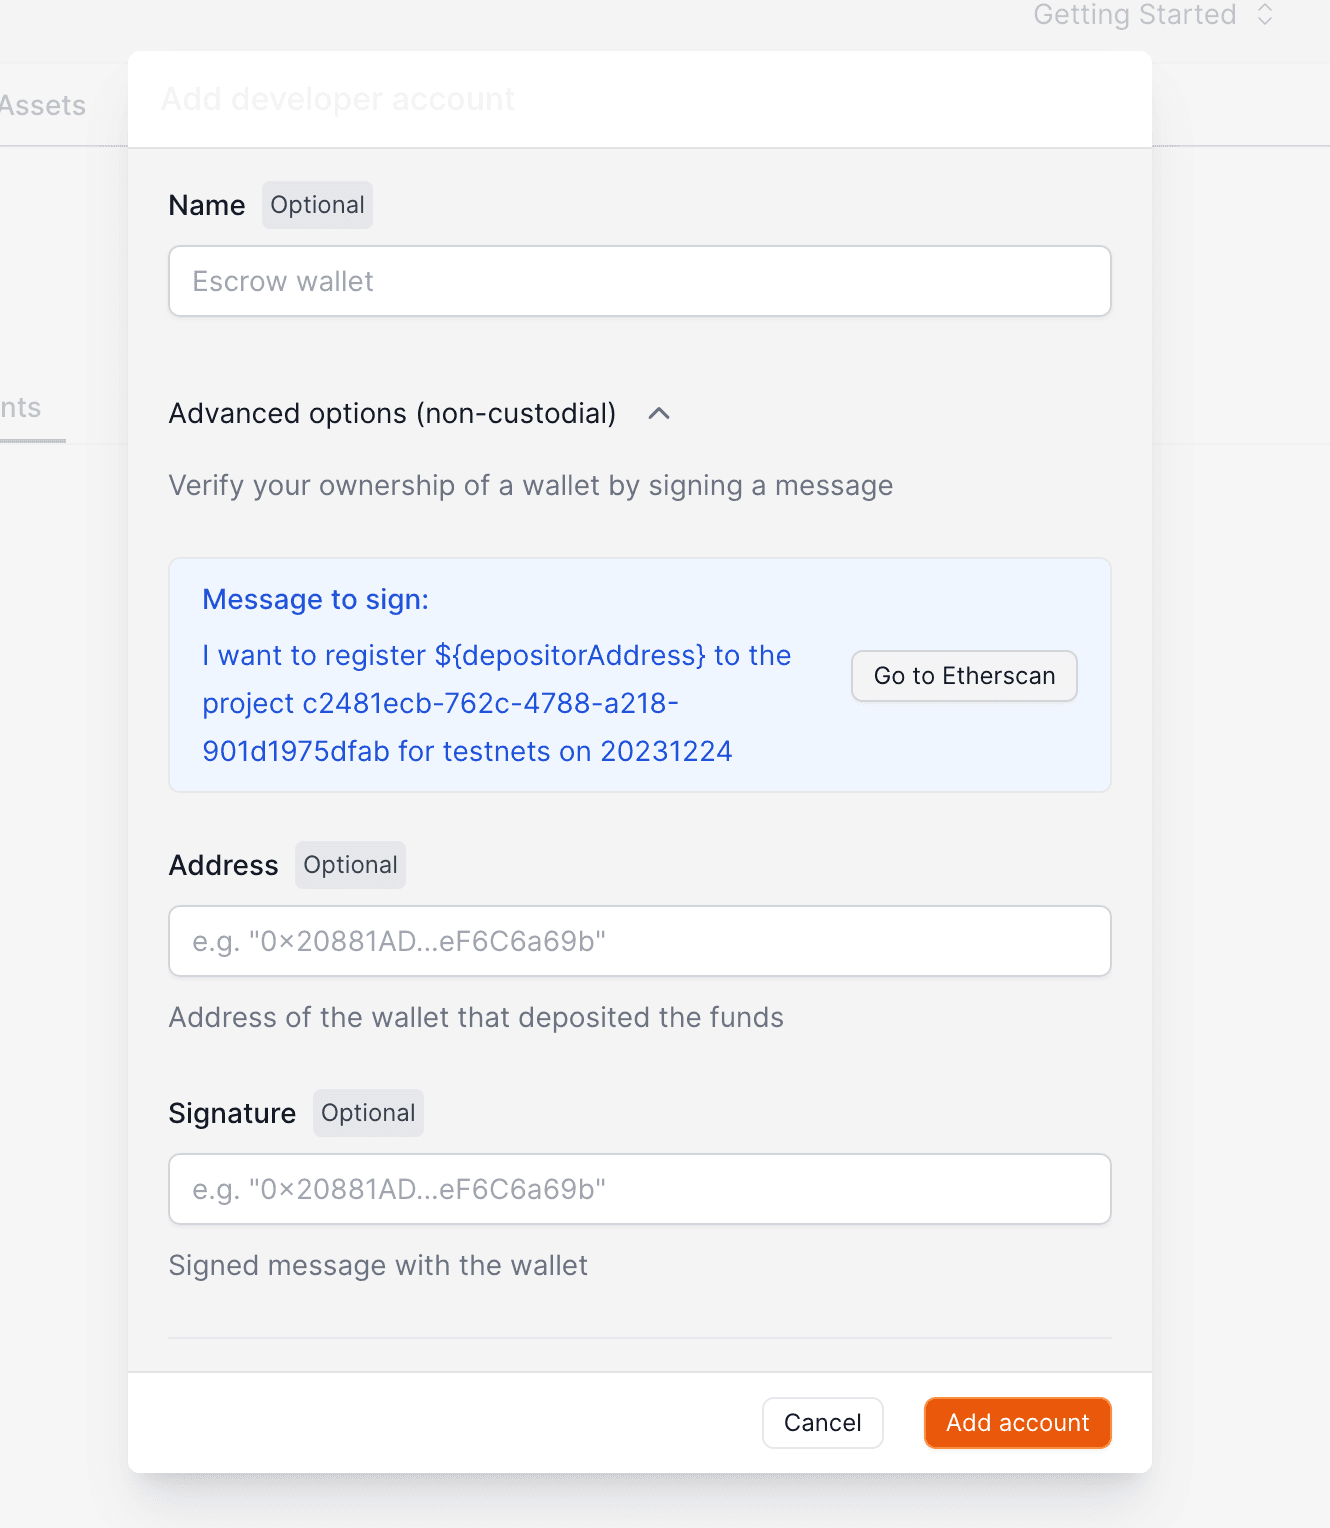
### Verify wallet ownership
If you're looking to **sponsor gas with your native tokens** for smart accounts, it's important to verify your deposited funds with the paymaster.
Head to [backend wallets](https://dashboard.openfort.io/accounts) in your dashboard and click on `Add account`.
1. Click on "Advanced Options" to start the process.
2. Sign the explorer message.
3. Add the wallet address used to deposit native tokens.
4. Add the signed message.
### Optional: Custom forwarder contract
By default you can use the [supported forwarder contracts](/docs/addresses) from Openfort if you need.
Alternatively, you can also use your forward contract in order to sponsor the transaction of your backend wallet. Go to your [Gas policy](https://dashboard.openfort.io/policies) section and create a policy by adding the address of your `Forwarder contract address`.
export const Page = ({ children }) =>
export default Page
---
File: /pages/configuration/ecosystem.mdx
---
import Layout from '@/layouts/DefaultGuideLayout'
import DashboardCustomization from '@/common/guides/dashboard-customization.mdx'
export const meta = {
title: 'Ecosystem dashboard configuration',
}
export const Page = ({ children }) =>
export default Page
---
File: /pages/configuration/external-auth.mdx
---
import Layout from '@/layouts/DefaultGuideLayout'
import { IconCheck } from '@/components/ui'
export const meta = {
title: 'Using a third-party auth provider',
description: 'Set up and integrate third-party authentication providers with your Openfort application.',
subtitle: 'Integrate external authentication systems with Openfort'
}
Openfort's signer solution enables the user onboarding by integrating with established backend solutions and authentication providers that support JWT-based authentication. This strategy provides a trusted, scalable, and versatile framework that supports an extensive range of authentication options.
## Third-party auth platforms
With this approach, Openfort is in charge of creating **embedded signers** on the and follow the necessary security steps to make sure the smart wallet created remains non custodial.
## Custom Auth Methods
We offer two options to setup embedded signers with custom auth, one that is based on the OIDC ([Open ID Connect](https://openid.net/developers/how-connect-works/)) standard, and a generic option that lets you bring your own auth server.
export const Page = ({ children }) =>
export default Page
---
File: /pages/configuration/faqs.mdx
---
import Layout from '@/layouts/DefaultGuideLayout'
export const meta = {
id: 'faqs',
title: 'FAQs',
description: 'Most frequently asked questions about the Openfort platform.',
}
### Can players use ERC-20 tokens to pay for gas fees?
Yes, you can sponsor fully or partially with the network token or ERC-20.
### Do users need to fund the newly created accounts?
You don't need to. With Openfort you can use policies to sponsor gas fees on behalf of your users.
### How do I pay for the sponsored gas fees?
Openfort handles all the gas payments for you when using policies. While everything is free on `Testnets`, on `Mainnets` you'll need to top up your account.
### What smart contracts can I interact with?
Yes, you're free to use any smart contracts you wish. You will need add contracts using the assets page in your dashboard.
### Is Openfort ERC-4337 compatible?
Yes, Openfort is compatible with Account Abstraction (ERC-4337) among other standards and follows best practices and implementations across other ethereum standards.
### What blockchains do you support?
Checkout the comprehensive list of [supported chains](/docs/development/chains).
### Can users have the same smart account address on all EVM chains?
Yes, users can have the same address across all EVM chains because the addresses are deterministic. Each chain will have separate smart account.
### Has Openfort been audited?
The Smart Account implementation has been [audited by CertiK](https://drive.google.com/drive/u/0/folders/1aoPgJD_oz1qagWflnO91ASlQo-2upjRL) and the embedded signer is [audited by Cure+53](https://drive.google.com/drive/u/0/folders/1aoPgJD_oz1qagWflnO91ASlQo-2upjRL).
### Do you provide the ability to communicate with players through notifications?
Openfort can notify you of transactions succeeded or reverted with [webhooks](/docs/configuration/webhooks). You can use that to send push notifications.
### What's Openfort's business model?
At Openfort we work with any size business to connect your backend and product to the blockchain. Our business model adapts to your needs based on volume as well as the revenue and growth model your business has.
### How can I activate "Live Mode"?
Whenever you want to go live with your product, you need to make sure to complete the details on your billing settings. This is necessary on order to top up your Account Funds.
### What options are available for branding and white labeling?
Openfort offers headless smart accounts which means that you can customize your own UI and experience. You can decide to use any popular framework or completely integrate it within you game (zero popups).
## Security and Contingency Planning
### If Openfort were to shut down with a one-month notice, would there be scope to change the signer on the Smart Contract Wallet and use it in connection with a different provider that manages the private keys differently?
**TLDR:** With enough time, transitioning is fairly simple. You’d need to invoke the `transferOwnership` function for users to accept the new signer.
**Detailed Answer:** Yes, if Openfort shuts down with a one-month notice, it's possible to change the signer. Since Openfort wallets are non-custodial, users have control over their private keys. The key migration process would involve using the "recovery share" and "device share" from Shamir's Secret Sharing (SSS) to reconstruct the private key, allowing users to accept a new signer through the `transferOwnership` function. The new provider would need to support compatible key management systems.
### If Openfort were shut down with zero notice, would there be any scope to do a migration? Would that rely on a self-hosted Shield for the recovery share and the device share being intact?
**TLDR:** If there is no self-hosted option, users should rely on on-chain social recovery.
**Detailed Answer:** Migration is still possible, but it depends on the self-hosted Shield for the recovery share and the availability of the device share. If a self-hosted Shield is not in place, users can utilize on-chain social recovery. As long as the device share and recovery share are intact, users can reconstruct their private key and migrate to a new provider. On-chain social recovery can also help recover the wallet if the device share is lost.
### If Openfort's API were compromised, what is the risk there? Can that risk be mitigated? What’s the risk of the auth share on the private key being exposed?
**TLDR:** Both Openfort's server and Shield are encrypted. Even if an attacker obtains the auth share, they would need a secret to decrypt it.
**Detailed Answer:** If Openfort's API were compromised, the risk is limited because both the auth share and Shield service are encrypted. Even if an attacker gains access to the auth share, they would still need to decrypt it using a secret. Furthermore, since the private key is split using Shamir's Secret Sharing, the auth share alone is insufficient to reconstruct the full key without the device or recovery share.
export const Page = ({ children }) =>
export default Page
---
File: /pages/configuration/notifications.mdx
---
import Layout from '@/layouts/DefaultGuideLayout'
export const meta = {
title: 'Events',
description: 'Set up and manage event notifications for on-chain activities and Openfort events.',
subtitle: 'Configure and manage event notifications in your application'
}
## Why use events?
When building Openfort integrations, you might want your applications to receive events as they occur in your Openfort accounts, so that your backend systems can execute actions accordingly.
You can configure notifications via the API to be notified about events that happen in your Openfort account or on-chain.
By default, Openfort will send a notification to the specified subscriptions every 24 hours.
## Create an event
Notification objects are the core of the event system. They define the name of the event and encapsulate both the trigger and subscriptions.
```bash command-line
curl https://api.openfort.io/v1/notifications/ \
-H "Authorization: Bearer $YOUR_SECRET_KEY" \
-d "name=Low balance"
```
```ts server.ts
const Openfort = require('@openfort/openfort-node').default;
const openfort = new Openfort(YOUR_SECRET_KEY);
const notifications = await openfort.notifications.create({
name: "Low balance"
})
```
```csharp Program.cs
using Openfort.SDK;
using Openfort.SDK.Model;
const openfort = new OpenfortClient(YOUR_SECRET_KEY);
const notifications = await openfort.Notifications.Create(
new CreateNotificationRequest(
name: "Low balance"
)
);
```
You can also configure events directly from your **dashboard**.
## Create a trigger
Triggers define the condition that will trigger the notification.
There are 3 available triggers:
- **[Project balance trigger](https://dashboard.openfort.io/settings/project/notifications)**: Define a threshold balance of credits in your project. This is useful to control you can continue to sponsor gas fees for your users.
- **[Contract balance trigger](https://dashboard.openfort.io/developers/events)**: Check for the returned parameter of a contract call and compare it to a threshold. This is useful to control the deposited amount in a paymaster contract.
- **[Backend wallet balance trigger](https://dashboard.openfort.io/developers/events)**: Check for the balance of a backend wallet and compare it to a threshold. This is useful when you're using a backend wallet itself is paying for the gas fees of the transactions it puts onchain.
There can be more than one notification trigger per event.
```bash command-line
curl https://api.openfort.io/v1/notification_triggers \
-u "$YOUR_SECRET_KEY:" \
-d 'notification=not_e0b84653-1741-4a3d-9e91-2b0fd2942f60' \
-d 'type=project_balance_trigger' \
-d 'threshold=1000000000'
```
```ts server.ts
const Openfort = require('@openfort/openfort-node').default;
const openfort = new Openfort(YOUR_SECRET_KEY);
const notificationtriggers = await openfort.notificationTriggers.create({
notification: "not_e0b84653-1741-4a3d-9e91-2b0fd2942f60",
type: "project_balance_trigger",
threshold: "1000000000"
})
```
```csharp Program.cs
using Openfort.SDK;
using Openfort.SDK.Model;
const openfort = new OpenfortClient(YOUR_SECRET_KEY);
const notificationtriggers = await openfort.NotificationTriggers.Create(
new CreateNotificationTriggerRequest(
notification: "not_e0b84653-1741-4a3d-9e91-2b0fd2942f60",
type: "project_balance_trigger",
threshold: "1000000000"
)
);
```
## Create a subscription
Subscriptions define the method and target of the event.
There are 2 available subscription methods:
- **Email**: Send an email to the specified target.
- **Webhook**: Send a POST request to the specified target. To learn more about receiving webhooks, check out the [webhooks guide](/docs/configuration/webhooks) and the types `notification.developer_account.balance`, `notification.contract.balance` or `notification.project.balance`.
There can be more than one notification subscription per event.
```bash command-line
curl https://api.openfort.io/v1/notification_subscriptions \
-u "$YOUR_SECRET_KEY:" \
-d 'notification=not_e0b84653-1741-4a3d-9e91-2b0fd2942f60' \
-d 'method=Email' \
-d 'target=jaume@openfort.xyz'
```
```ts server.ts
const Openfort = require('@openfort/openfort-node').default;
const openfort = new Openfort(YOUR_SECRET_KEY);
const notificationsubscriptions = await openfort.notificationSubscriptions.create({
notification: "not_e0b84653-1741-4a3d-9e91-2b0fd2942f60",
method: "Email",
target: "jaume@openfort.xyz"
})
```
```csharp Program.cs
using Openfort.SDK;
using Openfort.SDK.Model;
const openfort = new OpenfortClient(YOUR_SECRET_KEY);
const notificationsubscriptions = await openfort.NotificationSubscriptions.Create(
new CreateNotificationSubscriptionRequest(
notification: "not_e0b84653-1741-4a3d-9e91-2b0fd2942f60",
method: "Email",
target: "jaume@openfort.xyz"
)
);
```
export const Page = ({ children }) =>
export default Page
---
File: /pages/configuration/project-billing.mdx
---
import Layout from '@/layouts/DefaultGuideLayout'
export const meta = {
id: 'project-based-billing',
title: 'How billing works',
description: 'Learn how project-based billing works in Openfort.',
subtitle: 'Learn how organzation-based billing works in Openfort.',
}
Our goal at Openfort is to provide a _predictable_ billing system that grows with your project.
## How billing is organized
The Openfort Platform has "projects". A user can be a member of multiple projects. For example:
- `User 1`
- `Project 1` (Smart Accounts, Auth, Payments)
- `Project 2` (Smart Accounts, Auth, Payments)
- `User 2`
- `Project 3` (Smart Accounts, Auth, Payments)
## Billing system
### Project-based Billing
Each project has an individual subscription, a plan and addons. For example, `Project 1` could be on the Pro plan and `Project 2` could be on the Free plan.
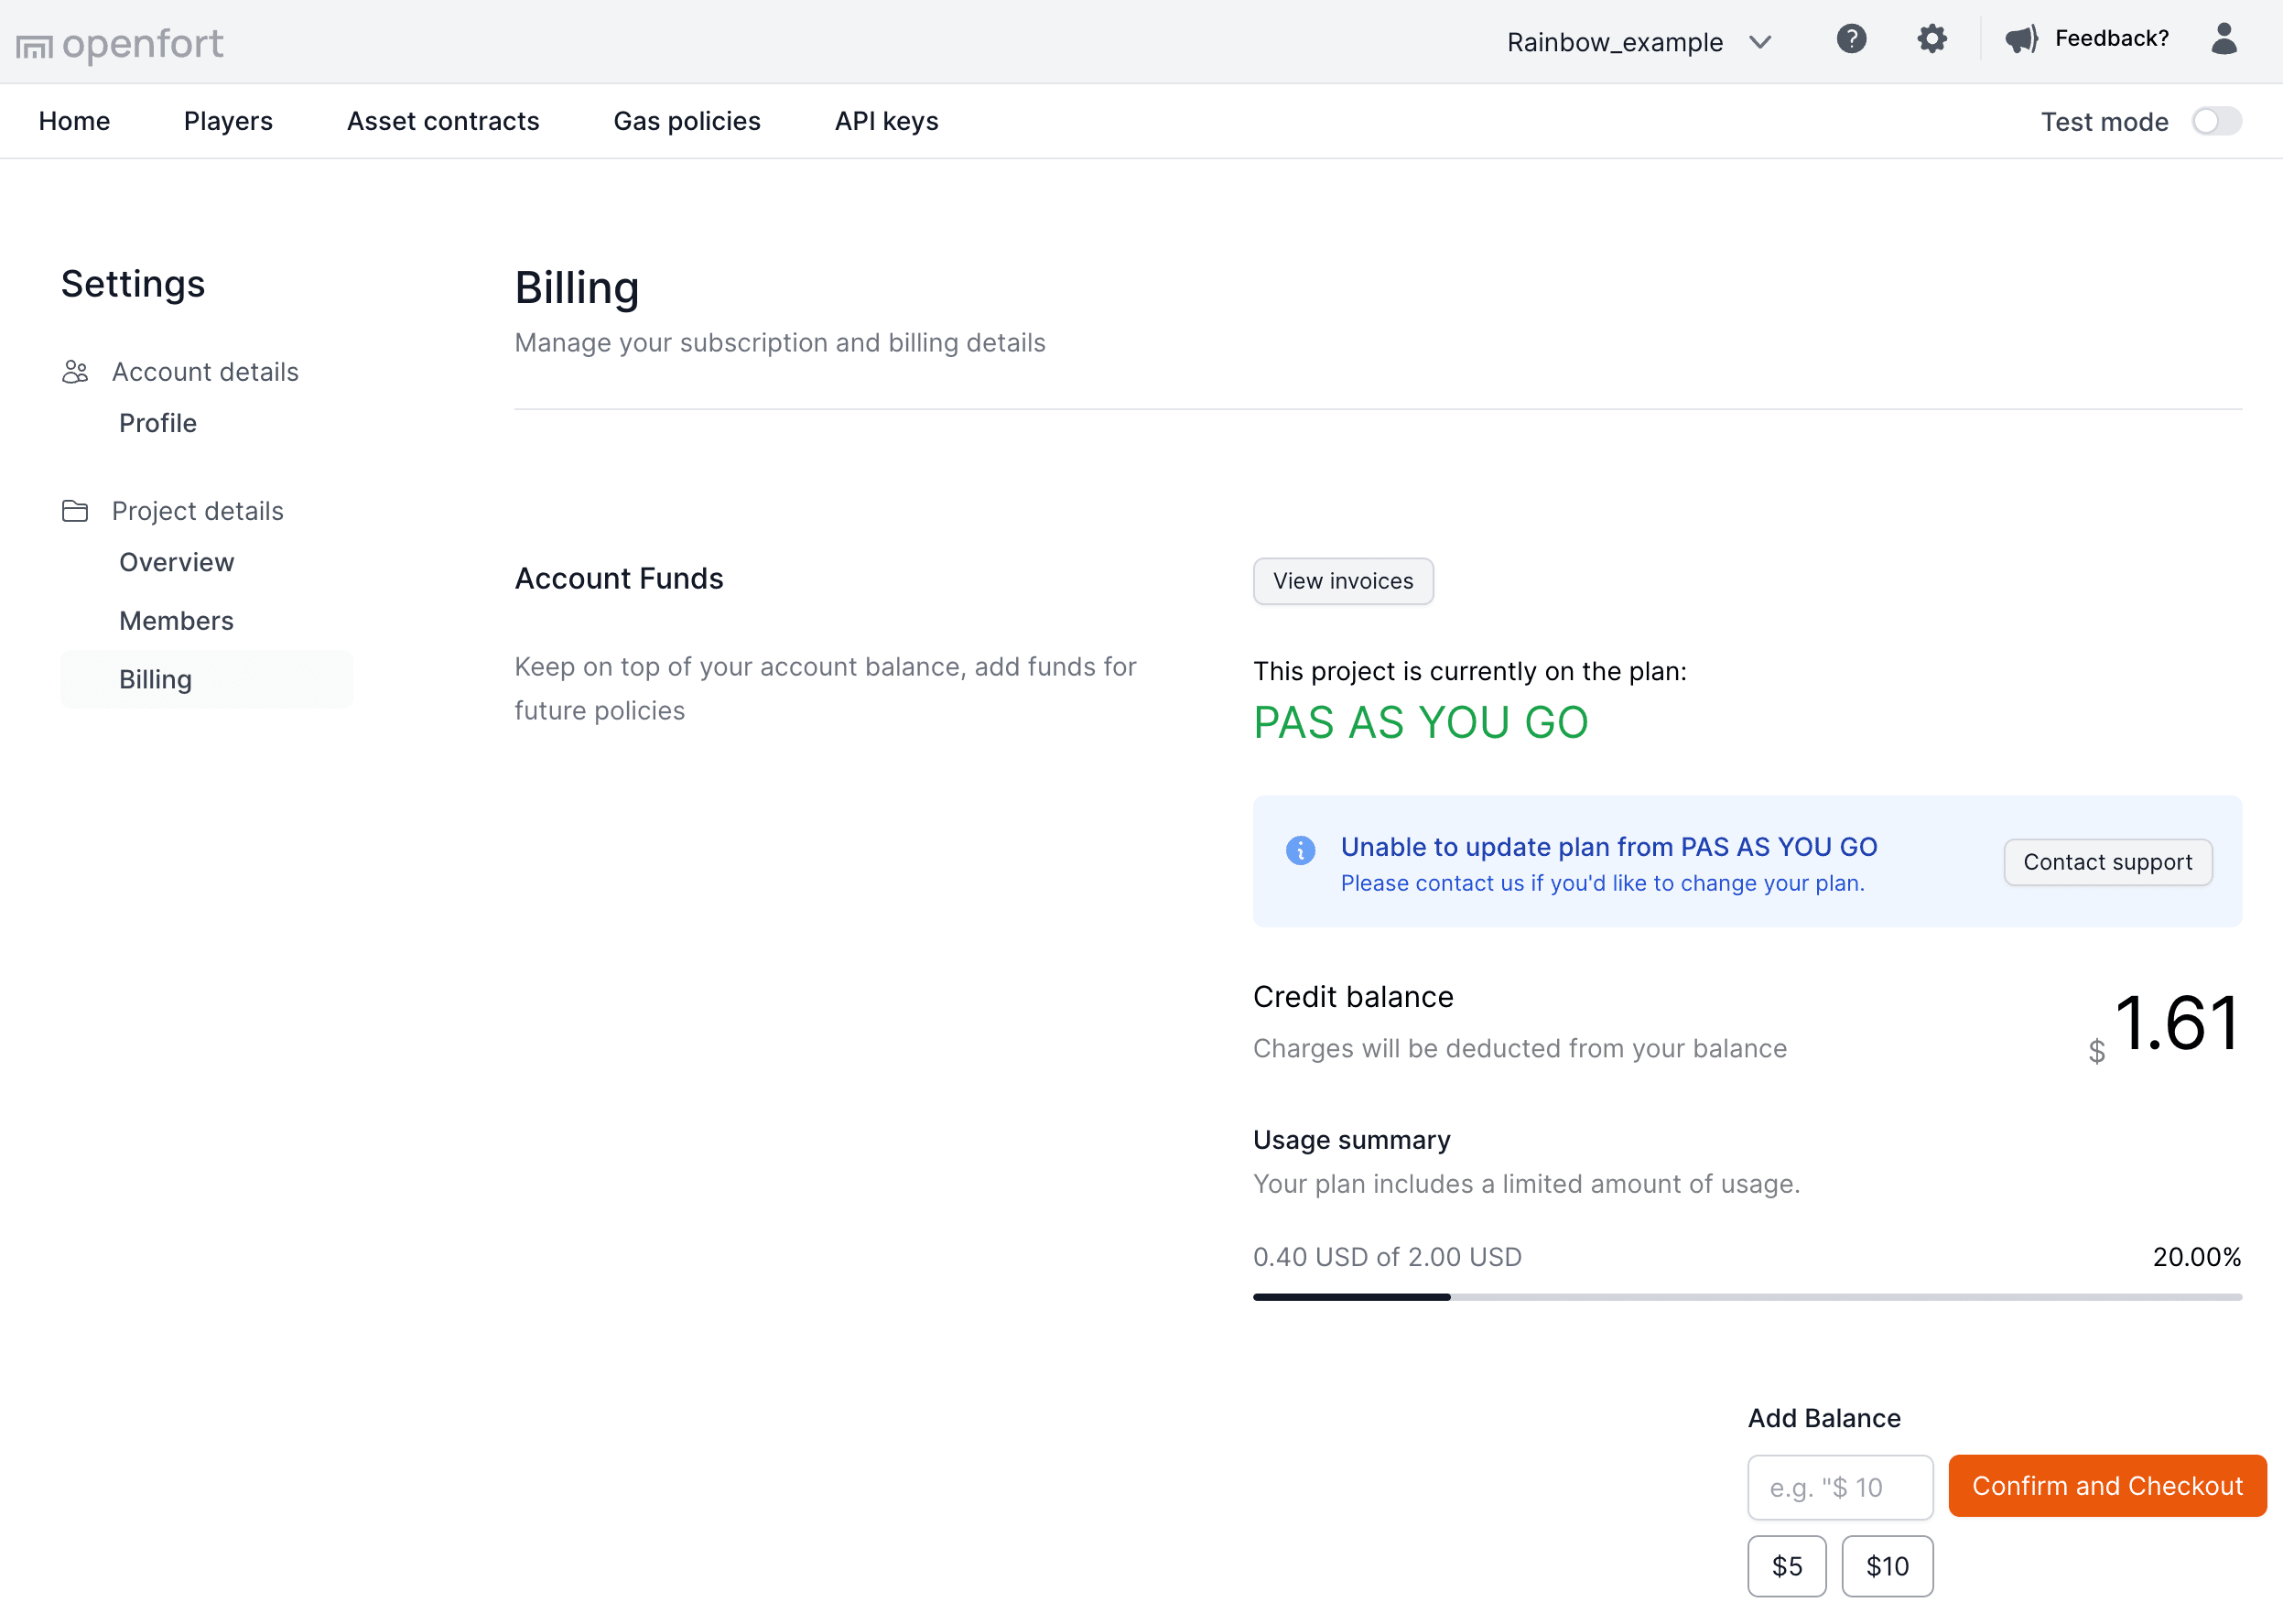
### Credit balance (Prepaid)
Each project has a credit balance. The credit balance is used to pay for the project's gas sponsorship.
Given that each proct supports all chains, the credit balance is shared across all chains.
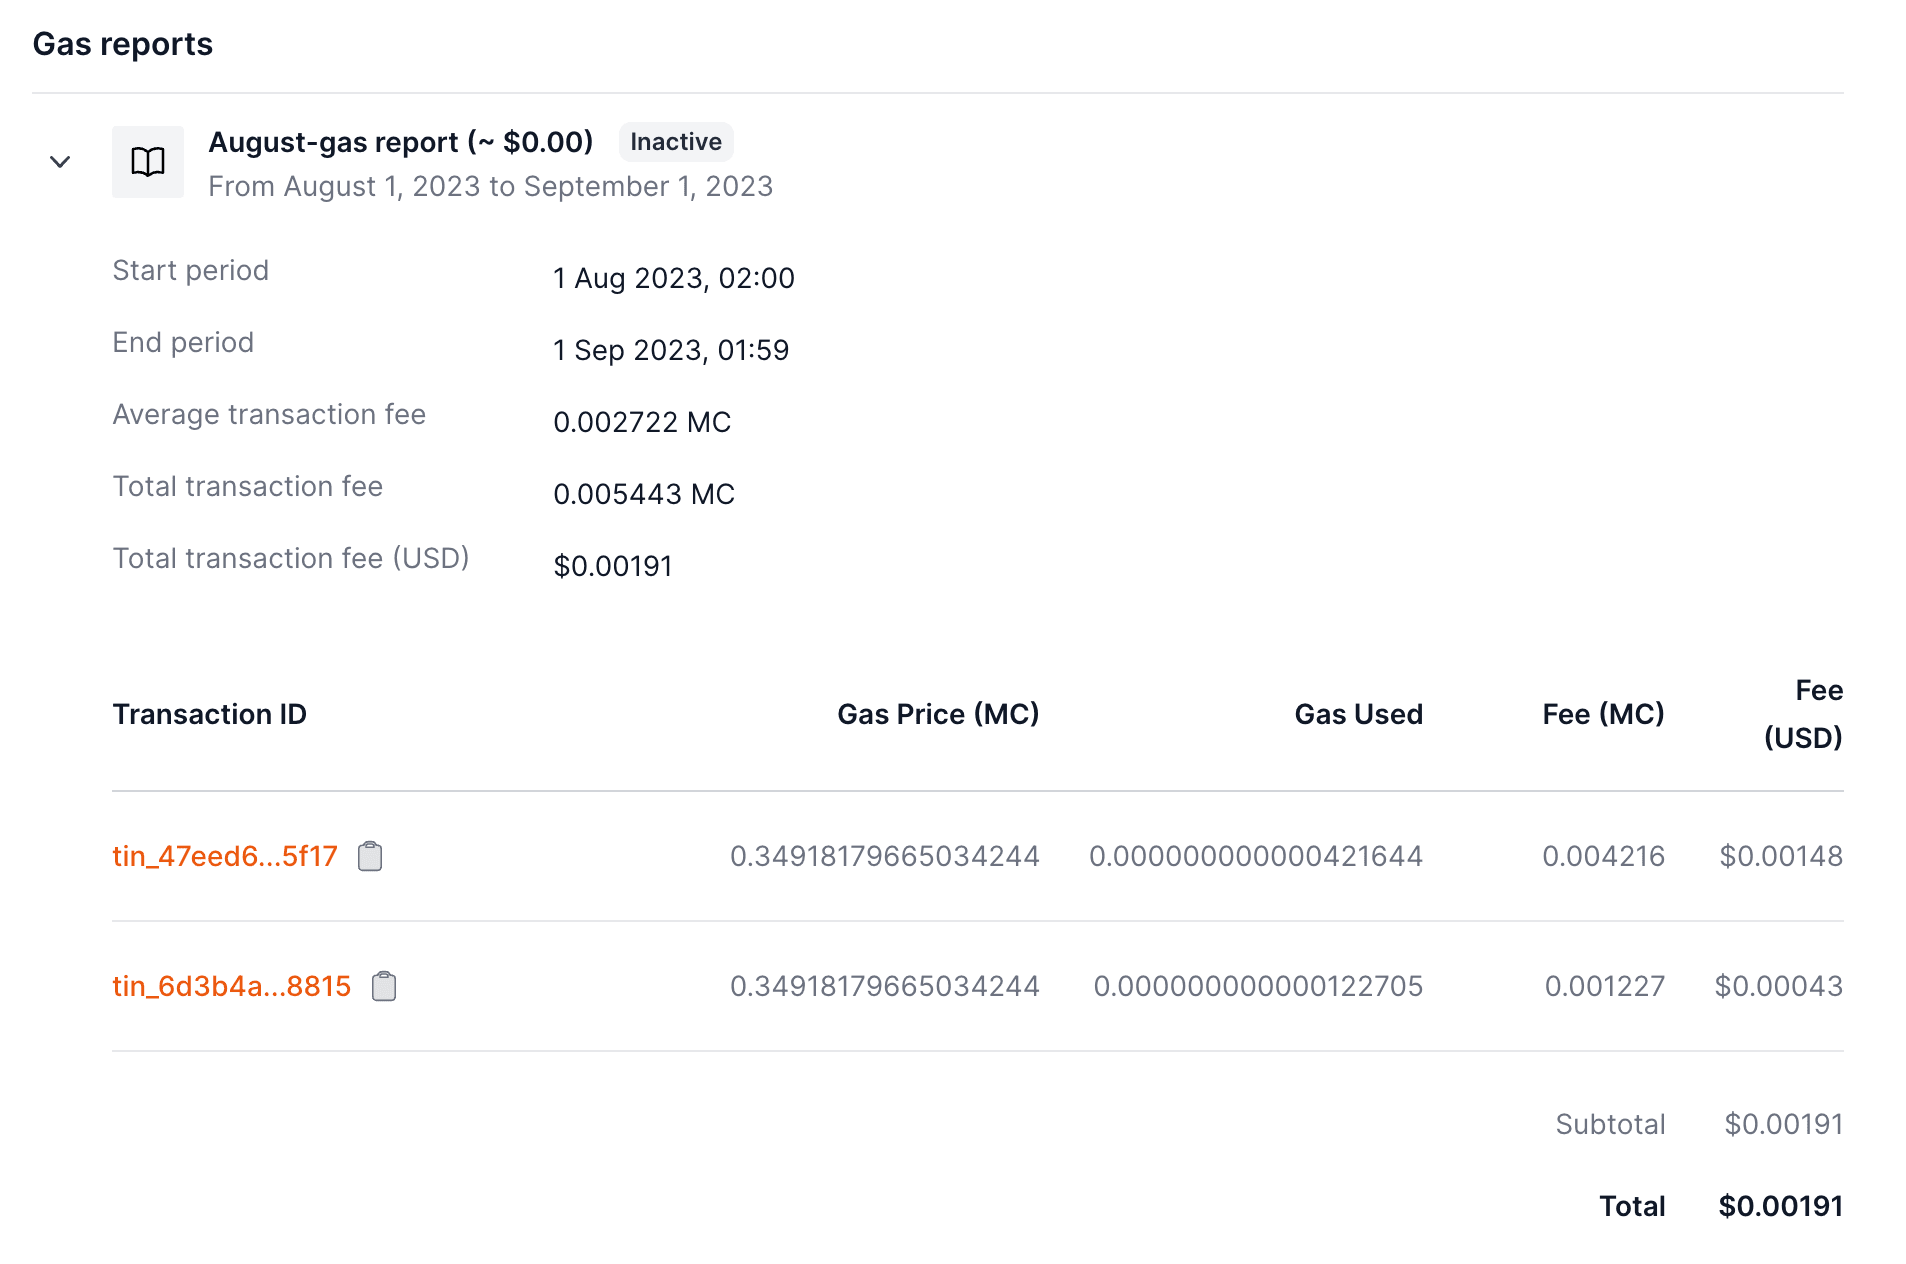
You can monitor the gas report spending in by visiting the policy page.
### FAQ
Do you only support the prepaid option?
No, we also support the postpaid option. Please contact us for more information
at joan@openfort.xyx.
What happens if my balance reaches 0?
Gas sponsorship will be disabled for your project. You can top up your balance
to enable it again. If you want more flexible billing options, please contact us
at joan@openfort.xyz, where we can enable a buffer for your project.
export const Page = ({ children }) =>
export default Page
---
File: /pages/configuration/social-login.mdx
---
import Layout from '@/layouts/DefaultGuideLayout'
export const meta = {
id: 'auth',
title: 'Social Login',
description: 'Logging in with social accounts',
}
OAuth is commonly used for things like logging in to a social media account from a third-party app. It is a secure and convenient way to authenticate users and share information between applications.
### Social Providers
## Provider Token
You can use the provider token and provider refresh token returned to make API calls to the OAuth provider. For example, you can use the Google provider token to access Google APIs on behalf of your user.
export const Page = ({ children }) =>
export default Page
---
File: /pages/configuration/team.mdx
---
import Layout from '@/layouts/DefaultGuideLayout'
import { IconCheck } from '@/components/ui'
export const meta = {
title: 'Manage teams',
description: 'Learn how to manage team members and control access to your Openfort organization.',
subtitle: 'Configure team permissions and roles in your organization'
}
Openfort provides granular **access controls** to manage permissions across your organizations. For each project, a user can have one of the following roles:
- Owner
- Administrator
- Member
A default project is created when you first sign in and you'll be assigned the **Owner** role. Each member can access everything under the project. Create a separate project if you need to restrict access to certain parts.
## Manage team members
To invite others to collaborate, visit your project's team settings in the [Dashboard](https://dashboard.openfort.com/settings/project/members) to send an invite link to another user's email. The invite expires after 24 hours.
If you're creating an ecosystem, head to the [ecosystem guide](/docs/guides/ecosystem).
### Permissions across roles [#permission-across-roles]
The table below shows the corresponding permissions for each available role you can assign a team member in the Dashboard.
| Permissions | Owner | Administrator | Member |
| ----------------------- | ----------------------- | ----------------------- | ----------------------- |
| **Members** |
| Add an Administrator | | | |
| Remove an Administrator | | | |
| Add a Member | | | |
| Remove a Member | | | |
| Revoke an invite | | | |
| Resend an invite | | | |
| Accept an invite | | | |
| **Billing** |
| Read invoices | | | |
| Read billing email | | | |
| Read billing address | | | |
| Update billing address | | | |
| Read payment methods | | | |
| Update payment methods | | | |
| **Projects** |
| Create a project | | | |
## Organization Overview
The default organization structure at Openfort are split in different projects. Each project has their own API Keys, players, assets and billing configuration beign completely independent one another.

export const Page = ({ children }) =>
export default Page
---
File: /pages/configuration/users.mdx
---
import Layout from '@/layouts/DefaultGuideLayout'
import { IconCheck } from '@/components/ui'
export const meta = {
title: 'Players',
description: 'Learn how to manage players and their authentication methods in your Openfort application.',
subtitle: 'Manage players and their authentication settings'
}
Use the **Players** page of the dashboard to manage all registered players in your Openfort application.
## Player table
The **player table** displays all players that have been registered within Openfort for your selected application. This table only shows players who have been created through Openfort's systems, whether via direct authentication or through your application's integration. You can see important information including:
- Provider used for authentication
- API ID (unique identifier)
- Creation date
- Last sign-in timestamp
The **player table** is paginated to display 10 players at a time. You can navigate through the list using the "Previous" and "Next" buttons at the bottom. The current view range is displayed (e.g., "Viewing 1 to 10 of 838 results").
### Player details
Clicking on a player's API ID opens the **player details** page, where you can see comprehensive information about the selected player, including:
- Details
- API ID
- Description
- Creation timestamp
- Metadata
- External User ID
- Accounts
- Chain (e.g., Polygon)
- Wallet address
- Status (Active/Inactive)
- Creation date
- Transactions
View and manage player transactions, including asset transfers and NFT minting
- Sessions
Monitor and manage player authentication sessions for frictionless interactions
## Authentication
The drawer displays session data such as when the user first logged into your app, when they were last seen in your app. Please note that the "Last seen" field is a rough approximation on the order of an hour from when the user was precisely last active in your app.
If you're using a third-party authentication provider instead of Openfort's authentication solution, this section will remain empty, and you'll manage your authentication through your chosen provider's interface.
### Deleting users
From the user drawer, you can delete a user if necessary. This is an irreversible and destructive action; if the user logs into your app again, they will have a new user's ID (`playerID`), will have to relink any formerly linked accounts, and will get a new embedded wallet address. **Please take extreme care when deleting users.**
For security of user assets, Openfort does not delete the embedded wallet, and instead "soft deletes" it by disassociating it from the deleted user. If the user still has access to their login method and their wallet password, if they have set one, their wallet can be recovered after deletion.
export const Page = ({ children }) =>
export default Page
---
File: /pages/configuration/webhooks.mdx
---
import Layout from '@/layouts/DefaultGuideLayout'
export const meta = {
id: 'webhooks',
title: 'Webhooks',
description: 'Listen for events and verify a webhook payload',
subtitle:
'Listen for events so your integration can automatically trigger reactions.',
}
Openfort uses webhooks to push real-time notifications to you about your transactions. All webhooks use HTTPS and deliver a JSON payload that can be used by your application. You can use webhook feeds to do things like:
- Granting users a game item when a transaction is confirmed.
- Store all transaction events in your own database for custom reporting/retention
## Using Openfort Node SDK
Use the [Openfort SDK's](https://www.npmjs.com/package/@openfort/openfort-node) `constructWebhookEvent` method to verify an incoming webhook. Pass in the request body and the signature header. As an example, you can verify a webhook using the code below:
```ts
app.post(
'/webhook',
express.raw({ type: 'application/json' }),
async (req: Request, _res: Response) => {
const openfort = new Openfort('OPENFORT_SECRET_KEY')
try {
const event = await openfort.constructWebhookEvent(
req.body.toString(),
req.headers['openfort-signature']
)
switch (event.type) {
case "transaction_intent.succeeded":
console.log(`TransactionIntent ID: ${event.data.id}`)
break
case "transaction_intent.failed":
console.log(`TransactionIntent ID: ${event.data.id}`)
break
default:
console.log(`Unhandled event type ${event.type}`);
}
} catch (e) {
console.error((e as Error).message)
}
}
)
```
```csharp
[HttpPost("webhook")]
public async Task Webhook()
{
var json = await new StreamReader(HttpContext.Request.Body).ReadToEndAsync();
WebHookEvent openfortEvent;
try
{
openfortEvent = client.ConstructWebhookEvent(
json,
Request.Headers["openfort-signature"]
);
// Handle the webhook event
var type = openfortEvent.Type;
var transactionIntent = openfortEvent.Data;
Console.WriteLine($"Webhook notification: {openfortEvent} found");
}
catch (Exception e)
{
Console.WriteLine($"Something failed {e}");
return BadRequest();
}
var transactionIntent = openfortEvent.Data;
Console.WriteLine($"TransactionIntent ID: {transactionIntent.Id}");
return Ok();
}
```
## Webhook object
The webhook object contains the following fields:
```json
{
"data": {
"id": "tin_c502d628-5bb3-42f2-b8f5-62ba4d71df3a",
"createdAt": 1689869074,
"object": "transactionIntent",
"etc":"..."
},
"type": "transaction_intent.succeeded",
"date": 1689869074
}
```
Where the `type` will be one of the following:
- `transaction_intent.succeeded`: The transaction intent has arrived on-chain and is confirmed.
- `transaction_intent.failed`: The transaction intent has arrived on-chain and is reverted.
- `transaction_intent.cancelled`: The transaction intent parameters were not met.
- `transaction_intent.broadcast`: The transaction intent was broadcasted.
- `balance. project`: The project balance.
- `balance.contract`: The contract balance.
- `balance.dev_account`: The balance of your backend wallet.
The `data` will be a [transaction intent object](https://www.openfort.xyz/docs/reference/api/get-a-transaction-intent-object).
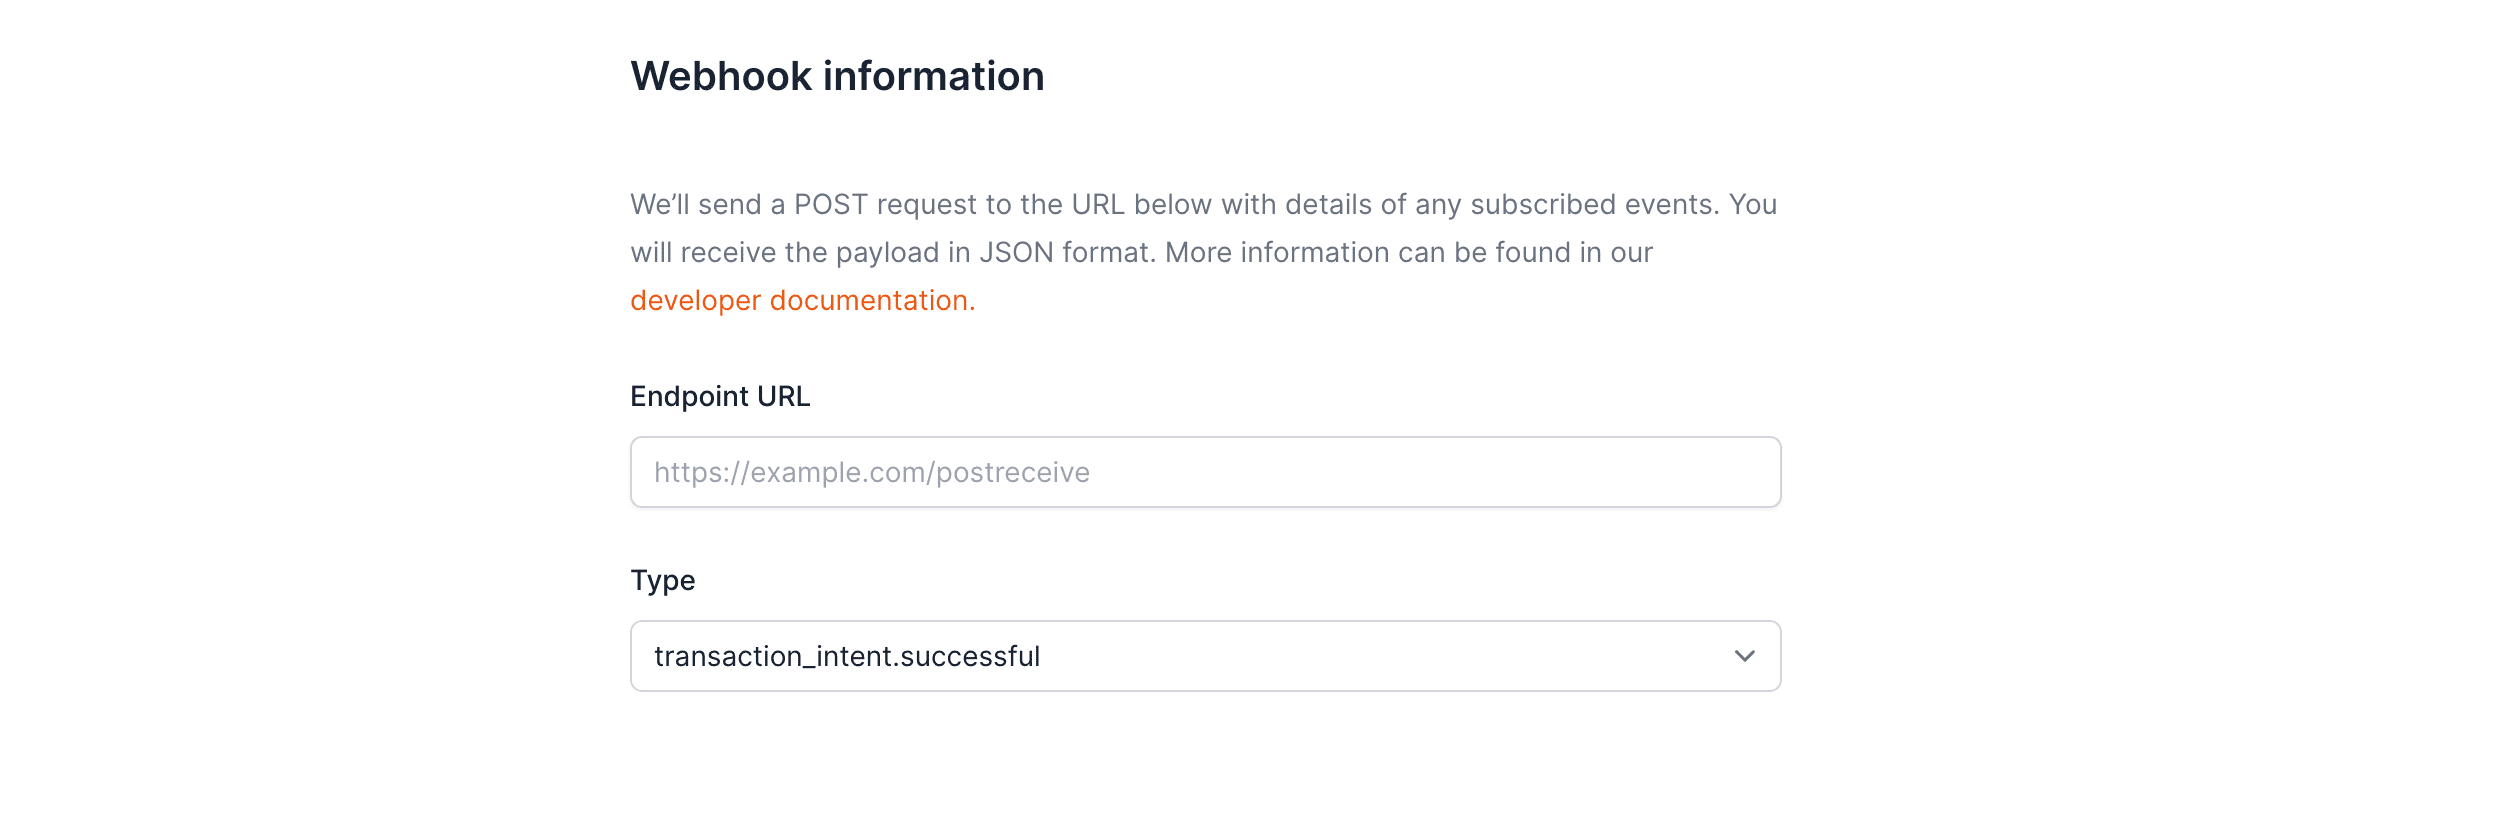
### Register your development webhook endpoint
Register your publicly accessible HTTPS URL in the Openfort [dashboard](https://dashboard.openfort.io/webhooks). Then decide the type of webhook you want to receive.
You can create a tunnel to your localhost server using a tool like [ngrok](https://ngrok.com/download). For example: https://8733-191-204-177-89.sa.ngrok.io/webhooks
### Test that your webhook endpoint is working properly
Your endpoint must return a 2xx (status code 200-299) response for the webhook to be marked as delivered. Any other statuses (including 3xx) are considered failed deliveries.
Send a few test transactions to check that your webhook endpoint is receiving the events.
You can specify the number of block confirmations you want to wait before getting notified of a transaction making it on chain. The default is 0 (i.e. as soon as the transaction arrives on chain).
To do so, you need to include the `confirmationBlocks` body parameter when [creating the transaction intent](https://www.openfort.xyz/docs/reference/api/create-a-transaction-intent-object).

export const Page = ({ children }) =>
export default Page
---
File: /pages/development/addresses.mdx
---
import Layout from '@/layouts/DefaultGuideLayout'
import Addresses from '@/common/guides/addresses.mdx'
export const meta = {
id: 'addresses',
title: 'Entity Addresses',
description:
'Check out the addresses used by Openfort',
sidebar_label: 'Overview',
}
export const Page = ({ children }) =>
export default Page
---
File: /pages/development/ai-tooling.mdx
---
import Layout from '@/layouts/DefaultGuideLayout'
import AiTooling from '@/common/guides/ai-tooling.mdx'
export const meta = {
id: 'features',
title: 'Using AI-powered IDEs with our docs',
}
export const Page = ({ children }) =>
export default Page
---
File: /pages/development/chains.mdx
---
import Layout from '@/layouts/DefaultGuideLayout'
import Chains from '@/common/guides/chains.mdx'
export const meta = {
title: 'Supported Chains',
description: 'Openfort supported blockchains',
}
export const Page = ({ children }) =>
export default Page
---
File: /pages/development/gas-erc20.mdx
---
import Layout from '@/layouts/DefaultGuideLayout'
import StepHikeCompact from '@/components/StepHikeCompact'
import { Accordion } from '@/components/ui'
export const meta = {
title: 'Charge Gas Fees with ERC20 Tokens',
description: 'Learn how to configure and implement ERC20 token-based gas fee payments in your application.',
subtitle: 'Enable gas fee payments using ERC20 tokens'
}
Gas fees can be a hurdle for many users in blockchain applications. This guide will help you configure gasless transactions where the gas is paid using an ERC20 token. Choose between dynamic or fixed-rate payment strategies. By the end of this guide, you’ll have a working implementation for charging gas fees with ERC20 tokens and executing transactions seamlessly.
Charge an ERC20 with dynamic price}
id="mint-nft"
>
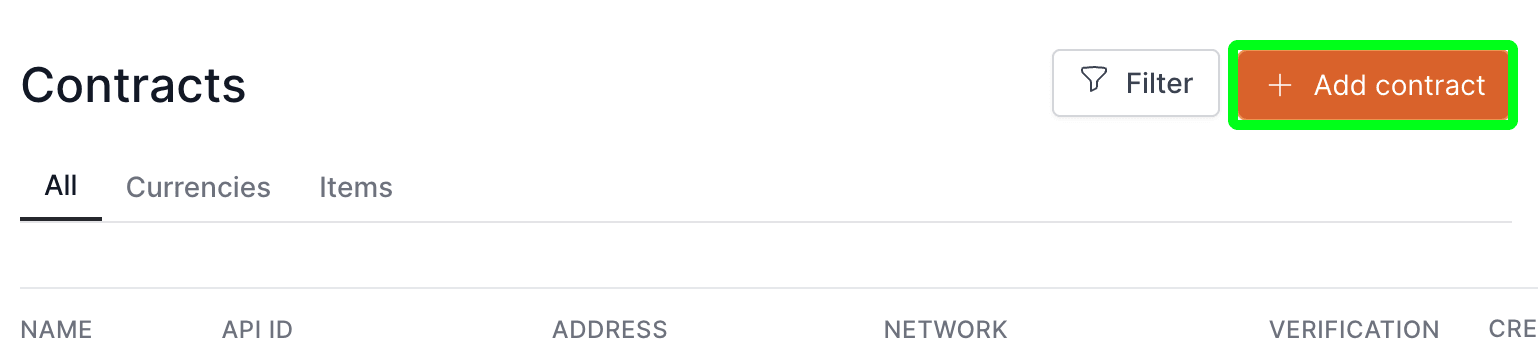
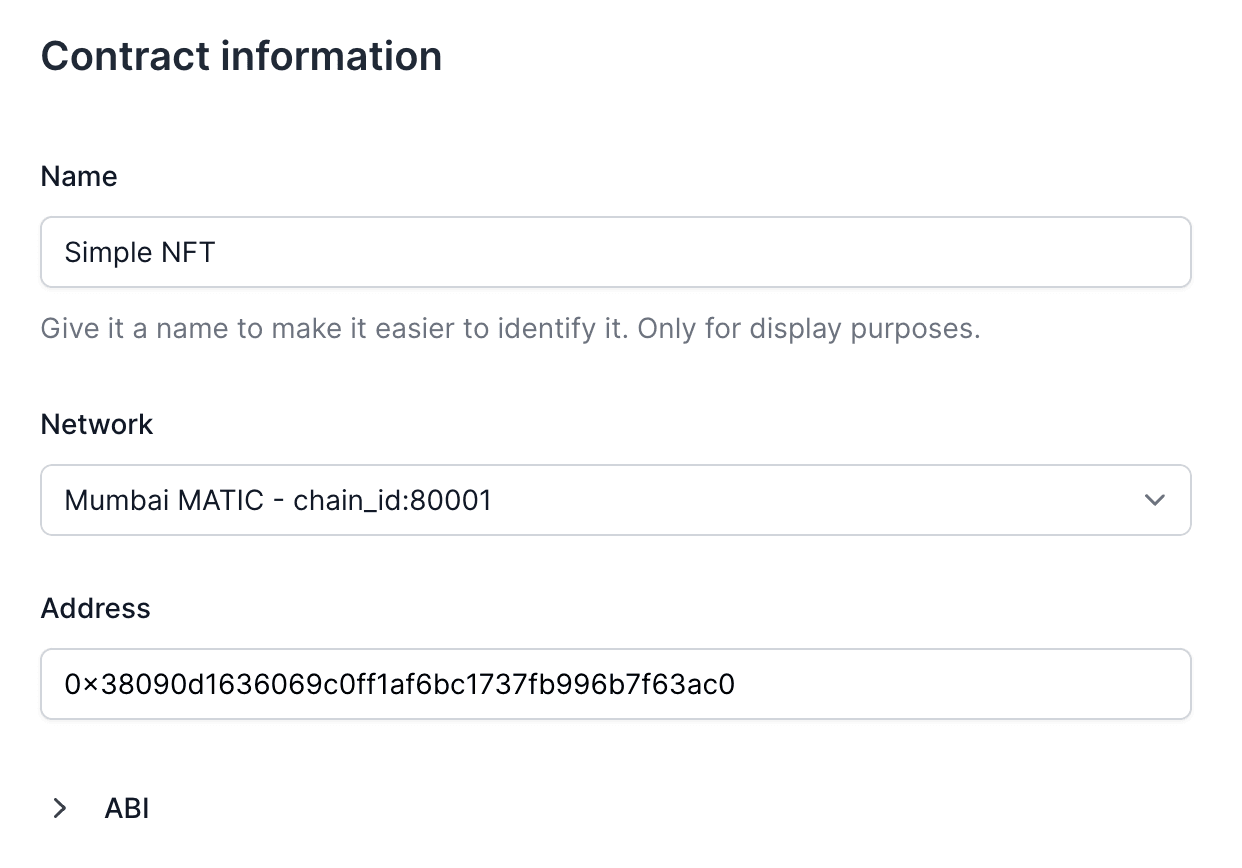
{/* Step 1: Select Contract */}
- Add your collectible’s smart contract.
- Define the contract function you want to use (e.g.,
mint).
```bash command-line
curl https://api.openfort.io/v1/contracts \
-u "$YOUR_SECRET_KEY:" \
-d 'name=NFT Contract' \
-d 'chainId=80002' \
-d 'address=contract_address'
```
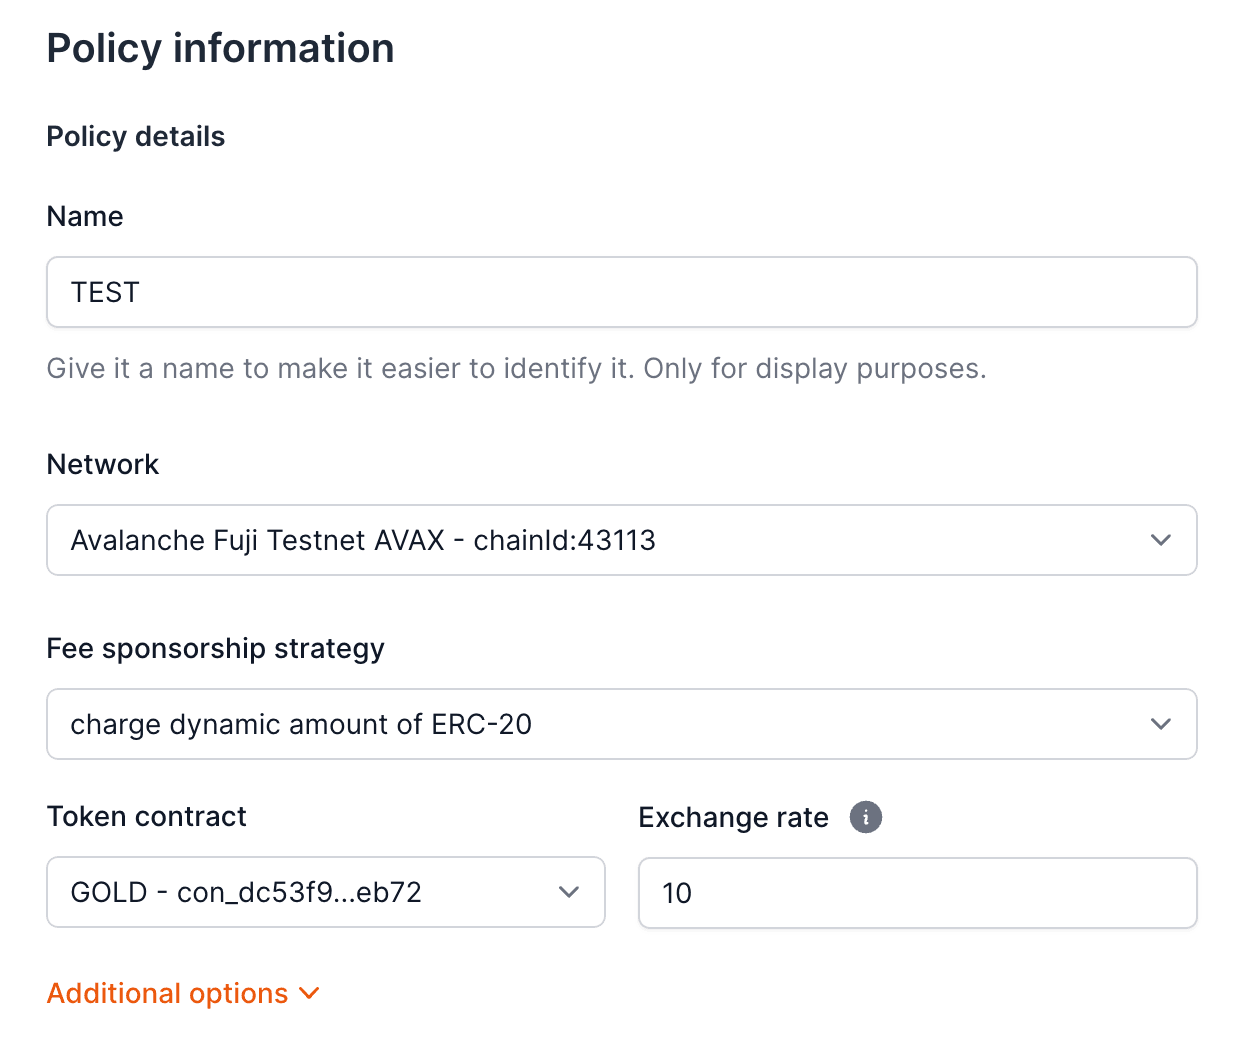
{/* Step 2: Create a Dynamic ERC20 Policy */}
- Create a new policy and select the strategy
charge dynamic amount of ERC20.
- Select the ERC20 token contract and exchange rate.
- Link the imported contract and the function you want to sponsor.
If you want to update the dynamic rate programmatically, contact us.
```bash command-line
curl https://api.openfort.io/v1/policies \
-u "$YOUR_SECRET_KEY:" \
-d 'name=My Policy' \
-d 'chainId=80002' \
-d 'strategy[sponsorSchema]=charge_custom_tokens' \
-d 'strategy[tokenContract]=con_...' \
-d 'strategy[tokenContractAmount]=1'
```
```bash command-line
curl https://api.openfort.io/v1/policies/:id/policy_rules \
-H "Authorization: Bearer $YOUR_SECRET_KEY" \
-d type="contract_functions" \
-d functionName="All functions" \
-d contract="con_..."
```
{/* Step 3: Create a Gasless Transaction */}
- Add
chainId.
- Add the contract.
- Add the policy.
- Add the function you want to interact with.
Note: You can make a transaction without a registered user or account deployed at the time of interaction. Once you make the transaction, a playerId and accountId will be created.
```bash command-line
curl https://api.openfort.io/v1/transaction_intents \
-u "$YOUR_SECRET_KEY:" \
-d 'chainId=80002' \
-d 'optimistic=true' \
-d 'policy=policy_id' \
-d 'interactions[0][contract]=contract_address' \
-d 'interactions[0][functionName]=mint' \
-d 'interactions[0][functionArgs][0]=sender_address_or_id'
```
{/* Optional Step 4: Add Account or Player */}
- Add an account or player to specify the user.
```bash command-line
curl https://api.openfort.io/v1/transaction_intents \
-u "$YOUR_SECRET_KEY:" \
-d 'chainId=80002' \
-d 'policy=policy_id' \
-d 'account=account_id' \
-d 'optimistic=true' \
-d 'interactions[0][contract]=contract_address' \
-d 'interactions[0][functionName]=mint' \
-d 'interactions[0][functionArgs][0]=sender_address_or_id'
```
Charge an ERC20 with fixed prize}
id="deploy"
>
{/* Step 1: Select Contract */}
- Add your collectible’s smart contract.
- Define the contract function you want to use (e.g.,
mint).
```bash command-line
curl https://api.openfort.io/v1/contracts \
-u "$YOUR_SECRET_KEY:" \
-d 'name=NFT Contract' \
-d 'chainId=80002' \
-d 'address=contract_address'
```
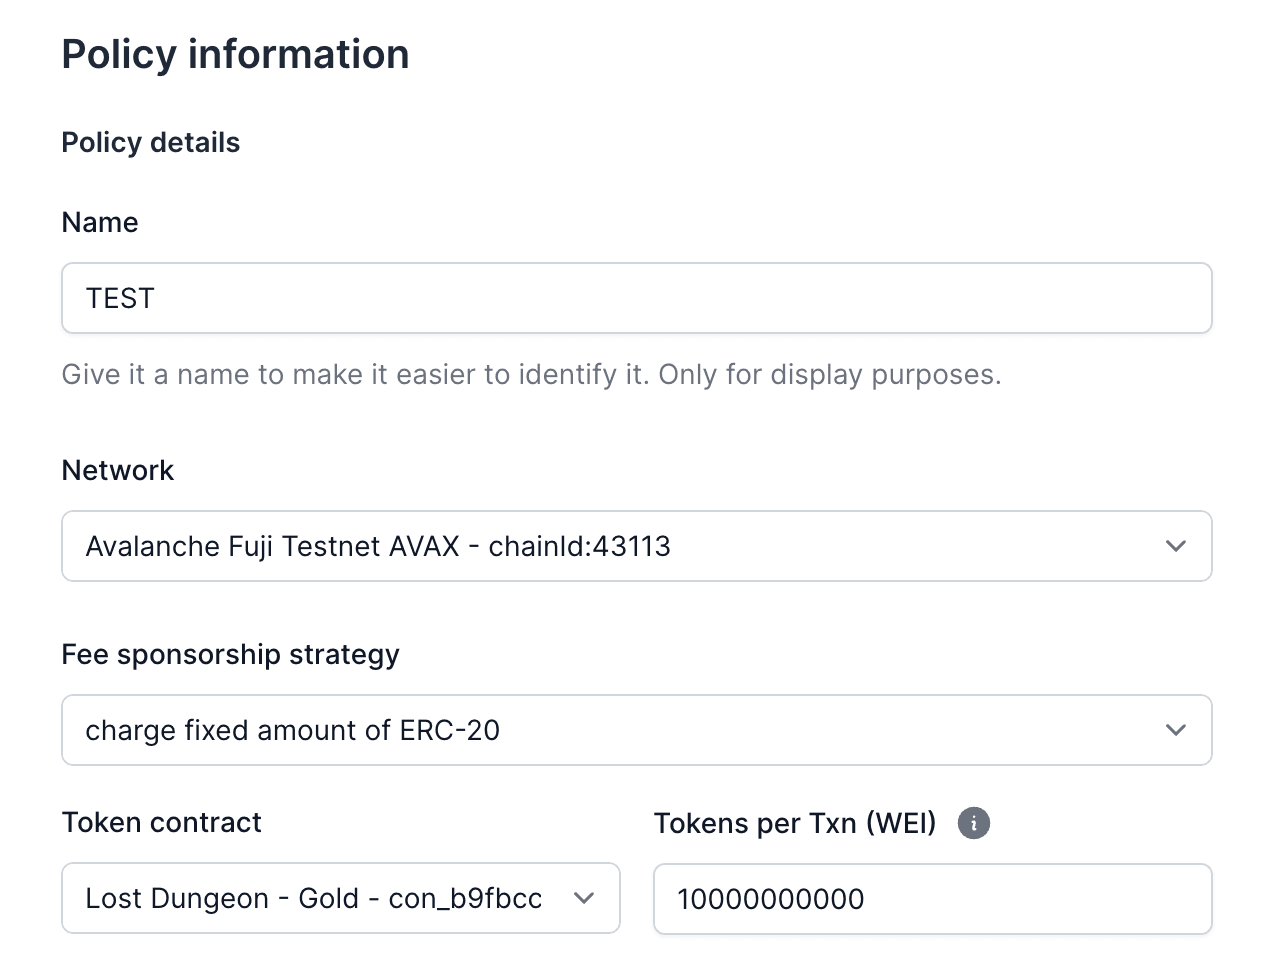
{/* Step 2: Create a Fixed ERC20 Policy */}
- Create a new policy and select the strategy
charge fixed amount of ERC20.
- Specify the ERC20 token contract and the fixed amount to charge.
- Link the imported contract and the function you want to sponsor.
```bash command-line
curl https://api.openfort.io/v1/policies \
-u "$YOUR_SECRET_KEY:" \
-d 'name=Fixed Policy' \
-d 'chainId=80002' \
-d 'strategy[sponsorSchema]=charge_fixed_rate' \
-d 'strategy[tokenContract]=contract_address' \
-d 'strategy[tokenContractAmount]=1'
```
{/* Step 3: Create a Gasless Transaction */}
- Add
chainId.
- Add the contract.
- Add the policy.
- Add the function you want to interact with.
Note: You can make a transaction without a registered user or account deployed at the time of interaction. Once you make the transaction, a playerId and accountId will be created.
```bash command-line
curl https://api.openfort.io/v1/transaction_intents \
-u "$YOUR_SECRET_KEY:" \
-d 'chainId=80002' \
-d 'optimistic=true' \
-d 'policy=pol_...'
-d 'interactions[0][contract]=con_...' \
-d 'interactions[0][functionName]=mint' \
-d 'interactions[0][functionArgs][0]=sender address or Id'
```
- Add account or add player
```bash command-line
curl https://api.openfort.io/v1/transaction_intents \
-u "$YOUR_SECRET_KEY:" \
-d 'chainId=80002' \
-d 'policy=pol_...' \
-d 'account=acc...' or 'player=pla...' \
-d 'optimistic=true' \
-d 'interactions[0][contract]=con_...' \
-d 'interactions[0][functionName]=mint' \
-d 'interactions[0][functionArgs][0]=sender address or Id'
```
export const Page = ({ children }) => (
)
export default Page
---
File: /pages/development/gas-sponsorship.mdx
---
import Layout from '@/layouts/DefaultGuideLayout'
import { Accordion } from '@/components/ui'
export const meta = {
title: 'Gas sponsorship',
description: 'Learn how to implement and manage gas sponsorship for your users using flexible payment strategies.',
subtitle: 'Set up and manage gas sponsorship for your application'
}
Whether you're building a game, marketplace, or any web3 application, these policies give you the tools to create seamless user experiences by controlling how transaction fees are handled.
## What's a Gas Manager?
A gas manager is at the heart of how Openfort handles transaction fees. Think of it as your control center for managing how and when your application will sponsor user's gas fees. You might use it to make onboarding smoother by covering gas fees for new users, let players use in-game tokens for transactions, or encourage specific actions in your ecosystem.
## Getting started
Setting up gas sponsorship is straightforward. Start by visiting the [Gas Policy tab](https://dashboard.openfort.io/policies) in your dashboard and clicking `Add Policy`. From there, you'll be able to configure how you want to handle transaction fees.
## Sponsoring gas fees
When it comes to sponsoring gas fees, you have two main approaches available:
### Paying with credit card
The simplest way to get started is by adding [balance credit](https://dashboard.openfort.io/settings/project/billing) to your account. When you choose this method, gas costs are automatically deducted from your balance as transactions occur. This is particularly useful when you're ready to go live with your project, as it's required for `livemode` operations.
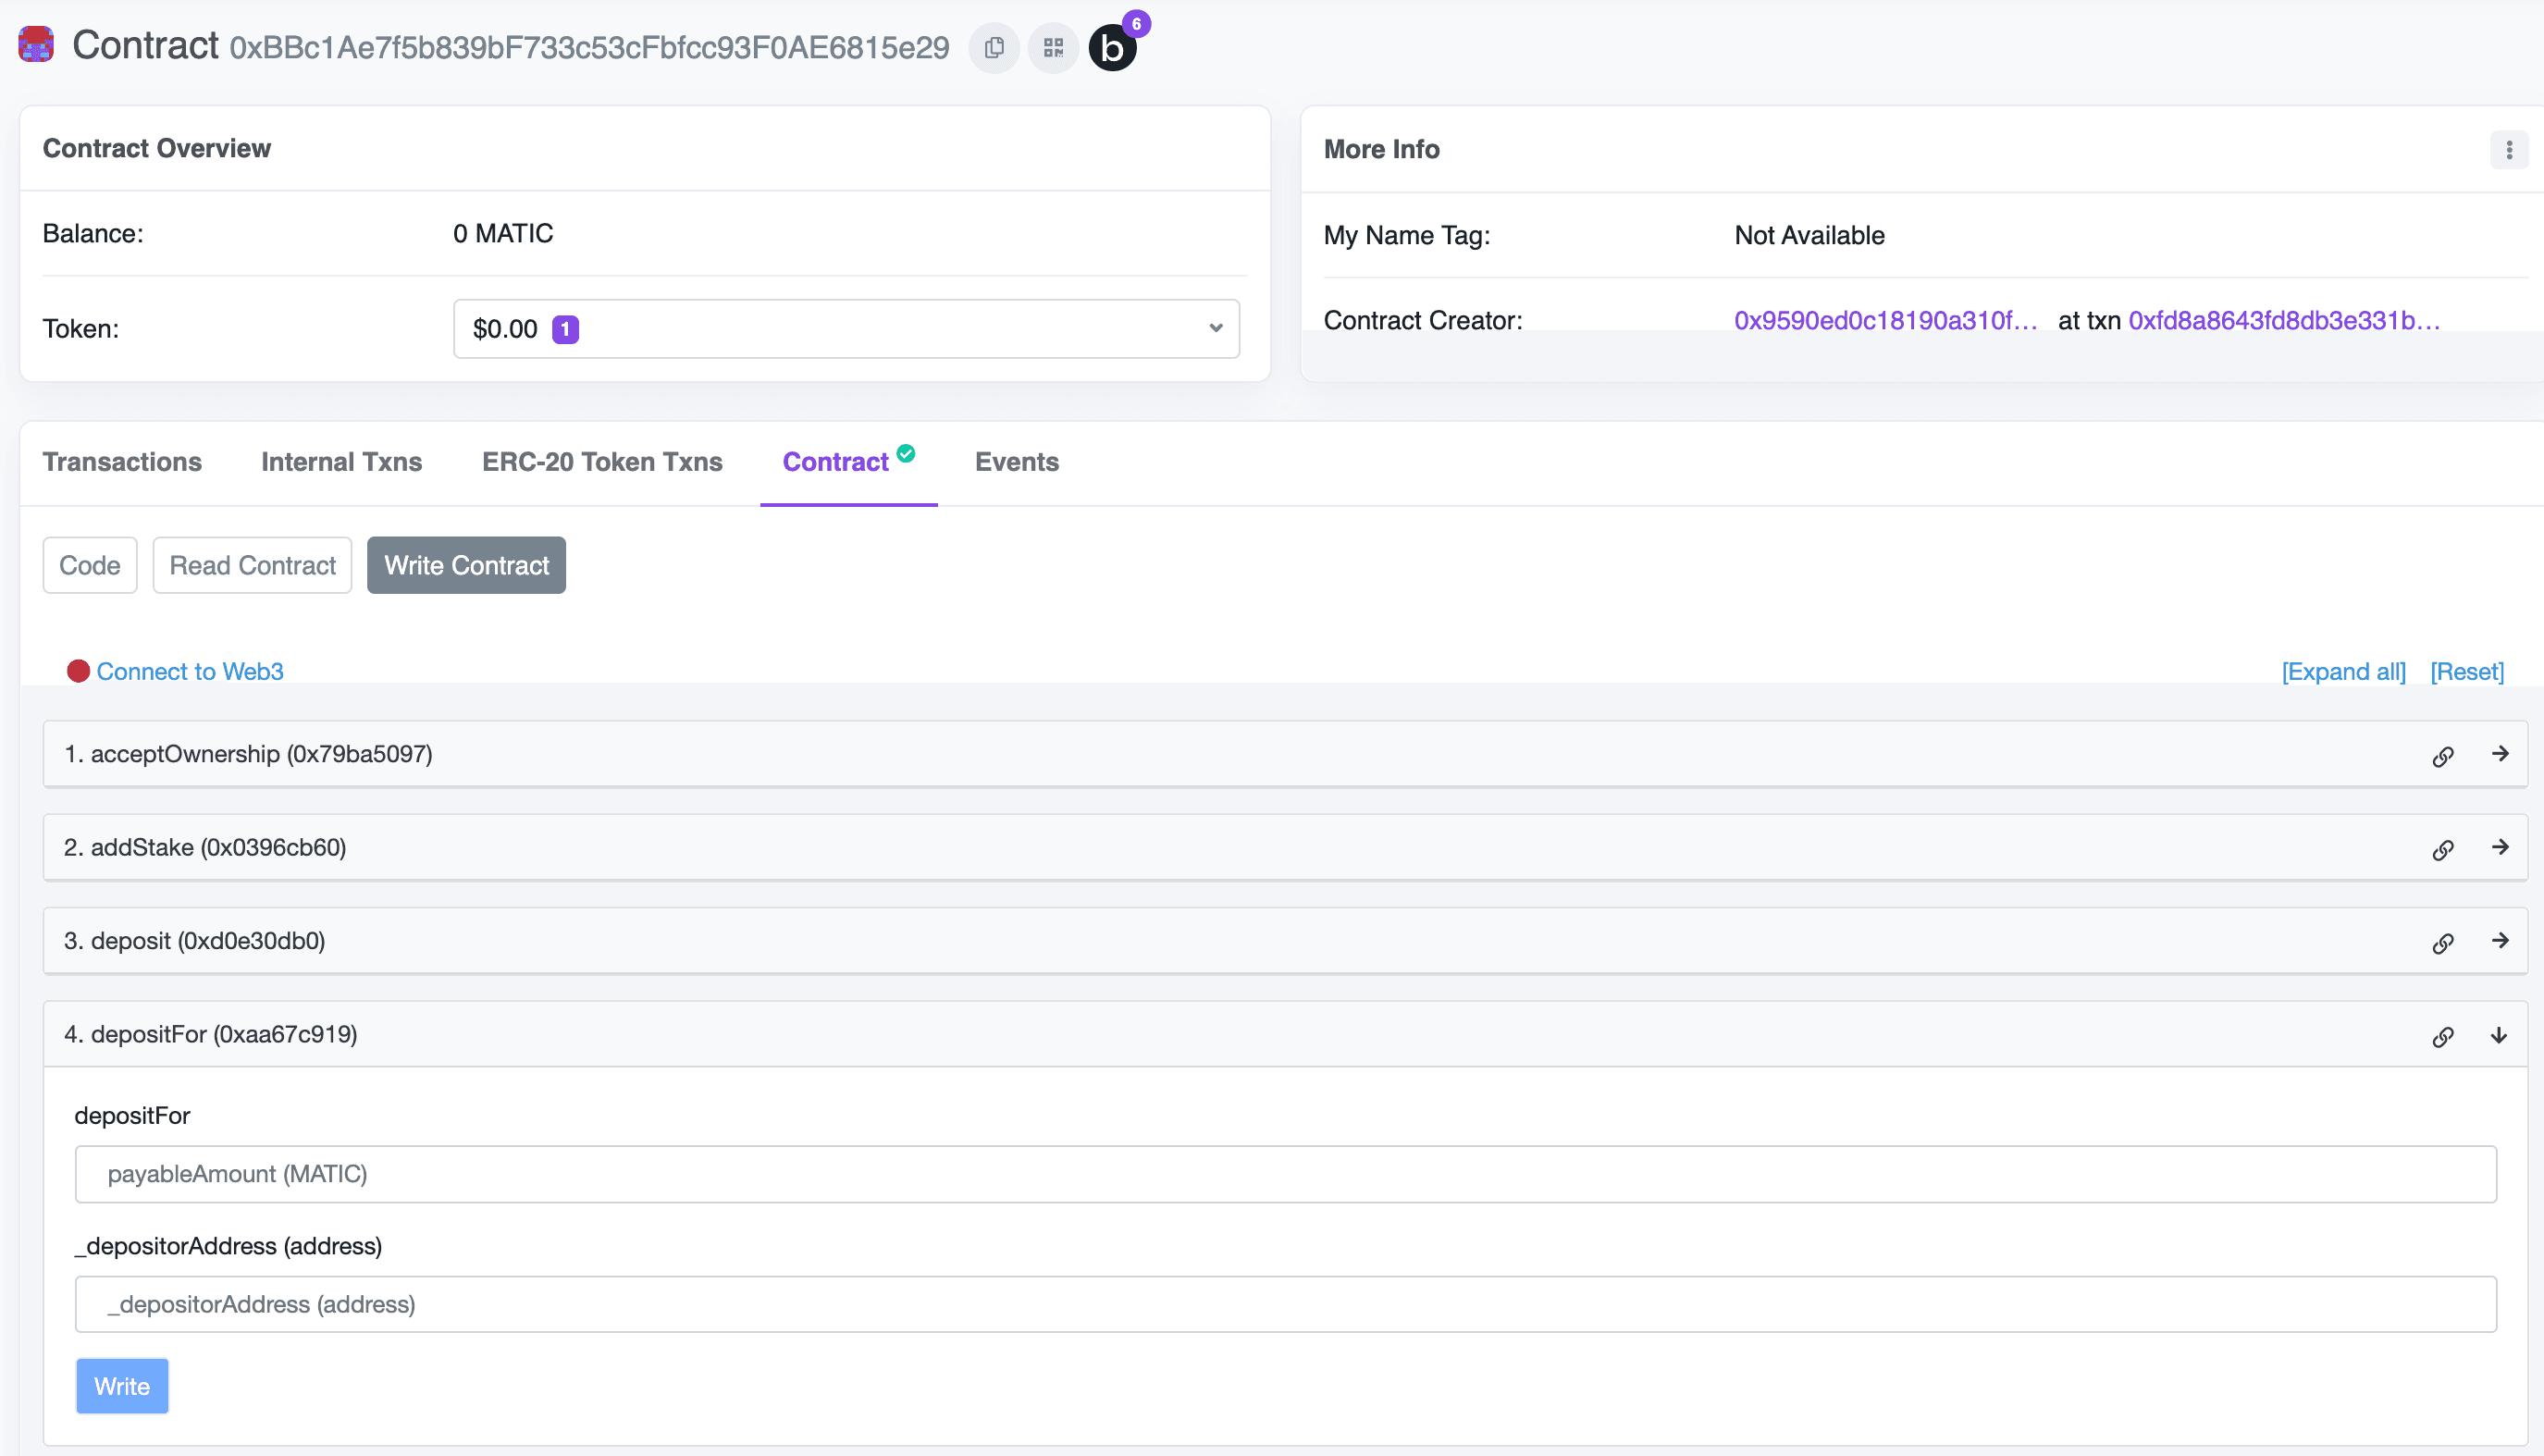
### Paying with native tokens
For more advanced use cases, you can use network native tokens (like ETH on Base). This method involves depositing tokens to Openfort's Paymaster contract. Here's how to set it up:
Check the [entity addresses](/docs/addresses) page to find the paymaster's address in your network.
Tokens deposited in this contract can always be withdrawn by the owner and you can control its balance at any time checking the its balance.
1. First, deposit your tokens using the `depositFor` function:
2. After depositing, head to the [backend wallets](https://dashboard.openfort.io/accounts) page to register your EOA wallet.
3. Sign and validate your signature by clicking on advanced configuration (see the video below).
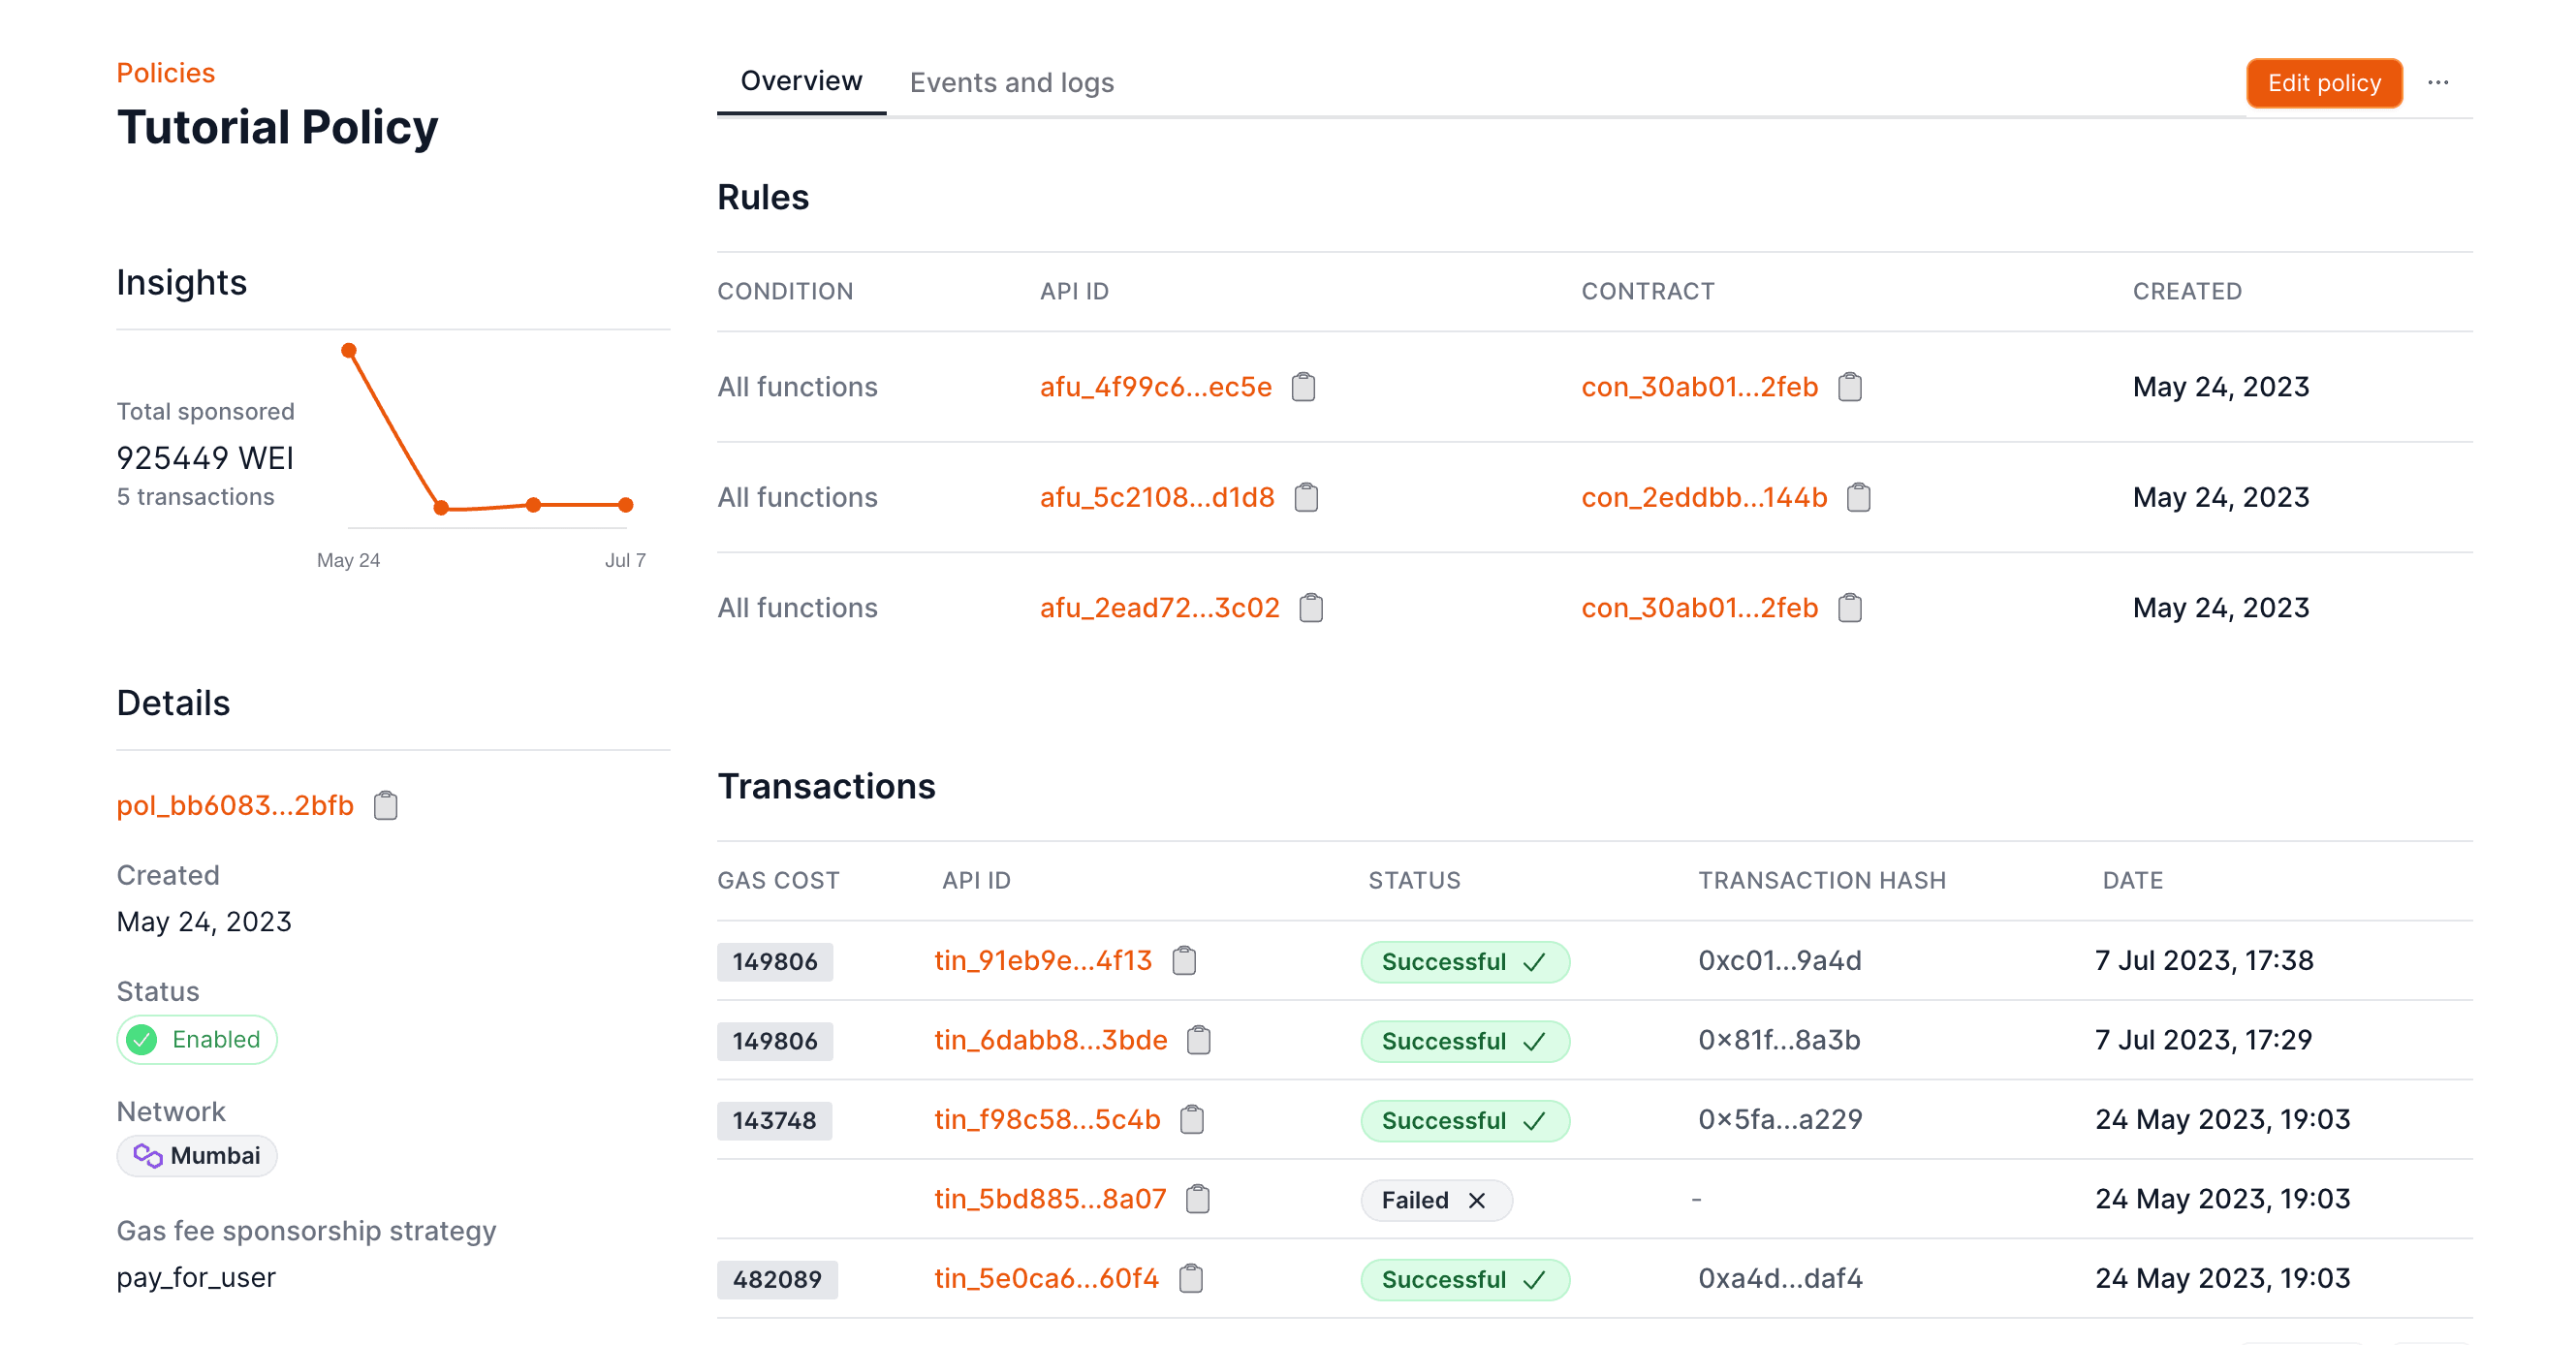
4. Finally, configure your policy to use these deposits by selecting "Sponsor gas with your tokens" when editing or creating a policy:
When using a strategy that supports payment in ERC-20 tokens (i.e. `charge_custom_tokens` or `fixed_rate`), the backend wallet will receive the tokens users pay for gas fees.
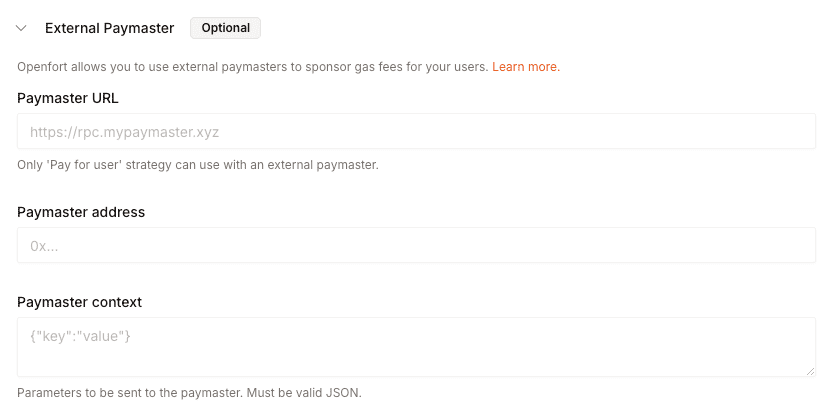
## Optional: Using external paymasters
For those needing custom solutions, Openfort supports integration with external paymasters. This feature is particularly useful when you have specific requirements for gas sponsorship that go beyond the standard options. Note that when using external paymasters, you'll need to use the `pay_for_user` strategy.
When using an external paymaster, the only supported `strategy` is `pay_for_user`.
To set up an external paymaster, you can either use the dashboard:
Or configure it through the API:
```bash
# Create the paymaster object
curl https://api.openfort.io/v1/paymasters/ \
-H "Authorization: Bearer $YOUR_SECRET_KEY" \
-d address=80002 \
-d url="YOUR_PAYMASTER_URL"
# Link it to your policy
curl https://api.openfort.io/v1/policies/:id \
-H "Authorization: Bearer $YOUR_SECRET_KEY" \
-d paymaster=pay_...
```
With these fundamentals in place, you're ready to start managing gas fees for your users. The next section will dive deeper into the different types of policies and rules you can create.
export const Page = ({ children }) =>
export default Page
---
File: /pages/development/migration.mdx
---
import Layout from '@/layouts/DefaultGuideLayout'
import { IconCheck } from '@/components/ui'
export const meta = {
title: 'Provider migration',
description: 'Migrate users from one Auth provider to another using Openfort\'s migration tool.',
subtitle: 'Migrate users from one Auth provider to another using Openfort\'s migration tool.',
}
This tool allows you to link users from one authentication provider to another, ensuring a smooth transition without losing any user data.
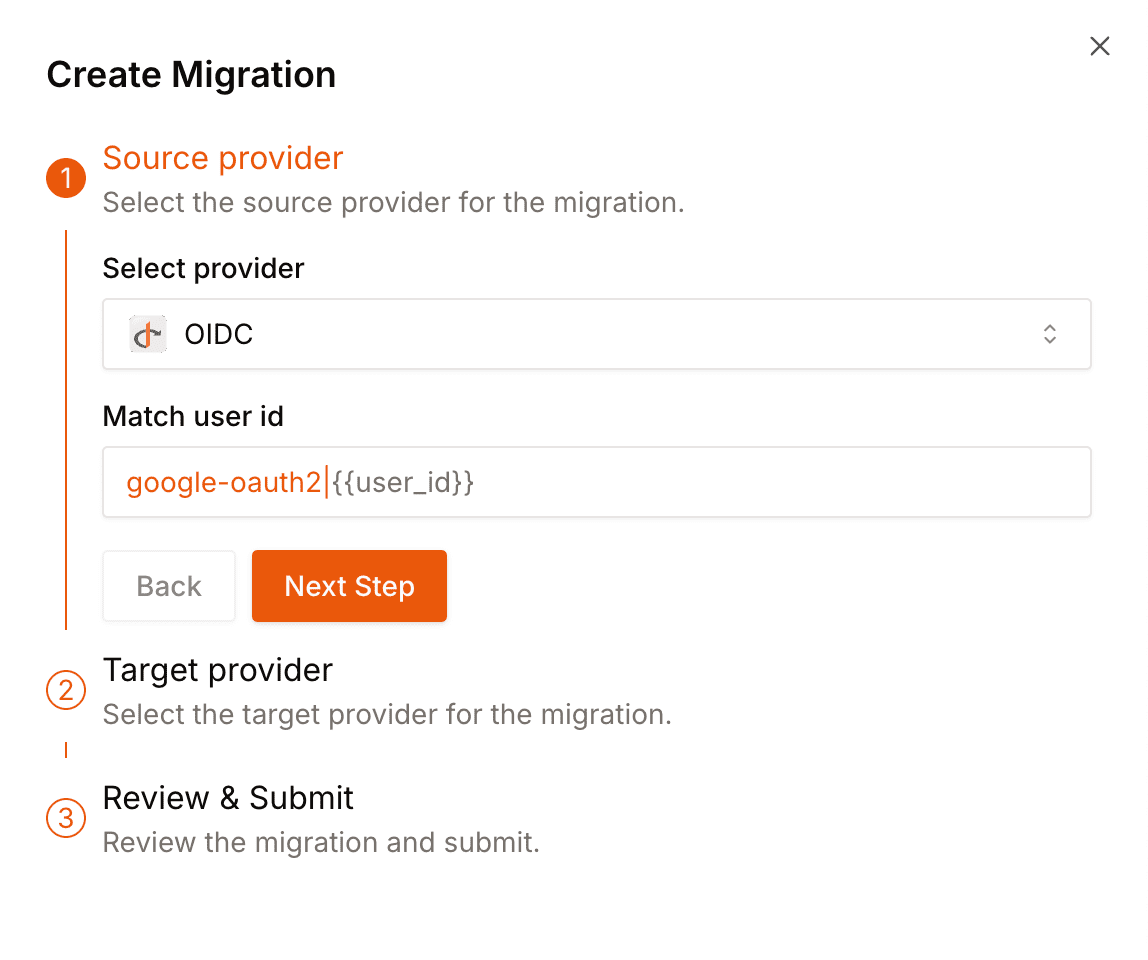
In this guide we will be creating a migration from **OIDC provider** with google oauth flow to **openfort Google provider**.
This is useful if you want to migrate users from a custom OIDC provider to Openfort's Google provider.
## Creating a migration
1. Enable both your source and destination providers in the Openfort dashboard.
You can do this in the [Providers](https://dashboard.openfort.io/players/auth/providers) section of your Openfort dashboard.
2. Start by going to the [Migration page](https://dashboard.openfort.io/players/auth/migrations) in your Openfort dashboard and create a new one.
3. Select the source destination, and add the matching criteria for the users you want to migrate.
4. Do the same for the destination provider.
5. Click on **Create migration**.
6. Start the migration by clicking on the **Start migration** button, next to "Ready to start".
7. That is it! Now when a user logs in with **openfort Google provider**, they will be automatically linked to their OIDC account.
When all users are migrated, you can mark the migration as complete by clicking on the **Mark as complete** button.
export const Page = ({ children }) =>
export default Page
---
File: /pages/development/security.mdx
---
import Layout from '@/layouts/DefaultGuideLayout'
import Security from '@/common/guides/security.mdx'
export const meta = {
title: 'Security & Trust at Openfort',
description: "Protecting your users' data with rigorous security measures and industry best practices.",
subtitle: 'Protecting your users with industry best practices.',
}
export const Page = ({ children }) =>
export default Page
---
File: /pages/development/sponsor-rules.mdx
---
import Layout from '@/layouts/DefaultGuideLayout'
import { Accordion } from '@/components/ui'
export const meta = {
id: 'rules',
title: 'Gas Policy Strategies & Rules',
description: 'Understand and configure gas sponsorship policies, strategies, and rules for your application.',
subtitle: 'Configure gas policies and sponsorship rules for your application'
}
## Gas Policy Strategies
Gas policies offer three distinct strategies for handling transaction fees:
### 1. Sponsored Transactions
Developers cover all gas fees, removing the need for users to hold native tokens.
```bash
curl https://api.openfort.io/v1/policies/ \
-H "Authorization: Bearer $YOUR_SECRET_KEY" \
-d chainId=80002 \
-d name="Sponsored Policy" \
-d "strategy[sponsorSchema]=pay_for_user"
```
### 2. Dynamic ERC20 Payment
Users pay gas fees using ERC20 tokens at a dynamic exchange rate.
```bash
curl https://api.openfort.io/v1/policies/ \
-H "Authorization: Bearer $YOUR_SECRET_KEY" \
-d chainId=43113 \
-d name="Dynamic ERC20" \
-d "strategy[sponsorSchema]=charge_custom_tokens" \
-d "strategy[tokenContract]=con_..." \
-d "strategy[tokenContractAmount]=1"
```
### 3. Fixed ERC20 Payment
Users pay a fixed amount of ERC20 tokens per transaction.
```bash
curl https://api.openfort.io/v1/policies/ \
-H "Authorization: Bearer $YOUR_SECRET_KEY" \
-d chainId=80002 \
-d name="Fixed ERC20" \
-d "strategy[sponsorSchema]=fixed_rate" \
-d "strategy[tokenContract]=con_..." \
-d "strategy[tokenContractAmount]=10000"
```
## Policy Rules
While strategies determine how gas fees are paid, rules define when and how your gas policy applies. Every policy needs at least one rule to function, and you can choose from three types:
| Rule Model | Description |
|----------------------|--------------------------------------------------------|
| **`contract_functions`** | Sponsor interactions with smart contracts. |
| **`account_functions`** | Sponsor interactions with the smart account. |
| **`limit_rules`** | Limit the amount of gas or number of transactions over an interval. |
### Contract functions
These rules let you specify which smart contract interactions your policy covers. You might want to sponsor all interactions with your game contracts but not with external marketplaces, for instance.
Wildcard policies allow you to sponsor any transaction for any contract without the need to add them in the policy. Enable "Catch-all sponsorship".
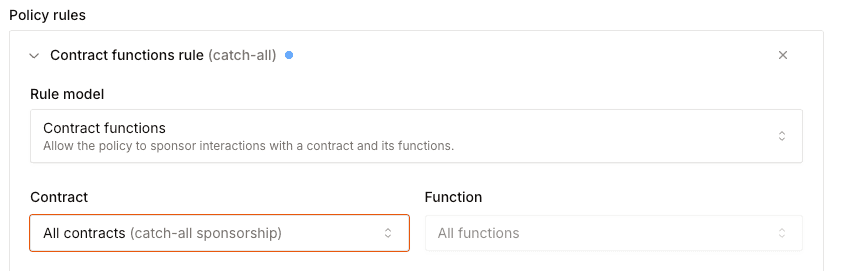 To create a policy rule, you need first to add a contract to Openfort:
Add a contract}
id={`add-contract`}
>
If the contract is not verified on the block explorer, you will need to enter the ABI manually. If the contract you want to interact with is a proxy contract, you will need to enter the ABI of the implementation contract.
Add a contract to Openfort to an API request:
```bash command-line
curl https://api.openfort.io/v1/contracts \
-H "Authorization: Bearer $YOUR_SECRET_KEY" \
-d name="SimpleNFT" \
-d address="0x416c...354D" \
-d chainId="80002"
```
Add a new contract by clicking the `Add contract` button in the [Asset contracts](https://dashboard.openfort.io/contracts) section, then enter:
- The name of the contract (it can be any name you want; the name is only for identification purposes)
- The network (`chainId`) where the smart contract is located.
- The address of the contract.
- The Application Binary Interface (ABI) of the contract (if not verified in the block explorer of that network).
Once you've selected your contract, you can then choose what function you whish to enable sponsorship for. You can select `All functions` instead to allow sponsoring all functions in that specific contract.
```bash command-line
curl https://api.openfort.io/v1/policy_rules \
-H "Authorization: Bearer $YOUR_SECRET_KEY" \
-d type="contract_functions" \
-d functionName="mint" \
-d "contract=con_..."
```
### Account functions
These rules cover account-related operations, such as transferring ownership of accounts, managing session keys, or deploying smart accounts. They're essential for maintaining smooth account management operations within your application.
```bash command-line
curl https://api.openfort.io/v1/policy_rules \
-H "Authorization: Bearer $YOUR_SECRET_KEY" \
-d type="account_functions"
```
### Limit rule
Limit rules help you control usage of your gas policy. You can set limits based on:
| Rule Type | Description | Example Use Case |
|-----------|-------------|-----------------|
| Gas per Interval | Total gas limit in timeframe | 1000 WEI/minute |
| Gas per Transaction | Gas limit per transaction | 100 WEI/transaction |
| Count per Interval | Transaction count limit | 10 transactions/minute |
```bash command-line
curl https://api.openfort.io/v1/policy_rules \
-H "Authorization: Bearer $YOUR_SECRET_KEY" \
-d type="rate_limit" \
-d functionName="gas_per_transaction" \
-d gasLimit="1000000"
```
export const Page = ({ children }) =>
export default Page
---
File: /pages/overview/ai-tooling.mdx
---
import Layout from '@/layouts/DefaultGuideLayout'
import AiTooling from '@/common/guides/ai-tooling.mdx'
export const meta = {
id: 'features',
title: 'Using AI-powered IDEs with our docs',
description: 'Discover how to leverage AI-powered IDEs to enhance your development experience with Openfort documentation.',
subtitle: 'Boost productivity with AI tooling in your workflow.',
}
export const Page = ({ children }) =>
export default Page
---
File: /pages/overview/architecture.mdx
---
import Layout from '@/layouts/DefaultGuideLayout'
export const meta = {
id: 'overview',
title: 'Architecture',
description: 'Understand the modular and flexible architecture behind Openfort, including its smart contracts, wallet solutions, and backend infrastructure.',
subtitle: 'Explore Openfort’s system design and components.',
}
Openfort's smart contracts are [open source](https://github.com/openfort-xyz/openfort-contracts). Moreover, Openfort is built on public goods infrastructure like the [ERC-4337](https://eips.ethereum.org/EIPS/eip-4337), [ERC-7702](https://eips.ethereum.org/EIPS/eip-7702) or [ERC-6551](https://eips.ethereum.org/EIPS/eip-6551) standards. We choose open source tools which are scalable and make them simple to use.
Openfort is not a 1-to-1 mapping of any wallet solution you've seen. While we offer many of the features that other solutions have, we go much further than anyone else because: (1) we support both Smart wallets (4337) and Smart EOAs (7702), and (2) we build the server stack so you don't have to worry about the reliability of the infrastructure.
## Architecture
Openfort consists of modular components that allow you to plug-and-play the tools to achieve your success. Our product suite is designed to be flexible - you can use individual components or the entire stack based on your needs.
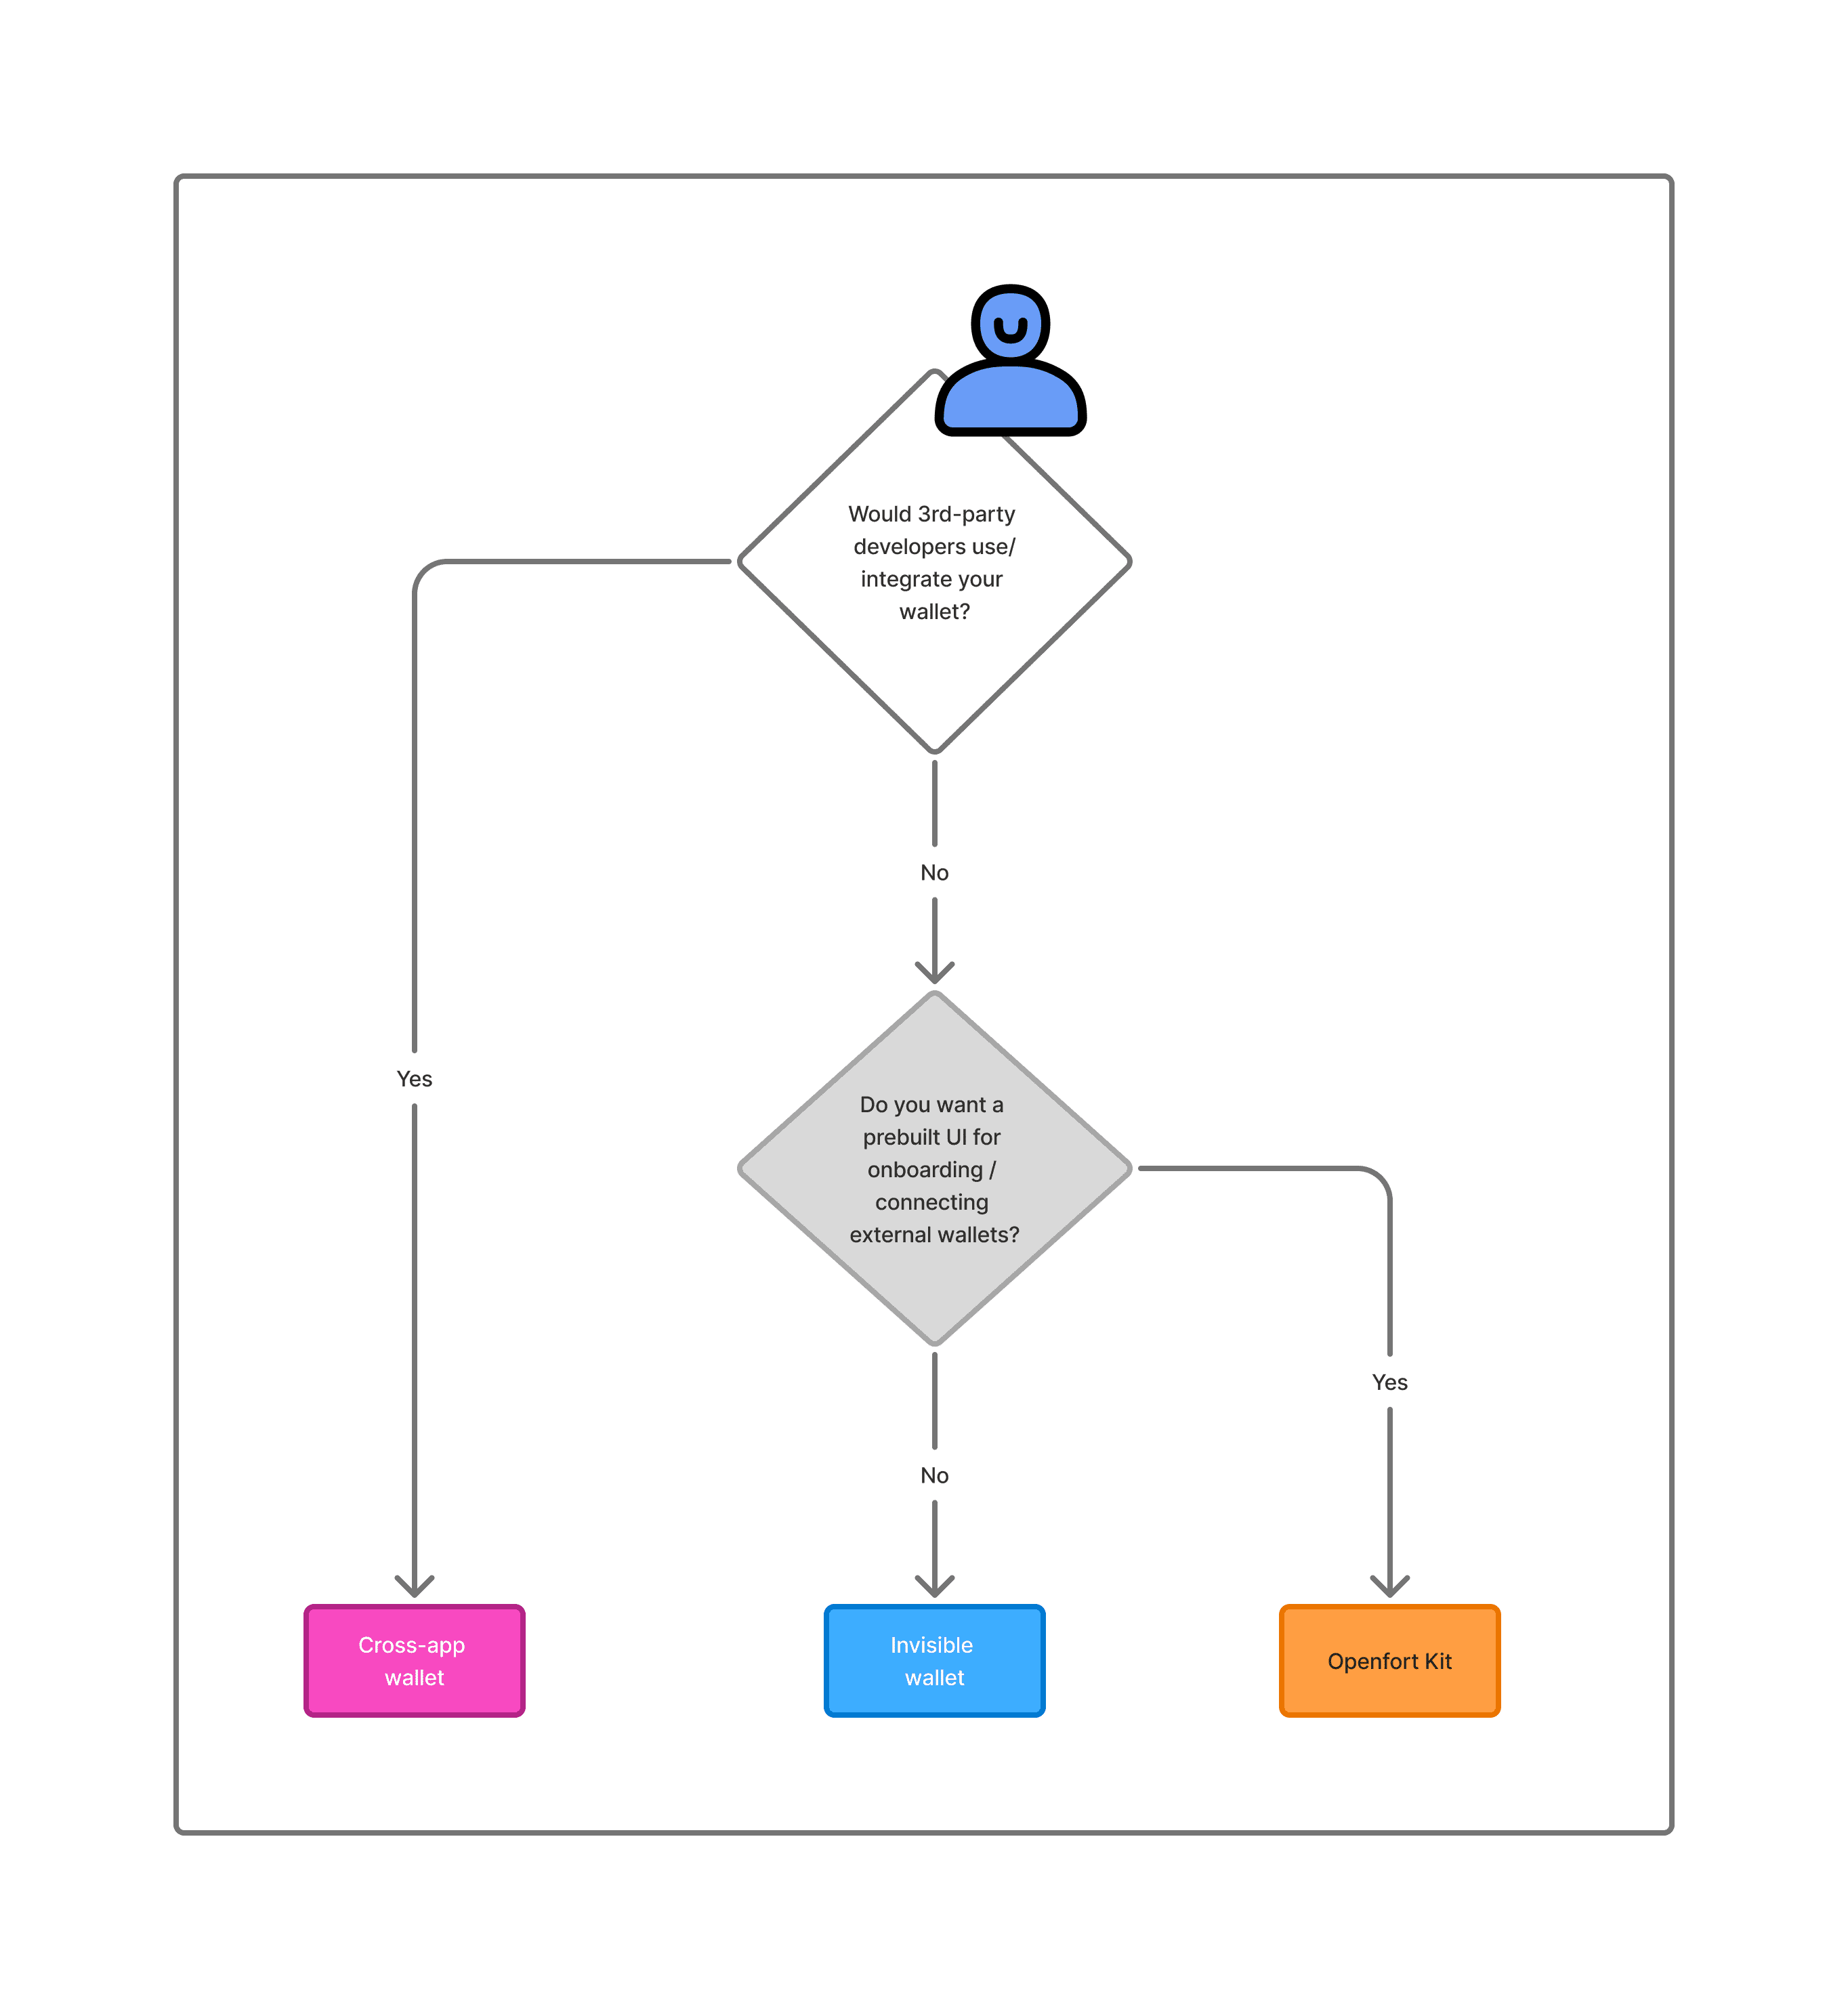
Our infrastructure orchestrates everything under the hood to make development and maintenance easy. The key components we take care of are:
## Core Infrastructure
- **Authentication UI + Wallet Connector**: A flexible authentication system that works with both Smart EOAs (7702) and Smart Wallets (4337). This component can be used independently of other Openfort solutions.
- **Invisible wallet**: A non-custodial wallet that is invisible to the user. It can be used for both smart EOAs and smart wallets. This wallet is designed to be used with Openfort's infrastructure, but it can also be integrated with third-party key management solutions.
- **Cross-App Wallet**: Our newest wallet solution that works seamlessly with all Openfort infrastructure or can be integrated with third-party key management solutions.
- **Backend Wallets**: These are externally-owned accounts used internally to manage the project flows and experience. They can execute logic like escrow for competitions or sending a minted asset to a user after winning a competition.
- **Infrastructure**: We built a robust infrastructure to support the seamless integration of blockchain functionalities into your applications. With features like REST APIs, SDKs, webhooks, and abstraction infrastructure, developers can efficiently manage their applications while providing a smooth user experience.
- **Bundlers/RPCs**: We built a Meta Bundler Network to ensure reliable access to the blockchain. If one fails, another takes over.
- **Paymasters**: We built the most customizable paymasters to configure granular rate limits and policies for gas sponsoring, through either our API or dashboard.
## Modularity & Flexibility
Openfort's architecture is designed to be modular, allowing you to:
- Use the authentication UI and wallet connector with either smart EOAs or smart wallets.
- Use the invisible wallet with third-party key management solutions.
- Implement the cross-app wallet with Openfort's full infrastructure or with third-party key management and third-party wallets.
- Use any paymasters.
Our goal at Openfort is to help _all_ types of applications have wallets that touch the blockchain.
## Glossary:
- **Embedded Signers**: Signers create non-custodial wallets for your users. [Learn more about embedded wallets](/docs/products/embedded-wallet/javascript/wallets).
- **Wallets**: We offer an optimized and [diverse set of accounts](https://github.com/openfort-xyz/openfort-contracts) to fit your needs:
- **Smart Wallets (4337)**: Smat contract wallets deployed on every chain with ERC-4337 standards.
- **Smart EOAs (7702)**: Enhanced EOAs with smart contract capabilities (except privtae key rotation).
export const Page = ({ children }) =>
export default Page
---
File: /pages/overview/authentication.mdx
---
import Layout from '@/layouts/DefaultGuideLayout'
export const meta = {
id: 'overview',
title: 'Authentication UI and Wallet Connector',
description: 'Learn about Openfort’s flexible authentication options, including social login, password auth, SIWE, wallet connectors, and custom authentication flows.',
subtitle: 'Integrate secure and seamless authentication for your users.',
}
Openfort provides a comprehensive suite of authentication elements to ensure secure and flexible user access to your platform. Here's a summary of the key authentication capabilities:
### Social Login
Implement OAuth-based authentication flows to allow users to sign in using their accounts from popular social media platforms or other OAuth providers. This method enhances user convenience and can increase sign-up rates.
### Password Auth
Set up secure password-based authentication. Always salt and pepper passwords before hashing to enhance security against brute-force attacks.
### SIWE (Sign-In with Ethereum)
Enable users with existing Ethereum wallets to authenticate seamlessly using the Sign-In with Ethereum (SIWE) protocol. This feature bridges the gap between traditional web applications and blockchain-based identities.
### Wallet Connector Library
Using Openfort Kit you'll be able to authenticate external wallets like MetaMask, Coinbase Wallet, and Rainbow. This library simplifies the integration of wallet authentication into your application.
### Custom Auth
Integrate third-party authentication providers via JWT token or OIDC alongside Openfort's embedded wallets. This flexibility allows you to maintain your existing authentication stack while adding blockchain capabilities.
### Guest Access
Enable temporary guest accounts for users who want to explore your platform without full registration. Configure guest user permissions and create dedicated homepages or experiences for these temporary users.
### Account Linking
Connect multiple authentication methods to a single user account. This feature allows users to access their account through various identity providers while maintaining a unified profile within your application.
[Get started with our documentation](/docs/products/kit/react/quickstart)
export const Page = ({ children }) =>
export default Page
---
File: /pages/overview/server.mdx
---
import Layout from '@/layouts/DefaultGuideLayout'
export const meta = {
id: 'overview',
title: 'Backend Wallets',
}
Openfort provides powerful backend wallet APIs that allow developers to provision and manage wallets directly from their server-side applications. These backend wallets offer a robust set of features for creating, controlling, and automating blockchain interactions at scale.
### Direct Backend Control
Unlike user-centric embedded wallets, backend wallets are designed to be controlled directly by your application's backend. This allows for programmatic wallet management and transaction execution without requiring user intervention. Backend wallets are ideal for scenarios where you need to manage wallets at scale or automate blockchain interactions.
### Multi-chain Support
Openfort's backend wallets support multiple blockchain networks, including Ethereum and all EVM-compatible chains. This multi-chain functionality allows developers to create and manage wallets across various networks from a single API interface, simplifying cross-chain operations and expanding the reach of their applications.
### Flexible Wallet Types
Developers can choose between using Externally Owned Accounts (EOAs) or Smart Contract wallets, depending on their specific requirements. This flexibility allows for customized wallet architectures that best suit the needs of the application and its users.
### State Synchronization
Backend wallets offer seamless state synchronization between your application and the blockchain. Through webhook integrations, developers can register event listeners for transaction status updates and incoming fund notifications. This feature ensures that your application remains up-to-date with on-chain events in real-time.
### Policy Engine
A powerful policy engine is included with backend wallets, enabling developers to implement granular control over wallet actions. This engine allows for the definition of specific rules, such as setting allowlisted contracts or recipients, imposing maximum transfer amounts, and enforcing other custom restrictions on wallet usage.
### Pre-generated wallets
You can also offer pregenerated wallets for user's that have not yet signed up. This feature allows you to create wallets in advance, which can be assigned to users upon their first interaction with your application. Pregenerated wallets streamline the onboarding process and ensure that users have immediate access to wallet functionality.
[Get started with our documentation](/docs/products/server)
export const Page = ({ children }) =>
export default Page
---
File: /pages/overview/choose.mdx
---
import Layout from '@/layouts/DefaultGuideLayout'
export const meta = {
id: 'overview',
title: 'Choosing the Right Wallet Solution',
description: 'Compare Openfort’s wallet options and learn how to select the best solution for your application’s needs and user experience.',
subtitle: 'Find the ideal wallet integration for your project.',
}
This guide helps you decide which wallet integration approach works best for your use case.
## Decision Tree
Use the following questions to determine your path to a prodct that suirts your needs:
1. **Would 3rd-party developers use/integrate your wallet?**
- **Yes** → [Cross-App Wallet](/docs/products/cross-app-wallet/setup) + you can combine it with a wallet connector to allow external wallets.
- **No** → Continue to next question
2. **Do you want a prebuilt UI for authentication?**
- **Yes** → [Auth UI + Wallet Connector](/docs/products/kit/react/quickstart) → Then proceed to the next question
- **No** → [Invisible Wallet](/docs/products/embedded-wallet/javascript)
3. **Would you want in-wallet prompts for end users?**
- **Yes** → Wallet UI (Connect with the team)
- **No** → [Invisible Wallet](/docs/products/embedded-wallet/javascript)
## Overview of Wallet Approaches
1. **Cross-App Wallet**
- Intended for scenarios where multiple 3rd-party developers will be leveraging the wallet capabilities.
- It offers a unified solution to authentication, sign transactions, transactions and other onchain actions.
2. **Invisible Wallet**
- You want seamless onboarding, without prompting users to download or manage a separate wallet app.
- No UI is exposed to the user for authentication; everything runs behind the scenes.
3. **Auth UI + Wallet Connector**
- A middle-ground solution where you provide a prebuilt authentication UI.
- You want a minimal user flow for sign-up but still need a standard way to connect to external wallets.
4. **Wallet UI**
- You want your end users to see and interact with wallet prompts (confirmations, sign transactions).
- Best suited when you want your users to directly interact with a branded or familiar wallet user interface.
export const Page = ({ children }) =>
export default Page
---
File: /pages/overview/ecosystem-wallets.mdx
---
import Layout from '@/layouts/DefaultGuideLayout'
export const meta = {
id: 'overview',
title: 'Cross-app Wallets',
description: 'Explore Openfort’s cross-app wallets for interoperable digital asset management across multiple games and applications within an ecosystem.',
subtitle: 'Unified wallets for seamless ecosystem integration.',
}
Openfort's cross-app wallets provide a comprehensive solution for creating interoperable wallets across multiple games and applications within a unified ecosystem. These wallets offer advanced features that enhance user experience and simplify asset management for both players and developers.
### Use with Web3 Libraries
Ecosystem wallets can be seamlessly integrated with popular web3 libraries, allowing developers to configure their ecosystem to be displayed in any wallet-compatible web3 library. This feature supports integration with tools like Wagmi and RainbowKit, enabling developers to incorporate ecosystem wallet functionality into existing projects while maintaining familiar development workflows. This compatibility ensures that ecosystem wallets can be easily recognized and utilized across various platforms and applications.
### Wallet UI Customization
Developers have the flexibility to customize the appearance and user interface of their ecosystem wallets. This feature allows for the creation of a branded and cohesive user experience across all applications within the ecosystem. By tailoring the wallet's look and feel, developers can ensure that it aligns with their overall design aesthetic and provides a seamless integration with their games or applications.
### Ecosystem Paymaster
The ecosystem paymaster functionality allows developers to manage gas fee rules for transactions within their ecosystem. This feature is part of the gas sponsorship capabilities offered by Openfort's smart wallet technology. By implementing ecosystem-wide policies for gas fees, developers can create a more user-friendly experience, potentially subsidizing or optimizing transaction costs across multiple applications within their ecosystem.
### Create your own Log in
Openfort's ecosystem SDK simplifies the process of adding wallet creation functionality to applications with a single button. This feature streamlines the onboarding process for users, allowing them to create a unified wallet that works across all games and applications within the ecosystem. The Create Wallet Button leverages Openfort's embedded wallet creation capabilities, enabling a frictionless entry point for new users.
### Dashboard Setup
Ecosystem wallets can be customized and managed through a single, comprehensive dashboard. This centralized management tool allows developers to configure various aspects of their ecosystem, including wallet features, security settings, and integration parameters. The dashboard provides a user-friendly interface for developers to oversee and adjust their ecosystem's functionality, ensuring efficient management of the entire wallet infrastructure across multiple applications.
[Get started with our documentation](/docs/products/cross-app-wallet/setup)
export const Page = ({ children }) =>
export default Page
---
File: /pages/overview/embedded-wallets.mdx
---
import Layout from '@/layouts/DefaultGuideLayout'
export const meta = {
id: 'overview',
title: 'Invisible Wallets',
description: 'Learn how Openfort’s invisible wallets enable seamless, secure, and user-friendly onchain interactions within your applications.',
subtitle: 'Integrate embedded wallets for frictionless user experiences.',
}
Openfort's invisible wallets provide a seamless way to integrate wallet functionality into your application without any user interface. These embedded wallets offer a range of features to enhance user experience and security, allowing for onchain interactions.
### Embedded Signer
The embedded signer functionality allows for advanced signing capabilities directly within your application. Users can securely sign transactions and messages without leaving your app's interface. This feature decouples signing from the user's identity, offering a more secure and flexible transaction process. It seamlessly integrates with authentication, allowing users to approve transactions without worrying about key management.
### Export Keys
For users who want more control over their assets, Openfort provides a secure method to export private keys. This feature allows users to transfer the ownership of accounts that hold assets to external signers, all natively on the blockchain without having to export a private key. This ensures that users have full control over their digital assets while maintaining security.
### Smart Wallet
Openfort's smart wallet feature enables advanced interactions with smart contracts, including gas sponsorship and transaction batching. The smart account layer leverages ERC-4337 standards to provide features like gasless transactions, automated batch transactions, and heightened security, all while keeping user assets secure. These smart accounts are decoupled from the signer, offering flexibility for users to control their assets independently.
### Session Keys
Session keys, also referred to as scoped preapproved transactions, provide a secure way to create temporary private keys for signing transactions. This feature enables popupless preapproved transactions, enhancing both security and usability. It's particularly useful for specific gaming or trading sessions where temporary authorized access is required.
### Sign Messages
Openfort's embedded wallets handle various message signing workflows to authenticate users or sign off-chain data. This feature allows users to sign transactions without pop-ups, with all operations happening locally on their front-end and securely. It supports different types of message signing, ensuring compatibility with various protocols.
### Security Shield
Openfort enhances the security of signing operations with additional layers of protection. The platform offers non-custodial accounts by design, ensuring that only the rightful owner can access and sign transactions. This security model is crucial for maintaining user trust and protecting digital assets.
### State Management
Openfort efficiently manages signer states to keep your application in sync with blockchain interactions. This feature is part of the overall smart account management, allowing for seamless integration with various blockchain operations. It enables developers to track transaction status, manage nonce values, and handle pending and confirmed transactions effectively.
[Get started with our documentation](/docs/products/embedded-wallet/javascript)
export const Page = ({ children }) =>
export default Page
---
File: /pages/overview/index.mdx
---
import Layout from '@/layouts/DefaultGuideLayout'
export const meta = {
id: 'overview',
title: 'Welcome to Openfort',
description: 'Openfort features',
subtitle: 'Your gateway to secure, scalable wallet infrastructure and authentication.',
}
Openfort builds secure wallet infrastructure and user authentication to enable better Web3 products. We provide embedded wallet solutions and ecosystem wallet capabilities that allow applications to seamlessly integrate digital asset functionality for users, businesses, and automated systems.
Use Openfort's client-side SDKs to authenticate users, create embedded wallets, manage transactions, and build ecosystem wallets that work across multiple applications. Leverage server-side capabilities to securely control digital assets at the application level directly from your backend.
{'Get API keys and start building'}
{'Sign in to our demo account'}
{'Get support and share your projects'}
## Using Openfort
Openfort enables:
- **User Authentication** —Openfort helps developers implement secure user authentication regardless of their Web3 experience. Our libraries support both connecting existing wallets and creating embedded wallets for new users.
- **Wallet Infrastructure** —Developers can access Openfort's robust wallet APIs from their backend using server-side integration to manage cross-chain wallets for various use cases.
- **Ecosystem Wallets** —Create and manage whitelabel wallets that work seamlessly across multiple games and applications within your ecosystem. Move assets between different apps, prove ownership, sign messages, and send transactions with a unified experience.
---
## Product Principles
It is our goal to provide an architecture that any large-scale company would design for themselves,
and then provide tooling around that architecture that is easy-to-use for indie-developers and small teams.
We use a series of principles to ensure that scalability and usability are never mutually exclusive:
### Everything works in isolation
Each system must work as a standalone tool with as few moving parts as possible.
The litmus test for this is: "Can a user run this product with nothing but a Postgres database?"
### Everything is integrated
Openfort is composable. Even though every product works in isolation, each product on the platform needs to 10x the other products.
For integration, each tool should expose an API and Webhooks.
### Everything is extensible
We're deliberate about adding a new tool, and prefer instead to extend an existing one.
This is the opposite of many cloud providers whose product offering expands into niche use-cases. We provide _primitives_ for developers, which allow them to achieve any goal.
Less, but better.
### Everything is portable
To avoid lock-in, we make it easy to migrate in and out. Our cloud offering is compatible with our self-hosted product.
We use existing standards to increase portability (like pg_dump and CSV files). If a new standard emerges which competes with a "Openfort" approach, we will deprecate the approach in favor of the standard.
This forces us compete on experience. We aim to be the best Postgres hosting service.
### Build for developers
"Developers" are a specific profile of user: they are _builders_.
When assessing impact as a function of effort, developers have a large efficiency due to the type of products and systems they can build.
As the profile of a developer changes over time, Openfort will continue to evolve the product to fit this evolving profile.
export const Page = ({ children }) =>
export default Page
---
File: /pages/overview/infrastructure.mdx
---
import Layout from '@/layouts/DefaultGuideLayout'
export const meta = {
id: 'overview',
title: 'Infrastructure',
description: 'Dive into Openfort’s robust infrastructure, including APIs, SDKs, bundlers, and paymasters for seamless blockchain integration.',
subtitle: 'Build on reliable, scalable blockchain infrastructure.',
}
Openfort provides robust infrastructure to support the seamless integration of blockchain functionalities into your applications. With features like REST APIs, SDKs, webhooks, and abstraction infrastructure, developers can efficiently manage their applications while providing a smooth user experience.

### REST API
Openfort's REST API supports a wide range of endpoints that allow developers to manage their applications directly from their servers. These endpoints enable actions such as searching, creating, and deleting users with simple API calls. The API is designed to handle complex blockchain interactions effortlessly, providing developers with the tools to integrate wallet and user management functionalities into their backend systems.
### Backend SDK
For applications with a backend, Openfort offers a dedicated SDK that simplifies interaction with its REST API. This SDK allows developers to easily access API endpoints, enabling streamlined integration of features like user management, wallet creation, and transaction handling. By using the SDK, developers can reduce the complexity of implementing blockchain functionality in their backend environments.
### Webhooks
Openfort includes built-in webhooks that notify your servers whenever specific user actions occur within your application. Developers can configure events such as user creation, login, or wallet creation and set up a destination URL to receive these notifications. The webhook system ensures near real-time updates for critical events, enabling developers to automate workflows and enhance application responsiveness.
### Dashboard
The Openfort Dashboard serves as a centralized hub for managing applications. It allows administrators to retrieve API keys, configure features, and oversee account settings. From the dashboard, developers can create new apps, customize wallet configurations, and monitor key metrics about users and transactions. This intuitive interface simplifies the management of blockchain infrastructure across multiple applications.
### Account Abstraction Infrastructure
Openfort provides account abstraction infrastructure by deploying paymasters and bundlers to support smart wallet compatibility from day one. This infrastructure enables advanced features like gasless transactions and transaction batching while maintaining compatibility with ERC-4337 standards. Developers can leverage this abstraction layer to simplify user onboarding and optimize transaction workflows.
### Chain Abstraction Infrastructure
Openfort offers chain abstraction infrastructure through the deployment of vaults, invoices, and proof systems. This setup allows developers to implement chain-abstracted balances from the start, enabling seamless multi-chain support for wallets and transactions. By abstracting chain-specific complexities, Openfort ensures a consistent experience across different blockchain networks.
export const Page = ({ children }) =>
export default Page
---
File: /pages/overview/repositories.mdx
---
import Layout from '@/layouts/DefaultLayout'
import Link from 'next/link'
import {
GlassPanel,
IconPanel,
Button,
IconChevronRight,
} from '@/components/ui'
export const meta = {
id: 'overview',
title: 'Openfort samples',
description: 'Browse the official Openfort repositories for SDKs, smart contracts, and integrations to accelerate your development.',
subtitle: 'Access Openfort’s open source resources and tools.',
}
Find even more samples in our [GitHub repository](https://github.com/openfort-xyz/samples#readme).
## Starter repos
Explore the library of sample projects using Openfort.
{
[
{
title: 'Openfort Kit Sample',
description: 'Openfort Kit is the easiest way to onboard your users onchain.',
href: 'https://github.com/openfort-xyz/openfort-kit/tree/main/examples'
},
{
title: 'Openfort JS Sample',
description: 'Openfort Auth Sample in a NextJS project.',
href: 'https://github.com/openfort-xyz/openfort-js/tree/main/examples/apps/auth-sample'
},
{
title: 'Expo starter repo',
description: 'Template for integrating openfort into a bare Expo (vanilla React Native) app',
href: 'https://github.com/openfort-xyz/react-native-auth-sample'
},
{
title: 'Wagmi starter repo',
description: 'Wagmi sample with embedded signer.',
href: 'https://github.com/openfort-xyz/openfort-js/tree/main/examples/apps/wallet-libraries/vite-wagmi'
},
{
title: 'Third-party auth starter repo',
description: 'Third-party auth with embedded signer.',
href: 'https://github.com/openfort-xyz/embedded-wallet-firebase-auth-sample-nextjs'
},
{
title: 'Unity starter repo',
description: 'Using Unity SDK with Openfort.',
href: 'https://github.com/openfort-xyz/openfort-csharp-unity/tree/main/sample'
},
{
title: 'Unity WebGL starter repo',
description: 'Integration of Openfort with a WebGL build.',
href: 'https://github.com/openfort-xyz/openfort-csharp-unity/tree/main/sample/Assets/WebGLTemplates'
},
{
title: 'Ecosystem wallet starter repo',
description: 'Example of an ecosystem wallet with embedded signer.',
href: 'https://github.com/openfort-xyz/ecosystem-sample'
}
].map((data)=> (
{data.description}
))
}
export const Page = ({ children }) =>
export default Page
---
File: /pages/products/kit/react/hooks/index.mdx
---
import Layout from '@/layouts/DefaultGuideLayout'
export const meta = {
title: 'Hooks',
description: 'Explore the React hooks provided by Openfort Kit to easily access authentication, user status, and wallet functionality in your app.',
subtitle: 'React hooks provided by Openfort Kit for seamless integration with Openfort SDK.',
}
Openfort Kit provides a set of hooks to interact with the Openfort SDK. These hooks are designed to make it easier to integrate Openfort into your React application.
## useStatus
The `useStatus` hook provides the current status of the Openfort SDK. The status can be one of the following:
- `LOADING`: The SDK is loading
- `CONNECTED`: The user is connected
- `DISCONNECTED`: The user is disconnected
- `NEEDS_RECOVERY`: The SDK needs the recovery phrase to be entered.
- `DISCONNECTED_WITH_ADDRESS`: The SDK is disconnected with an address. This can happen when the user has connected to a Web3 wallet without connecting to Openfort.
It also provides helpful boolean values to check the status, like `isConnected` or `isLoading`.
```jsx
import { useStatus } from "@openfort/openfort-kit";
function App() {
const { status, isConnected, isLoading } = useStatus()
}
```
## useUser
Hook to get the current user. It returns the following properties:
- `user`: The user object.
- `getAccessToken`: A function to get the access token.
```jsx
import { useUser } from "@openfort/openfort-kit";
function App() {
const { user, getAccessToken } = useUser()
}
```
The user object contains combines the user's information with the Openfort player `id`:
```json
{
"id": "pla_ff54b031-a878-4ca2-9cf5-ae190f921e9b",
"object": "player",
"createdAt": 1691658234,
"linkedAccounts": [
{
"provider": "email",
"email": "jaume@openfort.xyz",
"disabled": false,
"updatedAt": 1691658234
}
]
}
```
To get the `address` of the user, you would use [wagmi](https://wagmi.sh/react/api/hooks)'s `useAccount` hook:
```jsx
import { useAccount } from 'wagmi';
function App() {
const { address } = useAccount();
}
```
## useProviders
Hook to get the providers. It returns the following properties:
- `linkedProviders`: An array of providers that the user has linked. If user is not connected, the array will be empty.
- `allProviders`: An array of all providers.
- `availableProviders`: An array of providers that the user can link. (All providers except the ones that are already linked)
```jsx
import { useProviders } from "@openfort/openfort-kit";
function App() {
const { linkedProviders, availableProviders, allProviders } = useProviders();
}
```
## useWallets
Hook to get the wallets liked by the user and available on the current device. It returns the following properties:
- `wallets`: An array of wallets linked by the user.
- `currentWallet`: The current active wallet.
- `setActiveWallet`: A function to set the active wallet.
```jsx
import { useIsMounted } from "@openfort/openfort-kit";
function App() {
const { wallets, setActiveWallet, currentWallet } = useWallets()
}
```
## useLogout
Hook to logout the user. It returns a function that you can call to logout the user.
```jsx
import { useLogout } from "@openfort/openfort-kit";
function App() {
const logout = useLogout();
}
```
## useModal
Hook for controlling the modal. It returns the following functions:
- `setOpen`: Sets the modal open state.
- `openWallets`: Opens the wallets page.
- `openProviders`: Opens the providers page. (Only available if the user is connected)
- `openSwitchNetworks`: Opens the switch networks page. (Only available if the user is connected)
```jsx
import { useModal } from "@openfort/openfort-kit";
function App() {
const { openSwitchNetworks, setOpen, openProviders, openWallets } = useModal();
}
```
## useChains
Hook to get the chains set in the wagmi configuration. It returns an array of chains.
```jsx
import { useChains } from "@openfort/openfort-kit";
function App() {
const chains = useChains();
}
```
## useChainIsSupported
Hook to check if a chain is supported. It returns a function that you can call to check if a chain is supported.
```jsx
import { useChains, useChainIsSupported } from "@openfort/openfort-kit";
function App() {
const chains = useChains();
const chainIsSupported = useChainIsSupported(chains?.[0]?.id);
}
```
## useIsMounted
Helper hook to check if the component is mounted. It returns a boolean value. Useful for ssr apps.
```jsx
import { useIsMounted } from "@openfort/openfort-kit";
function App() {
const isMounted = useIsMounted();
}
```
export const Page = ({ children }) =>
export default Page
---
File: /pages/products/kit/react/setup/button.mdx
---
import Layout from '@/layouts/DefaultGuideLayout'
export const meta = {
title: 'Openfort Kit Button',
description: 'Learn how to use and customize the OpenfortKitButton component for seamless user login and onboarding.',
subtitle: 'All your users need to login with Openfort.',
}
To use the Openfort Kit Button, you will need to use the `OpenfortKitButton` component. This component will render a button that will open the Openfort login screen when clicked.
```jsx
import { OpenfortKitButton } from '@openfort/openfort-kit';
function App() {
return (
);
};
```
This button will use the default configuration of the Openfort Kit, but you can customize the theme properties of the button.
There are other customization properties:
- `showAvatar`: Show the avatar of the user
- `showBalance`: Show the balance of the user
- `label`: The label of the button when the user is not connected
The `OpenfortKitButton` component also provides a `onClick` callback that will be called when the user clicks the button.
export const Page = ({ children }) =>
export default Page
---
File: /pages/products/kit/react/setup/custom-ui.mdx
---
import Layout from '@/layouts/DefaultGuideLayout'
export const meta = {
title: 'Customize the Openfort UI',
description: 'Learn how to personalize the appearance and user experience of the Openfort login screen using theming and customization options.',
subtitle: 'Customize the look and feel of the Openfort login screen.',
}
```jsx
{/* Your app here */}
```
## More customization
Openfort Kit uses ConnectKit, and offers the same theming and customization options. You can edit fonts, colors, and other styling via the theme and customTheme props. For detail, see the [ConnectKit docs](https://docs.family.co/connectkit/customization).
export const Page = ({ children }) =>
export default Page
---
File: /pages/products/kit/react/setup/index.mdx
---
import Layout from '@/layouts/DefaultGuideLayout'
export const meta = {
title: 'Configuration',
description: 'Learn how to customize and configure Openfort Kit for your application needs.',
subtitle: 'Configure Openfort Kit for your application',
}
In this guide, we will show you how to use the Openfort Kit configuration to customize the look and feel of the Openfort login screen, configure your signer and more.
To learn more about the provider configuration, go to the [provider configuration page](/docs/products/kit/react/setup/provider).
This is a full example of how to use the `OpenfortKitProvider` with password authentication and a `retro` theme, using `beamTestnet` and `polygonAmoy` chains.
```jsx
import React from 'react';
import { QueryClient, QueryClientProvider } from '@tanstack/react-query';
import { AuthProvider, OpenfortKitProvider, RecoveryMethod, getDefaultConfig } from '@openfort/openfort-kit';
import { beamTestnet, polygonAmoy } from 'viem/chains';
import { WagmiProvider, createConfig } from 'wagmi';
import CustomLogo from './CustomLogo';
const config = createConfig(
getDefaultConfig({
appName: 'OpenfortKit Next.js demo',
chains: [beamTestnet, polygonAmoy],
walletConnectProjectId: process.env.NEXT_PUBLIC_WALLET_CONNECT_PROJECT_ID!,
})
);
const queryClient = new QueryClient();
export const Web3Provider = ({ children }: { children: React.ReactNode }) => {
return (
{
console.log('onConnect', params);
}}
onDisconnect={() => {
console.log('onDisconnect');
}}
options={{
// You can customize the logo of your app
logo: (),
// Set the auth providers you want to use
authProviders: [
AuthProvider.GUEST,
AuthProvider.EMAIL,
AuthProvider.GOOGLE,
AuthProvider.TWITTER,
AuthProvider.FACEBOOK,
AuthProvider.WALLET,
],
// Set the chain id you want to use, by default it will use the first chain
initialChainId: polygonAmoy.id,
// Skip the email verification, useful for testing
skipEmailVerification: true,
// Other useful options
overlayBlur: 2.5,
hideTooltips: true,
}}
// Set the theme of the OpenfortKit
theme="retro"
>
{children}
);
};
```
## OpenfortKitButton
The button component that will allow your users to connect to Openfort.
To learn more about the `OpenfortKitButton` component, go to the [button configuration page](/docs/products/kit/react/setup//button).
```jsx
import { OpenfortKitButton } from '@openfort/openfort-kit';
function App() {
return (
);
};
```
export const Page = ({ children }) =>
export default Page
---
File: /pages/products/kit/react/setup/provider.mdx
---
import Layout from '@/layouts/DefaultGuideLayout'
export const meta = {
title: 'OpenfortKitProvider Configuration',
description: 'Learn how to configure and customize the OpenfortKitProvider component for your application.',
subtitle: 'Configure Openfort Kit Provider for your application.',
}
Openfort Kit Provider is the main component that you will use to wrap your application. It will provide the context to all the components that need to interact with the Openfort Kit.
It has the following props:
- `publishableKey`: The Openfort publishable key. You can get it from the [Openfort dashboard](https://dashboard.openfort.io/developers/configuration/api-keys).
- `walletConfig`: Configuration for the Fort wallet. It is explained in the [Wallet Configuration](#wallet-configuration) section.
- `theme`: The theme to be used, default is 'auto'. Learn more about themes in the [Custom UI](/docs/products/kit/react/setup/custom-ui) guide.
- `mode`: The theme mode to be used, default is 'auto'.
- `customTheme`: Custom theme configuration.
- `options`: Additional configuration options. It is explained in the [Options Configuration](#options-configuration) section.
- `onConnect`: Callback function to be called on connect.
- `onDisconnect`: Callback function to be called on disconnect.
- `debugMode`: Enable or disable debug mode, default is false.
## Options Configuration
In this section we will describe the most important properties of the `options` object.
### Auth Providers
The `authProviders` property is an array of `AuthProvider` authentication providers.
Currently, the following providers are supported:
- Guest
- Email
- Wallet
- Google
- Facebook
- Twitter
Social login like Google, Facebook, and Twitter require some additional configuration to let Openfort know about your app. You can find more information in the [Social login](/docs/configuration/social-login) guide.
### Disclaimer
There are two ways to configure the disclaimer, you can either set the terms of service and privacy policy URLs:
- `privacyPolicyUrl`: The privacy policy URL.
- `termsOfServiceUrl`: The terms of service URL.
or customize the disclaimer component:
- `disclaimer`: A disclaimer to be shown in the wallet.
### Other options
- `skipEmailVerification`: Skip email verification. Useful for testing.
- `enforceSupportedChains`: This will enforce the supported chains, it will open the modal until the user selects a supported chain.
- `logo`: The logo to be shown in the wallet.
- `openfortUrlOverrides`: The Openfort URL overrides.
- `hideBalance`: Hide the balance in the wallet.
- `hideTooltips`: Hide the tooltips in the wallet.
- `hideRecentBadge`: Hide the recent badge in the wallet.
- `walletConnectCTA`: Show the WalletConnect CTA as a link, modal or both.
- `avoidLayoutShift`: Avoid layout shift when the wallet is loaded.
- `embedGoogleFonts`: Embed Google Fonts in the wallet.
- `truncateLongENSAddress`: Truncate long ENS addresses.
- `walletConnectName`: The name to be used for WalletConnect.
- `reducedMotion`: Enable reduced motion.
- `bufferPolyfill`: Enable buffer polyfill.
- `customAvatar`: Custom avatar component.
- `initialChainId`: The initial chain ID.
- `overlayBlur`: The overlay blur.
## Wallet Configuration
In this section we will describe the properties of the `walletConfig` object.
### How will the user sign transactions?
There are two ways to configure the signer, you can either use the **embedded signer** - a non-custodial signer provided by Openfort - or have the user sign transactions with a **web3 provider**.
### Embedded Signer
If you are using the embedded signer, you will need to set the following properties:
- `createEmbeddedSigner`: Set to `true` to use the embedded signer.
- `embeddedSignerConfiguration`: The configuration for the embedded signer. Explained in the [following](#embedded-signer-configuration) section.
### Embedded Signer Configuration
The most important properties of the `embeddedSignerConfiguration` object are:
- `shieldPublishableKey`: This is the publishable key of the shield. You can get it from the [Openfort dashboard](https://dashboard.openfort.io/developers/configuration/api-keys).
- `recoveryMethod`: The recovery method you want to use. Currently, the following methods are supported:
- `RecoveryMethod.AUTOMATIC`
- `RecoveryMethod.PASSWORD`
If you need help deciding which method to use, check the [embedded signer](/docs/products/kit/react/signer/recovery) guide.
- `ethereumProviderPolicyId`: Optional policy ID when they use the Embedded Signer. This can be used to sponsor the gas fees for your users. Create one using [Openfort dashboard](/docs/development/sponsor-rules). Learn more about [sponsoring gas fees](/docs/products/kit/react/smart-wallet/send#transactions).
### Automatic Recovery
If you use automatic recovery, you will need a **backend service** to create an encryption session for the user. This endpoint should be protected and only accessible by the user who is requesting the encryption session (i.e. the user who is logging in).
For example, in a Next.js API route, you can create an endpoint like this:
```ts protected-create-encryption-session.ts
import openfort from './openfortAdminConfig';
export default async function handler(
req: NextApiRequest,
res: NextApiResponse
) {
const session = await openfort.registerRecoverySession('YOUR_SHIELD_PUBLISHABLE_KEY', 'YOUR_SHIELD_SECRET_KEY', 'YOUR_SHIELD_ENCRYPTION_SHARE')
res.status(200).send({
session: session,
});
}
```
```ts openfortAdminConfig.ts
import Openfort from '@openfort/openfort-node';
const openfort = new Openfort('YOUR_OPENFORT_SECRET_KEY');
export default openfort;
```
In the `embeddedSignerConfiguration` you will need to specify one of the following properties:
- `createEncryptedSessionEndpoint`: the URL of the endpoint you created
- `getEncryptedSession`: the function that will return the encrypted session.
{/* TODO: ADD EXAMPLES */}
### Password Recovery
If you use password recovery, you can set the `shieldEncryptionKey` property with the encryption key to encrypt the recovery data.
You can also create a backend service, the same way as with automatic recovery instead of setting the `shieldEncryptionKey` property.
{/* TODO: ADD EXAMPLES */}
### Web3 Provider
If you don't want to use the embedded signer, you can use a web3 provider. You will need to enable `AuthProvider.Wallet` in the `authProviders` array, and make the users sign transactions with their web3 provider:
- `linkWalletOnSignUp`: This will ensure that the user links their wallet on sign up.
export const Page = ({ children }) =>
export default Page
---
File: /pages/products/kit/react/setup/wagmi.mdx
---
import Layout from '@/layouts/DefaultGuideLayout'
export const meta = {
title: 'Wagmi configuration',
subtitle: 'Configure Wagmi',
}
Openfort Kit uses [wagmi](https://wagmi.sh/) internally and therefore it's possible to use hooks from wagmi to fetch data such as info about the connected account.
Here is an example of how you can set up the wagmi configuration:
```jsx
const config = createConfig(
getDefaultConfig({
// Your dApps chains
chains: [mainnet],
transports: {
// RPC URL for each chain
[mainnet.id]: http(
`https://eth-mainnet.g.alchemy.com/v2/${process.env.NEXT_PUBLIC_ALCHEMY_ID}`,
),
},
// Required API Keys
walletConnectProjectId: process.env.NEXT_PUBLIC_WALLETCONNECT_PROJECT_ID,
// Required App Info
appName: "Your App Name",
// Optional App Info
appDescription: "Your App Description",
appUrl: "https://openfort.io", // your app's url
appIcon: "https://openfort.io/logo.png", // your app's icon, no bigger than 1024x1024px (max. 1MB)
}),
);
```
export const Page = ({ children }) =>
export default Page
---
File: /pages/products/kit/react/signer/advanced/iframe.mdx
---
import Layout from '@/layouts/DefaultGuideLayout'
import Iframe from '@/common/guides/wallets/signer/advanced/iframe.mdx'
export const meta = {
title: 'iframe Service',
description: 'Learn how to set up and manage your own secure iframe service for embedded signers',
subtitle: 'Deploy and integrate a custom iframe service for key management',
canonical: 'https://openfort.io/products/embedded-wallet/javascript/signer/advanced/iframe'
}
export const Page = ({ children }) =>
export default Page
---
File: /pages/products/kit/react/signer/advanced/shield.mdx
---
import Layout from '@/layouts/DefaultGuideLayout'
import Shield from '@/common/guides/wallets/signer/advanced/shield.mdx'
export const meta = {
title: 'Shield (automatic recovery)',
description: 'Use Openfort embedded signer to seamlessly create non-custodial smart accounts for your players.',
subtitle: 'Self-host and manage your own Shield service for automatic wallet recovery',
canonical: 'https://openfort.io/products/embedded-wallet/javascript/signer/advanced/shield'
}
export const Page = ({ children }) =>
export default Page
---
File: /pages/products/kit/react/signer/advanced.mdx
---
import Layout from '@/layouts/DefaultGuideLayout'
import Advanced from '@/common/guides/wallets/signer/advanced.mdx'
export const meta = {
title: 'Advanced (self-hosted)',
description: 'Learn advanced configuration options for embedded signers, including self-hosting and custom setups.',
subtitle: 'Customize and self-host your embedded signer implementation',
canonical: 'https://openfort.io/products/embedded-wallet/javascript/signer/advanced'
}
export const Page = ({ children }) =>
export default Page
---
File: /pages/products/kit/react/signer/export-key.mdx
---
import Layout from '@/layouts/DefaultGuideLayout'
import ExportKey from '@/common/guides/wallets/signer/export-key.mdx'
export const meta = {
title: 'Exporting the embedded signer',
description: 'Learn how to securely export and backup private keys from embedded wallets',
subtitle: 'Enable users to export and backup their wallet private keys',
canonical: 'https://openfort.io/products/embedded-wallet/javascript/signer/export-key'
}
export const Page = ({ children }) =>
export default Page
---
File: /pages/products/kit/react/signer/recovery.mdx
---
import Layout from '@/layouts/DefaultGuideLayout'
import SignerRecovery from '@/common/guides/wallets/signer/recovery.mdx'
export const meta = {
title: 'Create and recover wallets',
description: 'Create and manage embedded wallets for your users',
subtitle: 'Set up secure wallet creation and recovery processes',
canonical: 'https://openfort.io/products/embedded-wallet/javascript/signer/recovery'
}
export const Page = ({ children }) =>
export default Page
---
File: /pages/products/kit/react/signer/sign-messages.mdx
---
import Layout from '@/layouts/DefaultGuideLayout'
import SignMessages from '@/common/guides/wallets/signer/sign-messages.mdx'
export const meta = {
title: 'Sign messages',
description: 'Learn how to implement message signing with embedded signers',
subtitle: 'Enable secure message signing in your application',
canonical: 'https://openfort.io/products/embedded-wallet/javascript/signer/sign-messages'
}
export const Page = ({ children }) =>
export default Page
---
File: /pages/products/kit/react/signer/update-recovery.mdx
---
import Layout from '@/layouts/DefaultGuideLayout'
import SignerUpdateRecovery from '@/common/guides/wallets/signer/update-recovery.mdx'
export const meta = {
id: 'auth',
title: 'Update recovery method',
description: 'Switch between different recovery methods',
subtitle: 'Manage and upgrade wallet recovery options',
canonical: 'https://openfort.io/products/embedded-wallet/javascript/signer/update-recovery'
}
export const Page = ({ children }) =>
export default Page
---
File: /pages/products/kit/react/smart-wallet/advanced/session-keys.mdx
---
import Layout from '@/layouts/DefaultGuideLayout'
import SessionKeys from '@/common/guides/wallets/smart-wallet/advanced/session-keys.mdx'
export const meta = {
id: 'session-keys',
title: 'Using session keys',
description: 'Learn how to implement and manage session keys for temporary wallet access and permissions.',
subtitle: 'Create, manage and configure session keys for controlled wallet access',
tocVideo: 'rh2E02PATlU',
canonical: 'https://openfort.io/products/embedded-wallet/javascript/smart-wallet/advanced/session-keys'
}
export const Page = ({ children }) =>
export default Page
---
File: /pages/products/kit/react/smart-wallet/advanced/sign-custodial.mdx
---
import Layout from '@/layouts/DefaultGuideLayout'
import SignCustodial from '@/common/guides/wallets/smart-wallet/advanced/sign-custodial.mdx'
export const meta = {
id: 'smart',
title: 'Sign messages with custodial wallets',
canonical: 'https://openfort.io/products/embedded-wallet/javascript/smart-wallet/advanced/sign-custodial'
}
export const Page = ({ children }) =>
export default Page
---
File: /pages/products/kit/react/smart-wallet/advanced/social-recovery.mdx
---
import Layout from '@/layouts/DefaultGuideLayout'
import SocialRecovery from '@/common/guides/wallets/smart-wallet/advanced/social-recovery.mdx'
export const meta = {
title: 'Use Social Recovery',
description: 'Learn how to emable social recovery',
subtitle: 'Learn how to set up social recovery in your game.',
tocVideo: 'E8e1pklBbgw',
canonical: 'https://openfort.io/products/embedded-wallet/javascript/smart-wallet/advanced/social-recovery'
}
export const Page = ({ children }) =>
export default Page
---
File: /pages/products/kit/react/smart-wallet/advanced/transfer-ownership.mdx
---
import Layout from '@/layouts/DefaultGuideLayout'
import TransferOwnership from '@/common/guides/wallets/smart-wallet/advanced/transfer-ownership.mdx'
export const meta = {
title: 'Transfer the owner of an account',
description:
'Learn how to transfer the ownership of an Openfort smart contract.',
subtitle: 'Learn how to transfer ownership of a smart account.',
tocVideo: 'xBzl8hk__P8',
canonical: 'https://openfort.io/products/embedded-wallet/javascript/smart-wallet/advanced/transfer-ownership'
}
export const Page = ({ children }) =>
export default Page
---
File: /pages/products/kit/react/smart-wallet/guides/bridge.mdx
---
import Layout from '@/layouts/DefaultGuideLayout'
import Bridge from '@/common/guides/wallets/smart-wallet/guides/bridge.mdx'
export const meta = {
title: 'Relay.link integration',
description: 'Learn how to bridge tokens in your game.',
subtitle: 'Learn how to implement bridging in your app.',
canonical: 'https://openfort.io/products/embedded-wallet/javascript/smart-wallet/guides/bridge'
}
export const Page = ({ children }) =>
export default Page
---
File: /pages/products/kit/react/smart-wallet/guides/exchange.mdx
---
import Layout from '@/layouts/DefaultGuideLayout'
import Exchange from '@/common/guides/wallets/smart-wallet/guides/exchange.mdx'
export const meta = {
title: 'Uniswap V3 integration',
description: 'Learn how to swapping tokens in your game.',
subtitle: 'Learn how to implement swaps in your app.',
canonical: 'https://openfort.io/products/embedded-wallet/javascript/smart-wallet/guides/exchange'
}
export const Page = ({ children }) =>
export default Page
---
File: /pages/products/kit/react/smart-wallet/funding.mdx
---
import Layout from '@/layouts/DefaultGuideLayout'
import Funding from '@/common/guides/wallets/smart-wallet/funding.mdx'
export const meta = {
title: 'Funding wallets',
description: 'Simplify onnramping funds to your embedded wallet.',
subtitle: 'Simplify onnramping funds to your embedded wallet.',
canonical: 'https://openfort.io/products/embedded-wallet/javascript/smart-wallet/funding'
}
export const Page = ({ children }) =>
export default Page
---
File: /pages/products/kit/react/smart-wallet/handling-networks.mdx
---
import Layout from '@/layouts/DefaultGuideLayout'
import HandlingNetworks from '@/common/guides/wallets/smart-wallet/handling-networks.mdx'
export const meta = {
id: 'smart-wallets',
title: 'Handling networks',
canonical: 'https://openfort.io/products/embedded-wallet/javascript/smart-wallet/handling-networks'
}
export const Page = ({ children }) =>
export default Page
---
File: /pages/products/kit/react/smart-wallet/index.mdx
---
import Layout from '@/layouts/DefaultGuideLayout'
import SmartWallet from '@/common/guides/wallets/smart-wallet/index.mdx'
export const meta = {
id: 'auth',
title: 'Using smart wallets',
description: 'Learn how to configure and use smart wallets',
subtitle: 'Configure embedded wallets and manage SDK states',
canonical: 'https://openfort.io/products/embedded-wallet/javascript/smart-wallet'
}
export const Page = ({ children }) =>
export default Page
---
File: /pages/products/kit/react/smart-wallet/libraries.mdx
---
import Layout from '@/layouts/DefaultGuideLayout'
import Libraries from '@/common/guides/wallets/smart-wallet/libraries.mdx'
export const meta = {
title: 'Integrating with web3 libraries',
description: 'Using web3 libraries to interact with wallets and smart contracts.',
subtitle: 'Using web3 libraries to interact with wallets and smart contracts.',
canonical: 'https://openfort.io/products/embedded-wallet/javascript/smart-wallet/libraries'
}
export const Page = ({ children }) =>
export default Page
---
File: /pages/products/kit/react/smart-wallet/send.mdx
---
import Layout from '@/layouts/DefaultGuideLayout'
import Send from '@/common/guides/wallets/smart-wallet/send.mdx'
export const meta = {
title: 'Requesting signatures and transactions',
description: 'Learn how to request signatures and transactions from smart wallets',
subtitle: 'Learn how to request signatures and transactions from smart wallets',
canonical: 'https://openfort.io/products/embedded-wallet/javascript/smart-wallet/send'
}
export const Page = ({ children }) =>
export default Page
---
File: /pages/products/kit/react/create-react-app.mdx
---
import Layout from '@/layouts/DefaultGuideLayout'
export const meta = {
title: 'Create Openfort App',
description: 'Learn how to set up and customize your Openfort-powered React app, including appearance, branding, and authentication options.',
subtitle: 'Easily configure and launch your Openfort login experience.',
}
Welcome to the Openfort app crestor! Follow the prompts to set up your project in React.
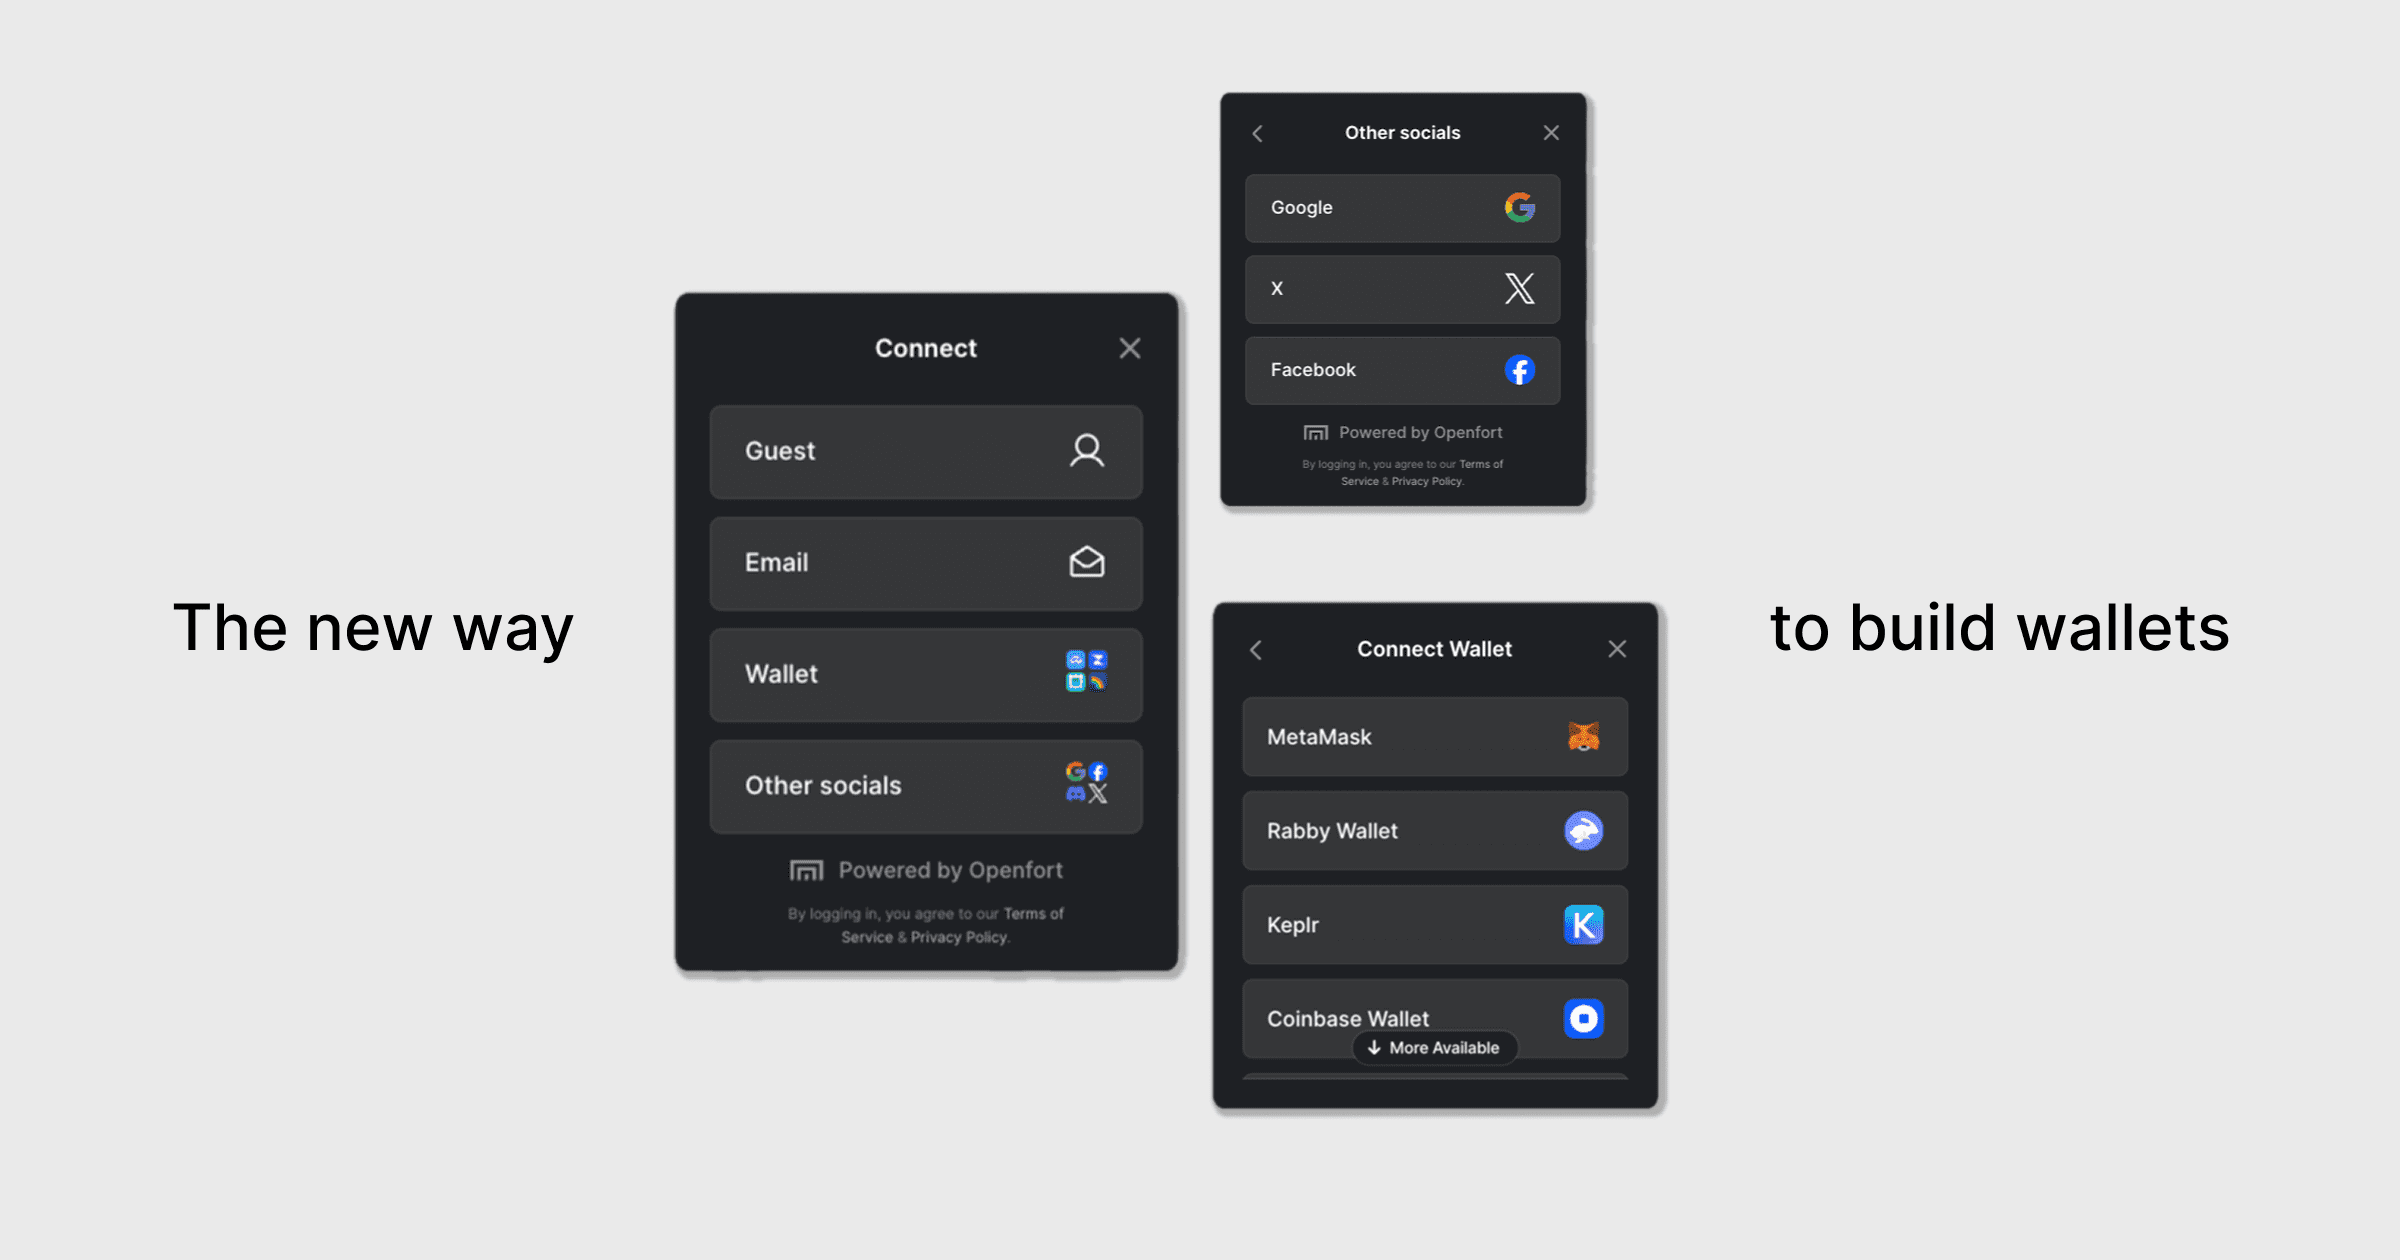
### Openfort Kit CLI
The Openfort Kit CLI is a command line tool that helps you quickly set up a new Openfort project with all the necessary dependencies and configurations. It allows you to customize your project by selecting different options during the setup process. You can select across:
- Framework: (Vue or Next.js)
- Auth providers: (email, socials, etc.)
- Wallet recovery method
- Theming
Simply run the following command to get started:
```sh Terminal
yarn create openfortkit
```
and follow the prompts!
export const Page = ({ children }) =>
export default Page
---
File: /pages/products/kit/react/index.mdx
---
import Layout from '@/layouts/DefaultGuideLayout'
export const meta = {
title: 'Authentication UI and Wallet Connector',
description: 'Get started with Openfort’s authentication UI elements and wallet connector to onboard users across web2 and web3 seamlessly.',
subtitle: 'Quickly integrate flexible authentication for your app.',
tocVideo: 'h__PUjSlkP4',
}
**With Openfort Kit, your app can authenticate users across web2 and web3 accounts, including:**
- **Email**, via password recovery
- **Wallet**: via Sign In With Ethereum ([SIWE](https://eips.ethereum.org/EIPS/eip-4361)) standard
- **Web2 social accounts**: via [OAuth2.0 Protocol](https://oauth.net/2/) (Google, Facebook, Twitter, Discord & more.)
You will get out of the box support for:
1. Simple UX — Give users a simple, attractive experience.
2. Multiple login methods - Email, Social, WalletConnect, and more.
3. Non-custodial embedded signer - Secure, self-custodied signing without complexity
4. Connection with Web3 wallets
5. Beautiful Themes - Predesigned themes or full customization
export const Page = ({ children }) =>
export default Page
---
File: /pages/products/kit/react/quickstart.mdx
---
import Layout from '@/layouts/DefaultGuideLayout'
export const meta = {
title: 'Quickstart',
description: 'Follow this step-by-step guide to quickly set up Openfort authentication UI and wallet connector in your application.',
subtitle: 'Get started with authentication UI elements and a wallet connector.',
tocVideo: 'h__PUjSlkP4',
}
**[Openfort Kit](https://www.npmjs.com/package/@openfort/openfort-kit) is the easiest way to onboard your users onchain.**
## 1. Install
Start by installing [Openfort Kit](https://www.npmjs.com/package/@openfort/openfort-kit) and its peer dependencies using your package manager of choice:
```sh Terminal
npm install @openfort/openfort-kit wagmi viem@^2.22.0 @tanstack/react-query
```
```sh Terminal
yarn add @openfort/openfort-kit wagmi viem@^2.22.0 @tanstack/react-query
```
```sh Terminal
pnpm install @openfort/openfort-kit wagmi viem@^2.22.0 @tanstack/react-query
```
{/*
## 2. Set your auth providers
Navigate to the **auth providers** page on the [Openfort dashboard](https://dashboard.openfort.io) by selecting your project and then clicking Auth providers Methods in the side bar in the [players page](https://dashboard.openfort.io/players). Select the account types you'd like users to be able to login with. For more information on how to enable social logins, check out the [dashboard docs](/docs/configuration/social-login). */}
## 2. Get your API keys
In the [API keys](https://dashboard.openfort.io/developers/configuration/api-keys) section of [Openfort dashboard](https://dashboard.openfort.io), you will find:
- **Publishable Key**: Safe to expose in client-side environment
- **Secret Key**: Must be kept secure and used only server-side
To generate non-custodial wallets:
1. Scroll to the Shield section and click **Create Shield keys**
2. **Store the encryption share** safely when it appears (you'll only see it once)
3. You'll receive:
- **Shield Publishable Key**: Safe for client-side use
- **Shield Secret Key**: Keep secure, server-side only
You will also need a walletConnect project ID. You can get one by creating a project on the [WalletConnect dashboard](https://cloud.reown.com/sign-in).
## 3. Set up providers.
Set up providers for Wagmi, TanStack Query, and OpenfortKit.
To set up a config for Wagmi, we will use Wagmi's `createConfig` function with `@openfort/openfort-kit`'s `getDefaultConfig` function. This automatically sets up the Wagmi instance to support all chains and transports supported by Openfort. If you need more configuration go to the [Wagmi configuration guide](/docs/products/kit/react/setup//wagmi).
To set up `OpenfortKitProvider` we will need the publishable key from the Openfort dashboard, and the wallet configuration. More information on the wallet configuration can be found [here](/docs/products/kit/react/setup/provider).
```tsx Providers.tsx
'use client'
import React from 'react'
import { AuthProvider, OpenfortKitProvider, getDefaultConfig, RecoveryMethod } from '@openfort/openfort-kit';
import { QueryClient, QueryClientProvider } from '@tanstack/react-query'
import { WagmiProvider, createConfig } from 'wagmi'
import { polygonAmoy } from 'viem/chains'
const config = createConfig(
getDefaultConfig({
appName: 'OpenfortKit demo',
walletConnectProjectId: "YOUR_WALLET_CONNECT_PROJECT_ID",
chains: [polygonAmoy],
ssr: true, // Enable server-side rendering if needed
})
);
const queryClient = new QueryClient()
export function Providers({ children }: { children: React.ReactNode }) {
return (
{children}
)
}
```
Wrap your app in the `Providers` component.
```tsx App.tsx
import React from 'react'
import { Providers } from './Providers'
export default function App() {
return (
{/* Your app content */}
)
}
```
## 4. You're good to go!
Once you've configured your app, you can now use `OpenfortKitButton` to onboard your users.
```tsx page.tsx
import { OpenfortKitButton } from '@openfort/openfort-kit';
function App() {
return (
);
};
export default App;
```
## 5. Next steps
Now that you've set up Openfort Kit, you can explore more features and customization options:
- [Configuration](/docs/products/kit/react/setup/)
export const Page = ({ children }) =>
export default Page
---
File: /pages/products/kit/react/use-openfort.mdx
---
import Layout from '@/layouts/DefaultGuideLayout'
import UseOpenfort from '@/common/guides/wallets/use-openfort.mdx'
export const meta = {
id: 'features',
title: 'Using the Openfort SDKs',
description: 'Learn how to configure and use Openfort SDKs in your JavaScript applications',
subtitle: 'Configure embedded wallets and manage SDK states',
canonical: 'https://openfort.io/products/embedded-wallet/javascript/use-openfort'
}
export const Page = ({ children }) =>
export default Page
---
File: /pages/products/kit/react/wallets.mdx
---
import Layout from '@/layouts/DefaultGuideLayout'
import WalletsOverview from '@/common/guides/wallets/overview.mdx'
export const meta = {
id: 'wallets',
title: 'Understanding wallets',
description: 'Learn about wallet functionality and implementation in JavaScript',
subtitle: 'Understanding the types of wallets in Openfort',
canonical: 'https://openfort.io/products/embedded-wallet/javascript/wallets'
}
export const Page = ({ children }) =>
export default Page
---
File: /pages/products/kit/react/white-label.mdx
---
import Layout from '@/layouts/DefaultGuideLayout'
export const meta = {
title: 'White Label',
description: 'Discover how to fully white-label and customize the Openfort login interface for your brand using openfort-js.',
subtitle: 'Tailor the Openfort experience to match your branding.',
}
## Openfort-js
To customize the look and feel of the Openfort login screen, you will need to use `openfort-js` to create a custom login screen.
With `openfort-js`, you will have access to `openfort` object and you will interact with it to customize the login screen, configure your signer and more.
To get started go to the Javascript documentation and follow the instructions to install `openfort-js` in your project.
Customize the look and feel of the Openfort login screen with `openfort-js`.
export const Page = ({ children }) =>
export default Page
---
File: /pages/products/cross-app-wallet/setup/react/branding.mdx
---
import Layout from '@/layouts/DefaultGuideLayout'
export const meta = {
title: 'Branding - Wallet SDK',
description: 'Learn how to customize the appearance and branding of your ecosystem wallet using the Openfort Wallet SDK.',
subtitle: 'Personalize your wallet’s look and feel for your ecosystem.',
}
When instantiating the **Client SDK**, you can pass in the `appearance` object to customize the appearance of the wallet. For wallet discovery, it will use [EIP-6963](https://eips.ethereum.org/EIPS/eip-6963) to embedded your branding.
The `appearance` object has the following properties:
- **icon**: a data url schema, compliant with [RFC-2397](https://www.rfc-editor.org/rfc/rfc2397).
- **logo**: a [URI](https://www.rfc-editor.org/rfc/rfc3986) pointing to an image. The image SHOULD be a square with 96x96px minimum resolution.
- **name**: a human-readable local alias of the Wallet Provider to be displayed to the user on the DApp. (e.g. `Example Wallet Extension` or `Awesome Example Wallet`)
- **reverseDomainNameSystem**: the Wallet MUST supply the `rdns` property which is intended to be a domain name from the Domain Name System in reverse syntax ordering such as `com.example.subdomain`. It’s up to the Wallet to determine the domain name they wish to use, but it’s generally expected the identifier will remain the same throughout the development of the Wallet. It’s also worth noting that similar to a user agent string in browsers, there are times where the supplied value could be unknown, invalid, incorrect, or attempt to imitate a different Wallet. Therefore, the DApp SHOULD be able to handle these failure cases with minimal degradation to the functionality of the DApp.
When creating your **client SDK** you need to add the *ecosystem ID*. It can be found in their dashboard at the [settings section](https://dashboard.openfort.io/settings/project/overview).
The *ecosystemWalletDomain* is the domain where your wallet UI is hosted.
Therefore, when creating your wallet SDK, you can pass in the `appearance` object to customize the appearance of the wallet.
```ts index.ts
// Set your ecosystem id. Remember to switch to your live secret key in production.
// See your ecosystem id here: https://dashboard.openfort.io/settings/project/overview
import { AppMetadata, Client } from '@openfort/ecosystem-js/client'
class EcosystemWallet extends Client {
constructor(appMetadata?: AppMetadata) {
super({
// Optional App Info
appMetadata: appMetadata,
baseConfig: {
// URL where the UI wallet is hosted
ecosystemWalletDomain: 'https://wallet.ecosystem.com',
windowStrategy: 'iframe', // or 'popup'. Rendering strategy the wallet UI.
},
appearance: {
icon: 'data:image/png;base64,iVBORw0KGgoAAAANSUhEUgAAABAAAAAQCAYAAAFwF52RAAAACXBIWXMAAAsTAAALEwEAmpwYAAABpElEQVQ4jZ2Sv0vDUBTFf4f9Cg',
logo: 'https://www.example.com/logo.png',
name: 'Ecosystem Wallet',
reverseDomainNameSystem: 'com.example.ecosystem.wallet'
}
});
// Use a Proxy to allow for new method additions
return new Proxy(this, {
get: (target, prop) => {
if (prop in target) {
const value = target[prop as keyof EcosystemWallet];
return typeof value === 'function' ? value.bind(target) : value;
}
return undefined;
}
});
}
setPolicy(options?: { policy?: string; }): void {
return super.setPolicy(options);
}
}
export default EcosystemWallet;
```
You can check all the available components in the [Client SDK reference](/docs/reference/ecosystem-js/modules/client.html).
export const Page = ({ children }) =>
export default Page
---
File: /pages/products/cross-app-wallet/setup/react/dashboard.mdx
---
import Layout from '@/layouts/DefaultGuideLayout'
import DashboardCustomization from '@/common/guides/dashboard-customization.mdx'
export const meta = {
title: 'Ecosystem dashboard configuration',
description: 'Configure your ecosystem dashboard for project management, API keys, and child project onboarding with Openfort.',
subtitle: 'Manage your ecosystem and partners through the dashboard.',
}
export const Page = ({ children }) =>
export default Page
---
File: /pages/products/cross-app-wallet/setup/react/ecosystem-id.mdx
---
import Layout from '@/layouts/DefaultGuideLayout'
export const meta = {
title: 'Onboard your ecosystem partners',
description: 'Learn how to onboard new projects and partners to your ecosystem wallet using the Openfort dashboard.',
subtitle: 'Invite and manage partners for your custom wallet ecosystem.',
}
After you've created your own ecosystem SDK and registered the npm package. You're now ready to onboard new projects and partners and let them use your new ecosystem wallet.
Through the dashboard, you're able to create `child_projects` under your ecosystem, given it a name, and head to the members section to invite their emails.
-----
Each child project will have their own API keys as well as capabilities to manage smart contracts, users, and gas policies. An ecosystem can decide to share multiple `contract_id` and `policy_id` with child projects in order to take advantage of gas policy campaigns or ecosystem assets like ERC20 tokens.
export const Page = ({ children }) =>
export default Page
---
File: /pages/products/cross-app-wallet/setup/react/login-methods.mdx
---
import Layout from '@/layouts/DefaultGuideLayout'
export const meta = {
title: 'Configure login methods (OpenfortProvider)',
description: 'Set up and customize login methods for your ecosystem wallet, including social, wallet, and custom providers.',
subtitle: 'Enable flexible authentication for your ecosystem wallet.',
}
This guide applies if you're using **Openfort** as your signer and account system.
Openfort supports a variety of login methods for your app, including email, phone, wallet, Google, Apple, Twitter, Discord, Epic Games, Line, Telegram, and more coming.
Users can either use these account types as their upfront login method, or can link them to their profile after logging in via a different method.
## Configure login methods in the SDK
The login methods you enable in the Openfort Dashboard should contain all of the account types that users are allowed to login with or link in your app. You can choose a subset (or all) of these account types as upfront login methods shown to users when they first login to your app.
Learn more about configuring your authentication methods in the [auth guide](/docs/configuration/social-login).
As soon as you enable each provider from your dashboard, it will automatically appear as an option in the authentication page.
Complete sample using Openfort as an authentication provider for the ecosystem wallet.
## Using a custom auth provider
Openfort's ecosystem wallets are fully-compatible with any authentication provider that supports JWT-based, stateless authentication.
- Use a custom authentication provider (easy to integrate alongside your existing stack).
Complete sample using Firebase as an authentication provider for the ecosystem wallet.
export const Page = ({ children }) =>
export default Page
---
File: /pages/products/cross-app-wallet/setup/react/quickstart.mdx
---
import Layout from '@/layouts/DefaultGuideLayout'
export const meta = {
title: 'Quickstart your wallet',
description: 'Learn how to create and configure your own ecosystem wallet using Openfort SDK',
subtitle: 'Build and launch your custom ecosystem wallet'
}
This guide and the `configuration` sections are to help developers launch their own ecosystem wallet. If you're looking to use an existing ecosystem wallet SDK, please refer to the `usage` section and install the specific ecosystem package.
The [**Ecosystem SDK**](https://www.npmjs.com/package/@openfort/ecosystem-js) is the easiest way to create your ecosystem wallet. It comes with a [code-splitting environment](https://developer.mozilla.org/en-US/docs/Glossary/Code_splitting), all the necessary tools to make **your wallet SDK** a reality. It is the easier way to create your own ecosystem wallet.
The Ecosystem SDK has **two main parts**:
1. `@openfort/ecosystem-js/client`: The **Client SDK** that you will use to create your wallet SDK.
2. `@openfort/ecosystem-js/core`: The **Core SDK** that you will use to create your wallet UI. Fort also includes a React specific package `@openfort/ecosystem-js/react` that you can use to get started faster.
When you finish this quickstart, this is what you will have:
## 0. Requirements
Your project will need some specific configuration to enable code splitting:
- [Typescript version 5.0.2](https://github.com/microsoft/TypeScript/releases/tag/v5.0.2) or higher.
- TS Config needs to have `compilerOptions.moduleResolution` set to `bundler`.
- Your code editor and project should have the same version of Typescript.
We'll be needed 2 main projects to create your **Ecosystem SDK**:
- **Wallet SDK**: This is the SDK that developers will use to integrate your wallet into their applications.
- **Wallet UI**: This is the UI that users will interact with when using your wallet.
## 1. Install the ecosystem SDK
Under your **`wallet SDK folder`**, install the latest version of [Ecosystem SDK](https://www.npmjs.com/package/@openfort/ecosystem-js) using your package manager of choice:
You will need to install `@openfort/ecosystem-js` at both your wallet SDK and wallet UI projects.
```sh Terminal
npm install @openfort/ecosystem-js
```
```sh Terminal
yarn add @openfort/ecosystem-js
```
## 2. Creating your wallet SDK
This is how developers will make your wallet available in their application.

The easiest way to get started is to create a [Proxy](https://developer.mozilla.org/en-US/docs/Web/JavaScript/Reference/Global_Objects/Proxy) object in order to map the already provided functionality of the **Client SDK**. You can nevertheless change or add new methods to fit your needs.
```tsx main.ts
import { AppMetadata, Client } from "@openfort/ecosystem-js/client";
class EcosystemWallet extends Client {
// optional constructor arguments developers can pass to the wallet for UI customization (e.g. logo, name, etc.) https://openfort.io/docs/reference/ecosystem-js/interfaces/client.AppMetadata.html
constructor(appMetadata?: AppMetadata) {
super({
baseConfig: {
// URL where the wallet UI is hosted:
ecosystemWalletDomain: 'https://id.sample.openfort.xyz',
windowStrategy: 'iframe', // or 'popup'. Rendering strategy the wallet UI.
},
appMetadata,
// Optional App Info
appearance: {
icon: 'data:image/....', // a data url schema, compliant with RFC-2397.
logo: 'https://purple-magnificent-bat-958.mypinata.cloud/ipfs/QmfQrh2BiCzugFauYF9Weu9SFddsVh9qV82uw43cxH8UDV', // a URI pointing to an image. The image SHOULD be a square with 96x96px minimum resolution.
name: 'Ecosystem Wallet Name', // human-readable local alias of the Wallet Provider
reverseDomainNameSystem: 'com.openfort.ecosystem.wallet', // domain name from the Domain Name System in reverse syntax
}
});
return new Proxy(this, {
get: (target, prop) => {
if (prop in target) {
const value = target[prop as keyof EcosystemWallet];
return typeof value === 'function' ? value.bind(target) : value;
}
return undefined;
}
});
}
}
export default EcosystemWallet;
```
```json package.json
{
"name": "@ecosystem/wallet",
"version": "0.0.1",
"main": "dist/index.js",
"module": "dist/index.mjs",
"types": "dist/index.d.ts",
"exports": {
".": {
"import": "./dist/index.mjs",
"require": "./dist/index.js",
"types": "./dist/index.d.ts"
}
},
"scripts": {
"build": "tsup src/index.ts --format cjs,esm --dts",
"prepublishOnly": "npm run build"
},
"keywords": [],
"author": "Openfort (https://www.openfort.xyz)",
"devDependencies": {
"@types/node": "^20.4.5",
"tsup": "^7.1.0",
"typescript": "^5.6.2"
},
"dependencies": {
"@openfort/ecosystem-js": "0.1.8"
},
"files": [
"dist"
]
}
```
```json tsconfig.json
{
"compilerOptions": {
"target": "ES2022",
"module": "ESNext",
"moduleResolution": "bundler",
"lib": ["ES2022", "DOM"],
"declaration": true,
"declarationMap": true,
"sourceMap": true,
"outDir": "./dist",
"rootDir": "./src",
"strict": true,
"esModuleInterop": true,
"skipLibCheck": true,
"forceConsistentCasingInFileNames": true,
"isolatedModules": true,
"resolveJsonModule": true
},
"include": ["src/**/*"],
"exclude": ["node_modules", "dist", "**/*.spec.ts"]
}
```
You're all set! By running the `build` script you'll get a `dist` folder with the compiled code. You can now publish your package to [npm](https://www.npmjs.com/) and share it with the world.
You can check all the available client methods in the [Client SDK reference](/docs/reference/ecosystem-js/classes/client.Client.html).
Complete sample including auth, transactions and session keys.
## 3. Choose your key management and account system
The **Ecosystem SDK** is agnostic to the key management and transaction signing solution you choose to use, so you can use any wallet SDK you prefer.
The team behind the **Ecosystem SDK** has created also create an embedded signer solution that you can use to create non-custodial wallets, referred to as `OpenfortProvider`.
### 3.1. Setting up Openfort signer and auth management
Navigate to the **auth providers** page on the [Openfort dashboard](https://dashboard.openfort.io) by selecting your project and then clicking Auth providers Methods in the side bar in the [players page](https://dashboard.openfort.io/players). Select the account types you'd like users to be able to login with. For more information on how to enable social logins, check out the [dashboard docs](/docs/configuration/social-login).
From the [Openfort Dashboard](https://dashboard.openfort.io) for select your desired app, navigate to the [developers page](https://dashboard.openfort.io/developers/configuration/api-keys) in the top bar. On the de tab, find the API keys section. Get your Openfort API keys, you will need it in the next step.
You will find two keys:
- **Publishable Key**: This value can be safely exposed in a client-side environment.
- **Secret Key**: This value should never be exposed in a client-side environment. It should be kept secure and used only in a server-side environment. Learn more on how to use it in the [server-side guide](/docs/products/server). You can [further secure it](/docs/configuration/api-keys) for production applications.
To generate non custodial wallets, you will need to create a Shield instance. At the [API keys page](https://dashboard.openfort.io/developers/configuration/api-keys), scroll down to the Shield section and click on the **Create Shield keys** button.
A **one time pop-up** will appear with a variable called **encryption share**. Its very important that you store it safely. You will not be able to see it again.
Then, in your page, you will see two Shield keys:
- **Publishable Key**: This value can be safely exposed in a client-side environment.
- **Secret Key**: This value should never be exposed in a client-side environment.
## 4. Creating your wallet UI
The **wallet UI** is how information is shown to wallet users. Under your **`wallet UI folder`**, install the latest version of [Ecosystem SDK](https://www.npmjs.com/package/@openfort/ecosystem-js) using your package manager of choice. Remember to comply with the requirements to benefit from code splitting.
To make things more concrete, we'll be using `OpenfortProvider` as the key management and account system. You can use any other wallet SDK you prefer.
`@openfort/ecosystem-js` SDK comes with a set of pre-built **React** components that you can use to create your wallet UI. To learn how to customize it further, head to the [UI screens guide](/docs/products/cross-app-wallet/setup/react/wallet-ui).
In your project, import the **EcosystemProvider** component and wrap your app with it. Concretely, the `EcosystemProvider` must wrap any component or page that will use the Ecosystem SDK in your react app. It is generally recommended to render it as close to the root of your application as possible.
For example, in a [NextJS](https://nextjs.org/) or [Create React App](https://create-react-app.dev/) project, you may wrap your components like so:
### Install the required dependencies
```sh Terminal
npm install @openfort/ecosystem-js wagmi viem@2.x @tanstack/react-query
```
```sh Terminal
yarn add @openfort/ecosystem-js wagmi viem@2.x @tanstack/react-query
```
- TypeScript is optional, but highly recommended.
### Implementation
When creating your **client SDK** you need to add the *ecosystem ID*. It can be found in their dashboard at the [settings section](https://dashboard.openfort.io/settings/project/overview).
The *ecosystemWalletDomain* is the domain where your wallet UI is hosted.
```tsx index.tsx
// Set your publishable key, shield publishable key and ecosystem id. Remember to switch to your live secret key in production.
// See your keys here: https://dashboard.openfort.io/developers/configuration/api-keys
// See your ecosystem ID here: https://dashboard.openfort.io/settings/project/overview
import React from 'react';
import ReactDOM from 'react-dom/client';
import './index.css';
import App from './App';
import { BrowserRouter, useNavigate } from 'react-router-dom';
import { WagmiProvider } from 'wagmi';
import { QueryClientProvider } from '@tanstack/react-query';
import * as Wagmi from './lib/Wagmi';
import * as Query from './lib/Query'
import { EcosystemProvider, OpenfortProvider, RecoveryMethod } from '@openfort/ecosystem-js/react';
async function getShieldSession(accessToken:string):Promise {
// When using AUTOMATIC embedded signer recovery, an encryption session is required.
// Sample encryption session generation backend: https://github.com/openfort-xyz/ecosystem-sample/tree/main/wallet-ui/backend
const response = await fetch(`${process.env.REACT_APP_BACKEND_URL!}/api/protected-create-encryption-session`, {
method: 'POST',
headers: {
'Content-Type': 'application/json',
'Authorization': `Bearer ${accessToken}`
}
});
if (!response.ok) {
throw new Error('Failed to fetch shield session');
}
const data = await response.json();
return data.session;
}
const ProtectedRoute = ({ component, ...args }: any) => {
const Component = withAuthenticationRequired(component, {
onRedirecting: () => ,
});
return ;
};
export default function Providers({children}: {children: React.ReactNode}) {
const nav = useNavigate()
return (
{
nav({
pathname: appState?.to,
search: appState?.search
})
}}
theme='midnight'
supportedChains={[80002, 11155111, 84532, 28122024, 3939, 2358]}
logoUrl='https://purple-magnificent-bat-958.mypinata.cloud/ipfs/QmfQrh2BiCzugFauYF9Weu9SFddsVh9qV82uw43cxH8UDV'
>
{
return nav(appState?.returnTo || window.location.pathname);
}}
publishableKey={process.env.REACT_APP_OPENFORT_PUBLIC_KEY!}
// To choose your recovery method, set the recoveryMethod to either 'AUTOMATIC' or 'PASSWORD'
// Learn more about configure embedded signers: https://openfort.io/docs/products/kit/react/wallets/
embeddedSignerConfiguration={
{
shieldPublishableKey: process.env.REACT_APP_SHIELD_PUBLIC_KEY!,
recoveryMethod: RecoveryMethod.AUTOMATIC,
// If you're using AUTOMATIC recovery, you need to provide an encryption session.
// If you're only using PASSWORD recovery, you can remove this function.
getEncryptionSessionFn(getAccessToken) {
return getShieldSession(getAccessToken);
}
}
}
>
{children}
);
}
```
``` tsx App.tsx
import {
WalletGrantPermissions,
WalletSendCalls,
EthRequestAccounts,
EthSendTransaction,
EthSignTypedDataV4,
PersonalSign,
WalletShowCalls,
withAuthenticationRequired,
Settings,
UnsupportedMethod,
LoginMethods,
Recover
} from '@openfort/ecosystem-js/react';
import { Route, Routes } from 'react-router-dom';
import Loading from './Loading';
const ProtectedRoute = ({ component, ...args }: any) => {
const Component = withAuthenticationRequired(component, {
onRedirecting: () => ,
});
return ;
};
function App() {
return (
{/* Required endpoints for EIP-1193 methods */}
} />
} />
} />
} />
} />
} />
} />
} />
} />
} />
{/* OpenfortProvider specific methods for EmbeddedSigner recovery (password based) and authentication */}
} />
} />
);
}
export default App;
```
```tsx Loading.tsx
import { Layout } from '@openfort/ecosystem-js/react';
import React from 'react';
const Loading: React.FC = () => {
return (
// Not how its wrapped in the Layout component, to ensure the styles are applied
{/* Adding custom styles */}
);
};
export default Loading;
```
```ts lib/Wagmi.ts
// Configure your wagmi instance with the chains you want to support: https://wagmi.sh/react/guides/chain-properties
import { http, createConfig } from 'wagmi'
import { ancient8Sepolia, baseSepolia, polygonAmoy, sepolia, dosChainTestnet, kromaSepolia } from 'wagmi/chains'
export const config = createConfig({
chains: [polygonAmoy, baseSepolia, sepolia, ancient8Sepolia, dosChainTestnet, kromaSepolia],
transports: {
[polygonAmoy.id]: http(),
[baseSepolia.id]: http(),
[sepolia.id]: http(),
[ancient8Sepolia.id]: http(),
[dosChainTestnet.id]: http(),
[kromaSepolia.id]: http(),
},
})
declare module 'wagmi' {
interface Register {
config: typeof config
}
}
```
```ts lib/Query.ts
import { QueryClient } from '@tanstack/react-query'
export const client = new QueryClient({
defaultOptions: {
queries: {
gcTime: 1000 * 60 * 60 * 24, // 24 hours
retry: 0,
},
},
})
```
**Components:**
- Check all the available `OpenfortProvider` configuration methods at [OpenfortProvider SDK reference](/docs/reference/ecosystem-js/types/react.OpenfortProviderProps.html).
- Check all the available `EcosystemProvider` configuration methods at [EcosystemProvider SDK reference](/docs/reference/ecosystem-js/interfaces/react.EcosystemProviderProps.html).
### Configure Supported Chains
As you can see above, its required that you configure [Wagmi](https://wagmi.sh) and the chains you plan on enabling for your wallet as well as **supportedChains** in the `EcosystemProvider`.
Note that, to enable transaction simulation through asset changes, the **Ecosystem SDK** internally requires the [`eth_simulateV1`](https://github.com/ethereum/execution-apis/pull/484) [JSON-RPC method](https://github.com/ethereum/execution-apis/pull/484), so you will need to provide an RPC endpoint that supports this method (or disable simulation through the EcosystemProvider using `disableTransactionSimulation`).
Sample wallet UI with all the necessary screens.
export const Page = ({ children }) =>
export default Page
---
File: /pages/products/cross-app-wallet/setup/react/wallet-ui.mdx
---
import Layout from '@/layouts/DefaultGuideLayout'
export const meta = {
title: 'Craft and customize your wallet',
description: 'Design, configure, and extend the wallet UI for your Openfort ecosystem wallet, including routes and user experience.',
subtitle: 'Customize wallet screens and user flows for your brand.',
}
Openfort **ecosystem wallets** come with a default set of screens for authentication, session key confirmation, sign typed message, configuration, and transaction confirmation. These screens are designed to be customizable to fit your brand and user experience. Openfort provides helpers to the most popular frameworks to make it easier to integrate the ecosystem wallets.
## Wallet Routes
Whenever the users of a wallet make a request, this request is eventually received by the **Wallet UI** which is in charge of directing the user to the correct screen.
The **Wallet UI** expects the following routes to exist in your project:
| Route | Description |
|-------------------------------------|-------------------------------|
| /sign/personal-sign | personal_sign |
| /sign/eth-sign-typed-data-v-4 | eth_signTypedData_v4 |
| /sign/eth-send-transaction | eth_signTransaction |
| /sign/eth-request-accounts | eth_requestAccounts |
| /sign/wallet-show-calls | wallet_showCallsStatus |
| /sign/wallet-send-calls | wallet_sendCalls |
| /sign/wallet-grant-permissions | wallet_grantPermissions |
| / | Loading screen |
## Wallet Window Strategy
The `Ecosystem SDK` supports two window modes, `popup` and `iframe`, which can be configured through the prop `windowStrategy` when creating the wallet SDK with `@openfort/ecosystem-js/client`.
### iframe
The wallet is embedded in the page. In mobile no new tab is required to show the wallet action.
| DESKTOP | MOBILE |
|---------|--------|
| | |
### Popup
The wallet is opened in a new window both in mobile and desktop.
| DESKTOP | MOBILE |
|---------|--------|
| | |
Here's how the **windowStrategy** is set in the `Rapidfire ID` sample wallet:
```tsx index.tsx
import { AppMetadata, Client, ThirdPartyAuthProvider } from "@openfort/ecosystem-js/client";
class EcosystemWallet extends Client {
constructor(appMetadata?: AppMetadata) {
super({
baseConfig: {
ecosystemWalletDomain: 'https://id.sample.openfort.xyz',
windowStrategy: 'iframe',
},
appMetadata,
appearance: {
icon: 'data:image/...',
logo: 'https://purple-magnificent-bat-958.mypinata.cloud/ipfs/QmfQrh2BiCzugFauYF9Weu9SFddsVh9qV82uw43cxH8UDV',
name: 'Rapidfire ID',
reverseDomainNameSystem: 'com.rapidfire.id'
}
});
// Use a Proxy to allow for new method additions
return new Proxy(this, {
get: (target, prop) => {
if (prop in target) {
const value = target[prop as keyof EcosystemWallet];
return typeof value === 'function' ? value.bind(target) : value;
}
return undefined;
}
});
}
authenticate(token: string) {
return super.authenticateWithThirdPartyProvider({ token: token, provider: ThirdPartyAuthProvider.FIREBASE });
}
// Add new methods here
setPolicy(options?: { policy?: string; }): void {
return super.setPolicy(options);
}
}
export default EcosystemWallet;
```
Complete sample setting the `windowStrategy` in the client SDK.
## Wallet UI Customization
The `Ecosystem SDK` uses ConnectKit themes, and offers the same theming and customization options. You can edit fonts, colors, and other styling via the **theme** and **customTheme** props of `EcosystemProvider`. For more detail on themes, see the [ConnectKit docs](https://docs.family.co/connectkit/customization).
export const Page = ({ children }) =>
export default Page
---
File: /pages/products/cross-app-wallet/setup/rpc/eth_accounts.mdx
---
import Layout from '@/layouts/DefaultGuideLayout'
import Ethaccounts from '@/common/guides/rpc/eth_accounts.mdx'
export const meta = {
id: 'eth_accounts',
title: 'eth_accounts',
description: 'Returns an array of all connected Account addresses.',
subtitle: 'Retrieve connected account addresses from the wallet.',
}
export const Page = ({ children }) =>
export default Page
---
File: /pages/products/cross-app-wallet/setup/rpc/eth_requestAccounts.mdx
---
import Layout from '@/layouts/DefaultGuideLayout'
import EthrequestAccounts from '@/common/guides/rpc/eth_requestAccounts.mdx'
export const meta = {
id: 'eth_requestAccounts',
title: 'eth_requestAccounts',
description: 'Requests access to Account addresses.',
subtitle: 'Connect an application to a wallet and request account access.',
}
export const Page = ({ children }) =>
export default Page
---
File: /pages/products/cross-app-wallet/setup/rpc/eth_sendTransaction.mdx
---
import Layout from '@/layouts/DefaultGuideLayout'
import EthsendTransaction from '@/common/guides/rpc/eth_sendTransaction.mdx'
export const meta = {
id: 'eth_sendTransaction',
title: 'eth_sendTransaction',
description: 'Instructs the Wallet to broadcast a transaction to the network.',
subtitle: 'Send a transaction from the wallet to the blockchain.',
}
export const Page = ({ children }) =>
export default Page
---
File: /pages/products/cross-app-wallet/setup/rpc/eth_signTypedData_v4.mdx
---
import Layout from '@/layouts/DefaultGuideLayout'
import EthsignTypedDataV4 from '@/common/guides/rpc/eth_signTypedData_v4.mdx'
export const meta = {
id: 'eth_signTypedData_v4',
title: 'eth_signTypedData_v4',
description: 'Signs EIP-712typed data.',
subtitle: 'Sign structured EIP-712 data with the wallet.',
}
export const Page = ({ children }) =>
export default Page
---
File: /pages/products/cross-app-wallet/setup/rpc/index.mdx
---
import Layout from '@/layouts/DefaultGuideLayout'
import Index from '@/common/guides/rpc/index.mdx'
export const meta = {
id: 'overview',
title: 'Overview',
description: 'Explore the available RPC methods for Openfort ecosystem wallets, including authentication, transaction, and capability endpoints.',
subtitle: 'Reference for RPC methods in ecosystem wallets.',
}
export const Page = ({ children }) =>
export default Page
---
File: /pages/products/cross-app-wallet/setup/rpc/personal_sign.mdx
---
import Layout from '@/layouts/DefaultGuideLayout'
import EthpersonalSign from '@/common/guides/rpc/personal_sign.mdx'
export const meta = {
id: 'personal_sign',
title: 'personal_sign',
description: 'Signs an EIP-191 personal message.',
subtitle: 'Sign personal messages using the wallet.',
}
export const Page = ({ children }) =>
export default Page
---
File: /pages/products/cross-app-wallet/setup/rpc/wallet_getCallsStatus.mdx
---
import Layout from '@/layouts/DefaultGuideLayout'
import WalletGetCallsStatus from '@/common/guides/rpc/wallet_getCallsStatus.mdx'
export const meta = {
id: 'wallet_getCallsStatus',
title: 'wallet_getCallsStatus',
description: 'Gets the status of a call bundle.',
subtitle: 'Monitor the status and results of bundled wallet calls.',
}
export const Page = ({ children }) =>
export default Page
---
File: /pages/products/cross-app-wallet/setup/rpc/wallet_getCapabilities.mdx
---
import Layout from '@/layouts/DefaultGuideLayout'
import WalletGetCapabilities from '@/common/guides/rpc/wallet_getCapabilities.mdx'
export const meta = {
id: 'wallet_getCapabilities',
title: 'wallet_getCapabilities',
description: 'Gets supported capabilities of the Ecosystem Wallet',
subtitle: 'Check which features and capabilities the wallet supports.',
}
export const Page = ({ children }) =>
export default Page
---
File: /pages/products/cross-app-wallet/setup/rpc/wallet_grantPermissions.mdx
---
import Layout from '@/layouts/DefaultGuideLayout'
import WalletGrantPermissions from '@/common/guides/rpc/wallet_grantPermissions.mdx'
export const meta = {
id: 'wallet_grantPermissions',
title: 'wallet_grantPermissions',
description: 'Grants permissions for an Application to perform actions on behalf of the account.',
subtitle: 'Allow applications to act on behalf of the wallet user.',
}
export const Page = ({ children }) =>
export default Page
---
File: /pages/products/cross-app-wallet/setup/rpc/wallet_revokePermissions.mdx
---
import Layout from '@/layouts/DefaultGuideLayout'
import WalletRevokePermissions from '@/common/guides/rpc/wallet_revokePermissions.mdx'
export const meta = {
id: 'wallet_revokePermissions',
title: 'wallet_revokePermissions',
description: 'Revokes a permission.',
subtitle: 'Remove previously granted permissions from an account.',
}
export const Page = ({ children }) =>
export default Page
---
File: /pages/products/cross-app-wallet/setup/rpc/wallet_sendCalls.mdx
---
import Layout from '@/layouts/DefaultGuideLayout'
import WalletSendCalls from '@/common/guides/rpc/wallet_sendCalls.mdx'
export const meta = {
id: 'wallet_sendCalls',
title: 'wallet_sendCalls',
description: 'Requests for the Wallet to broadcast a bundle of calls to the network.',
subtitle: 'Send multiple blockchain calls in a single bundled transaction.',
}
export const Page = ({ children }) =>
export default Page
---
File: /pages/products/cross-app-wallet/setup/faqs.mdx
---
import Layout from '@/layouts/DefaultGuideLayout'
export const meta = {
id: 'faqs',
title: 'FAQs',
description: 'Most frequently asked questions about the Openfort platform and ecosystem wallets.',
subtitle: 'Find answers to common questions about ecosystem wallets and Openfort.',
}
### Can Openfort support my ecosystem's login system?
Yes, Openfort's architecture is built to allow thousands of new gaming ecosystems flourish. You ecosystem can be added as an OAuth provider allowing your community to be recognized.
### What if I can't find my authentication provider in the documentation?
No problem, let us know which provider you want to use and we'll get right into it.
### Can players use their existing wallets alongside Openfort Auth?
Users can link existing wallets to their account. This allows you to store and share these wallet addresses with games via the SDK for read-only use.
### What level of support and Service Level Agreements (SLAs) are provided?
At Openfort, we understand the significance of maintaining a high standard of service. Our Service Level Agreements (SLAs) reflect our commitment to providing a reliable, efficient, and safe environment for your operations.
## Security and Contingency Planning
### If Openfort were to shut down with a one-month notice, would there be scope to change the signer on the Smart Contract Wallet and use it in connection with a different provider that manages the private keys differently?
**TLDR:** With enough time, transitioning is fairly simple. You’d need to invoke the `transferOwnership` function for users to accept the new signer.
**Detailed Answer:** Yes, if Openfort shuts down with a one-month notice, it's possible to change the signer. Since Openfort wallets are non-custodial, users have control over their private keys. The key migration process would involve using the "recovery share" and "device share" from Shamir's Secret Sharing (SSS) to reconstruct the private key, allowing users to accept a new signer through the `transferOwnership` function. The new provider would need to support compatible key management systems.
### If Openfort were shut down with zero notice, would there be any scope to do a migration? Would that rely on a self-hosted Shield for the recovery share and the device share being intact?
**TLDR:** If there is no self-hosted option, users should rely on on-chain social recovery.
**Detailed Answer:** Migration is still possible, but it depends on the self-hosted Shield for the recovery share and the availability of the device share. If a self-hosted Shield is not in place, users can utilize on-chain social recovery. As long as the device share and recovery share are intact, users can reconstruct their private key and migrate to a new provider. On-chain social recovery can also help recover the wallet if the device share is lost.
### If Openfort's API were compromised, what is the risk there? Can that risk be mitigated? What’s the risk of the auth share on the private key being exposed?
**TLDR:** Both Openfort's server and Shield are encrypted. Even if an attacker obtains the auth share, they would need a secret to decrypt it.
**Detailed Answer:** If Openfort's API were compromised, the risk is limited because both the auth share and Shield service are encrypted. Even if an attacker gains access to the auth share, they would still need to decrypt it using a secret. Furthermore, since the private key is split using Shamir's Secret Sharing, the auth share alone is insufficient to reconstruct the full key without the device or recovery share.
export const Page = ({ children }) =>
export default Page
---
File: /pages/products/cross-app-wallet/setup/index.mdx
---
import Layout from '@/layouts/DefaultGuideLayout'
import Link from 'next/link'
import {
GlassPanel,
IconPanel,
Button,
IconChevronRight,
} from '@/components/ui'
export const meta = {
id: 'ecosystem',
title: 'Ecosystem wallet',
description: 'Learn how to integrate, customize, and deploy Openfort ecosystem wallets for seamless onboarding, authentication, and payments across your apps.',
subtitle: 'Build and manage ecosystem wallets with the Openfort SDK.',
tocVideo: 'W1TTjWPJLz4',
}
Openfort **Ecosystem Wallets** integrate onboarding, authentication, payments, and recovery with no app or extension required. Projects use the Ecosystem SDK, a TypeScript library designed to bootstrap your wallet.
Ecosystem wallets are whitelabel and allow you to own the entire developer experience. **In short, you own the _npm package_ the developer installs.**
We have created a *sample* ecosystem wallet called **Rapidfire ID** to showcase the Ecosystem SDK. To interact with it, you can find its SDK in the NPM package directory: [@rapidfire/id](https://www.npmjs.com/package/@rapidfire/id). Check out the GitHub [repository for Rapidfire Wallet](https://github.com/openfort-xyz/ecosystem-sample) to learn how to create your own wallet.
Try signing into your Rapidfire account:
### Features
| Feature | Status |
|-------------------------------------------|--------|
| Authentication | ✅ |
| Third-party auth/signer support | ✅ |
| Smart wallet infrastructure | ✅ |
| Mobile Wallet Protocol compatible | ✅ |
| Themes and customization | ✅ |
## Get started
Check out these popular guides to get started.
{'Step by step guide to create your own wallet.'}
{'Using an ecosystem wallet with popular wallet connectors.'}
{'Integrate an ecosystem wallet with Wagmi.'}
## Using on any wallet provider
This will internally inject a Wallet instance into your Application via [EIP-6963](https://eips.ethereum.org/EIPS/eip-6963). Modern Wallet Connection libraries will automatically detect the injected instance.
Supported wallet connection libraries include:
- [Wagmi](https://wagmi.sh/)
- [Privy](https://privy.io/)
- [RainbowKit](https://rainbowkit.com/)
Learn more on how to get started in the [examples](/docs/products/cross-app-wallet/usage/web-app-wagmi) guide.
## Templates
Complete sample including auth, transactions and session keys.
Sample how to integrate ecosystem wallet with Expo.
export const Page = ({ children }) =>
export default Page
---
File: /pages/products/cross-app-wallet/setup/why.mdx
---
import Layout from '@/layouts/DefaultGuideLayout'
export const meta = {
title: 'Why choosing the Ecosystem SDK',
description: 'Understand the advantages of using the Openfort Ecosystem SDK for unified wallet management, seamless onboarding, and cross-app interoperability.',
subtitle: 'Discover the benefits of ecosystem wallets over isolated embedded wallets.',
}
Embedded wallets typically require each application to manage its own wallet setup.
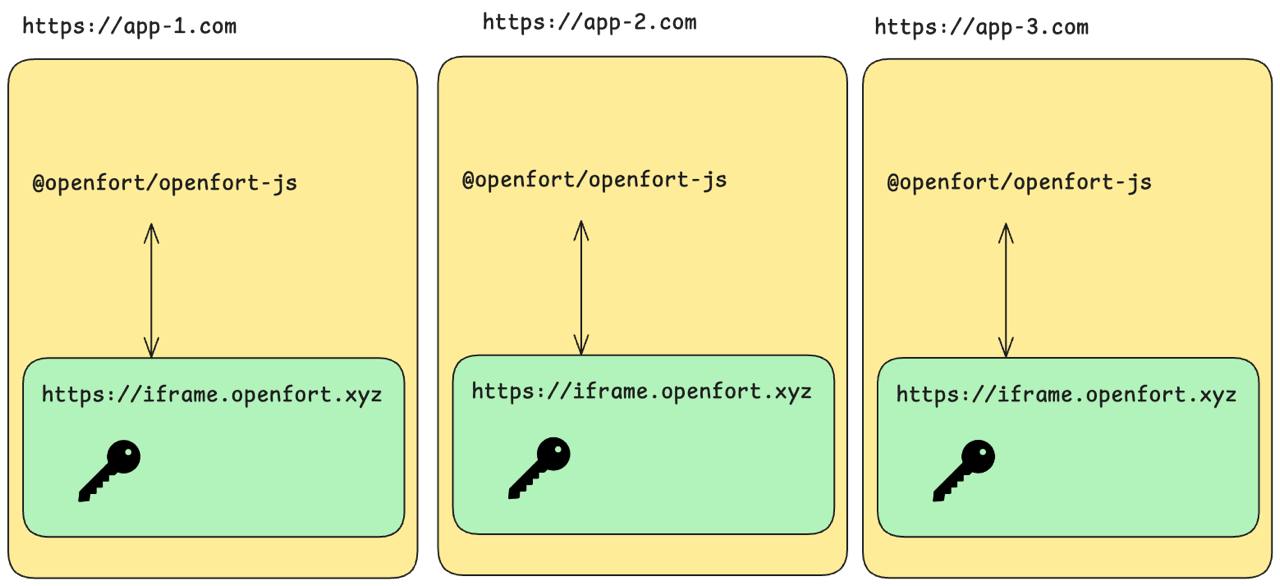
This can lead to several challenges:
- **Fragmented authentication across apps**
When each app manages its own authentication, you end up with duplicated logic, inconsistent session handling, and a messy user experience. OAuth2 providers struggle to maintain continuity across domains, making it difficult to track a user’s identity and wallet access holistically.
- **Liquidity fragmentation kills network effects**
If every app generates and manages its own wallets, user assets are scattered across isolated accounts. This makes it harder to build shared economies, pooled inventories, or unified user profiles—preventing the kind of liquidity and composability that ecosystems need to thrive.
- **No interoperability across apps**
Different wallet implementations across apps lead to incompatibilities in how users onboard, transact, or authorize actions. Without a shared interface or contract standard, there's no guarantee that features like cross-app identity, shared balances, or seamless UX will work consistently.
## How does the Ecosystem SDK solve this?
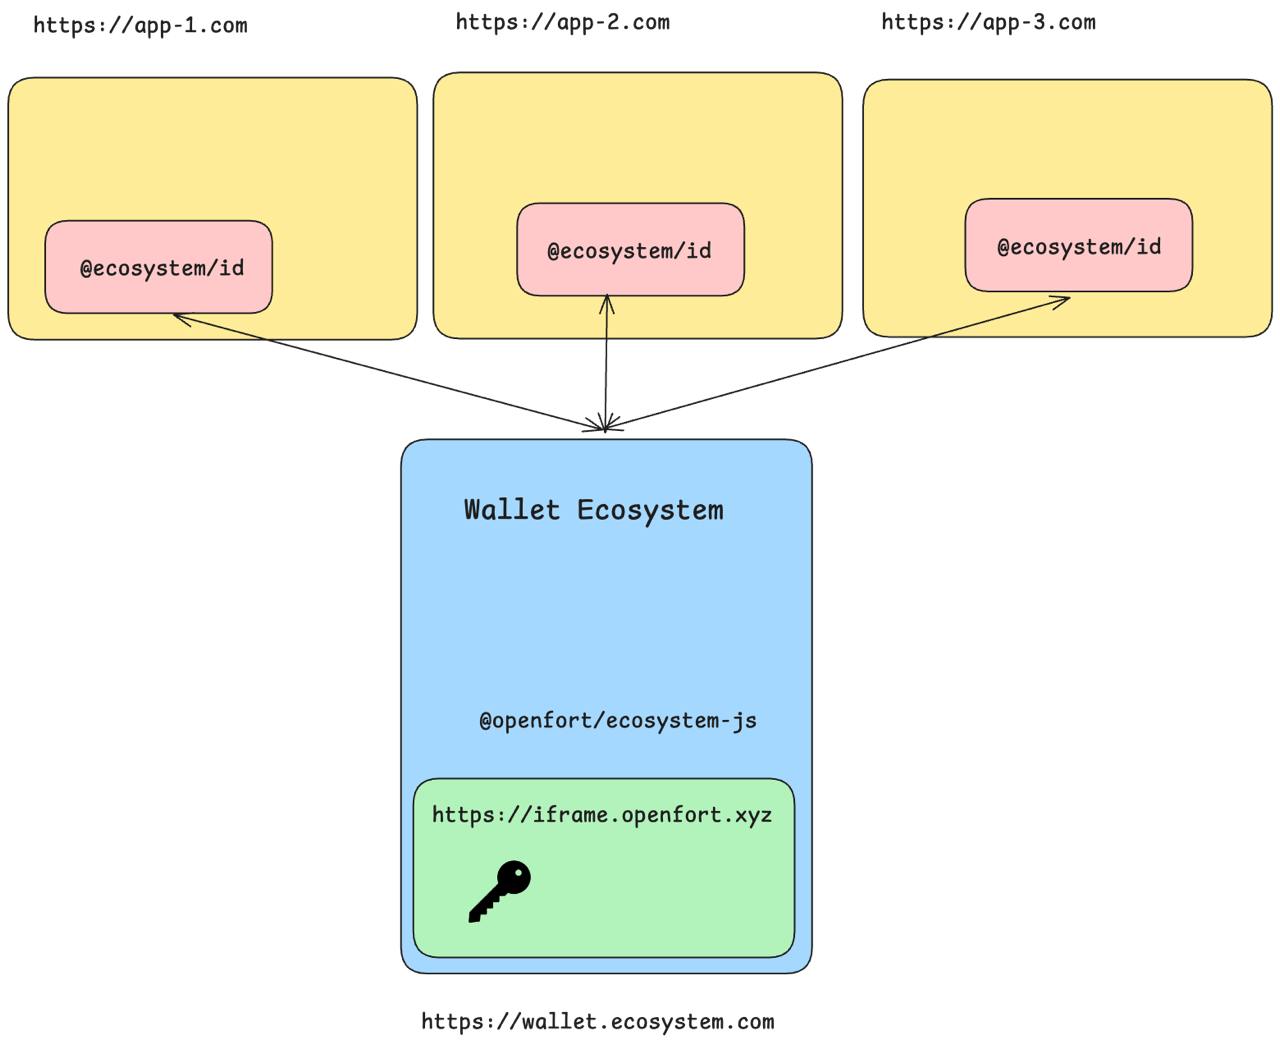
Switching to an ecosystem approach addresses the challenges of embedded wallets:
- **Unified authentication:** A single sign-on mechanism minimizes friction and simplifies session management across apps.
- **Monitoring and user management:** Manage all user permissions from a single dashboard. This empowers administrators to monitor activities and enforce security policies consistently.
- **Enhanced developer experience:** One integration point means your team can focus on building features rather than managing multiple wallet configurations.
- **Consistent user experience:** Provide a seamless and intuitive wallet experience regardless of which app the user interacts with.
## Architecture

## Core components
### Client SDK (`@openfort/ecosystem/client`)
The Client SDK is your front-line integration tool—the “head chef” of the wallet system. It handles everything from wallet creation, UI pop-ups, to transaction management. Integrated directly into your frontend, it is built to reflect your brand identity and is enhanced with robust security features.
> **Tip:** The Client SDK is EIP-1193 compatible, making it work seamlessly with popular blockchain libraries like [viem](https://viem.sh).
### Communication module (`@openfort/ecosystem/core`)
Acting as the intermediary, this module is responsible for establishing and maintaining efficient communication between the client-side applications and your wallet service. It simplifies wallet provisioning and works across diverse web environments. For a deeper dive, refer to our [wallet guide](/docs/products/embedded-wallet/javascript/wallets).
### Framework prefabs
Pre-built components and helpers for popular frameworks (e.g., [React](https://react.dev/) via `@openfort/ecosystem/react`) provide you with customizable UI components to accelerate development without compromising on design or functionality.
export const Page = ({ children }) =>
export default Page
---
File: /pages/products/cross-app-wallet/usage/rpc/eth_accounts.mdx
---
import Layout from '@/layouts/DefaultGuideLayout'
import Ethaccounts from '@/common/guides/rpc/eth_accounts.mdx'
export const meta = {
id: 'eth_accounts',
title: 'eth_accounts',
description: 'Returns an array of all connected Account addresses.',
subtitle: 'Retrieve connected account addresses from the wallet.',
canonical: 'https://openfort.io/products/cross-app-wallet/usage/rpc/eth_accounts'
}
export const Page = ({ children }) =>
export default Page
---
File: /pages/products/cross-app-wallet/usage/rpc/eth_requestAccounts.mdx
---
import Layout from '@/layouts/DefaultGuideLayout'
import EthrequestAccounts from '@/common/guides/rpc/eth_requestAccounts.mdx'
export const meta = {
id: 'eth_requestAccounts',
title: 'eth_requestAccounts',
description: 'Requests access to Account addresses.',
subtitle: 'Connect an application to a wallet and request account access.',
canonical: 'https://openfort.io/products/cross-app-wallet/usage/rpc/eth_requestAccounts'
}
export const Page = ({ children }) =>
export default Page
---
File: /pages/products/cross-app-wallet/usage/rpc/eth_sendTransaction.mdx
---
import Layout from '@/layouts/DefaultGuideLayout'
import EthsendTransaction from '@/common/guides/rpc/eth_sendTransaction.mdx'
export const meta = {
id: 'eth_sendTransaction',
title: 'eth_sendTransaction',
description: 'Instructs the Wallet to broadcast a transaction to the network.',
subtitle: 'Send a transaction from the wallet to the blockchain.',
canonical: 'https://openfort.io/products/cross-app-wallet/usage/rpc/eth_sendTransaction'
}
export const Page = ({ children }) =>
export default Page
---
File: /pages/products/cross-app-wallet/usage/rpc/eth_signTypedData_v4.mdx
---
import Layout from '@/layouts/DefaultGuideLayout'
import EthsignTypedDataV4 from '@/common/guides/rpc/eth_signTypedData_v4.mdx'
export const meta = {
id: 'eth_signTypedData_v4',
title: 'eth_signTypedData_v4',
description: 'Signs EIP-712typed data.',
subtitle: 'Sign structured EIP-712 data with the wallet.',
canonical: 'https://openfort.io/products/cross-app-wallet/usage/rpc/eth_signTypedData_v4'
}
export const Page = ({ children }) =>
export default Page
---
File: /pages/products/cross-app-wallet/usage/rpc/index.mdx
---
import Layout from '@/layouts/DefaultGuideLayout'
import Index from '@/common/guides/rpc/index.mdx'
export const meta = {
title: 'Overview',
description: 'Explore the available RPC methods for Openfort ecosystem wallets, including authentication, transaction, and capability endpoints.',
subtitle: 'Reference for RPC methods in ecosystem wallets.',
canonical: 'https://openfort.io/products/cross-app-wallet/usage/rpc'
}
export const Page = ({ children }) =>
export default Page
---
File: /pages/products/cross-app-wallet/usage/rpc/personal_sign.mdx
---
import Layout from '@/layouts/DefaultGuideLayout'
import EthpersonalSign from '@/common/guides/rpc/personal_sign.mdx'
export const meta = {
id: 'personal_sign',
title: 'personal_sign',
description: 'Signs an EIP-191 personal message.',
subtitle: 'Sign personal messages using the wallet.',
canonical: 'https://openfort.io/products/cross-app-wallet/usage/rpc/personal_sign'
}
export const Page = ({ children }) =>
export default Page
---
File: /pages/products/cross-app-wallet/usage/rpc/wallet_getCallsStatus.mdx
---
import Layout from '@/layouts/DefaultGuideLayout'
import WalletGetCallsStatus from '@/common/guides/rpc/wallet_getCallsStatus.mdx'
export const meta = {
id: 'wallet_getCallsStatus',
title: 'wallet_getCallsStatus',
description: 'Gets the status of a call bundle.',
subtitle: 'Monitor the status and results of bundled wallet calls.',
canonical: 'https://openfort.io/products/cross-app-wallet/usage/rpc/wallet_getCallsStatus'
}
export const Page = ({ children }) =>
export default Page
---
File: /pages/products/cross-app-wallet/usage/rpc/wallet_getCapabilities.mdx
---
import Layout from '@/layouts/DefaultGuideLayout'
import WalletGetCapabilities from '@/common/guides/rpc/wallet_getCapabilities.mdx'
export const meta = {
id: 'wallet_getCapabilities',
title: 'wallet_getCapabilities',
description: 'Gets supported capabilities of the Ecosystem Wallet',
subtitle: 'Check which features and capabilities the wallet supports.',
canonical: 'https://openfort.io/products/cross-app-wallet/usage/rpc/wallet_getCapabilities'
}
export const Page = ({ children }) =>
export default Page
---
File: /pages/products/cross-app-wallet/usage/rpc/wallet_grantPermissions.mdx
---
import Layout from '@/layouts/DefaultGuideLayout'
import WalletGrantPermissions from '@/common/guides/rpc/wallet_grantPermissions.mdx'
export const meta = {
id: 'wallet_grantPermissions',
title: 'wallet_grantPermissions',
description: 'Grants permissions for an Application to perform actions on behalf of the account.',
subtitle: 'Allow applications to act on behalf of the wallet user.',
canonical: 'https://openfort.io/products/cross-app-wallet/usage/rpc/wallet_grantPermissions'
}
export const Page = ({ children }) =>
export default Page
---
File: /pages/products/cross-app-wallet/usage/rpc/wallet_revokePermissions.mdx
---
import Layout from '@/layouts/DefaultGuideLayout'
import WalletRevokePermissions from '@/common/guides/rpc/wallet_revokePermissions.mdx'
export const meta = {
id: 'wallet_revokePermissions',
title: 'wallet_revokePermissions',
description: 'Revokes a permission.',
subtitle: 'Remove previously granted permissions from an account.',
canonical: 'https://openfort.io/products/cross-app-wallet/usage/rpc/wallet_revokePermissions'
}
export const Page = ({ children }) =>
export default Page
---
File: /pages/products/cross-app-wallet/usage/rpc/wallet_sendCalls.mdx
---
import Layout from '@/layouts/DefaultGuideLayout'
import WalletSendCalls from '@/common/guides/rpc/wallet_sendCalls.mdx'
export const meta = {
id: 'wallet_sendCalls',
title: 'wallet_sendCalls',
description: 'Requests for the Wallet to broadcast a bundle of calls to the network.',
subtitle: 'Send multiple blockchain calls in a single bundled transaction.',
canonical: 'https://openfort.io/products/cross-app-wallet/usage/rpc/wallet_sendCalls'
}
export const Page = ({ children }) =>
export default Page
---
File: /pages/products/cross-app-wallet/usage/batch-transactions.mdx
---
import Layout from '@/layouts/DefaultGuideLayout'
import StepHikeCompact from '@/components/StepHikeCompact'
import { IconCheck } from '@/components/ui'
export const meta = {
title: 'Batch transactions',
description: 'Learn how to send multiple onchain calls in a single transaction using Openfort Smart Wallet and the wallet_sendCalls RPC method.',
subtitle: 'Combine multiple actions into a single blockchain transaction.',
hide_table_of_contents: true
}
Smart Wallet enables you to send multiple onchain calls in a single transaction, improving UX by reducing multi-step interactions to a single click. A common example is combining an ERC-20 `approve` with a swap operation.
You can submit batch transactions using the new `wallet_sendCalls` [RPC](https://eip5792.xyz/reference/sendCalls) method.
- First, verify if your app supports atomic batching (This step is crucial if your app supports multiple wallet types)
- Use the `useCapabilities` hook from Wagmi experimental features
- Implement fallback functionality for unsupported wallets
Note: The `useWriteContracts` and `useCapabilities` hooks rely on new wallet RPC and may not be supported in all wallets.
```typescript app.tsx
import { useCapabilities } from 'wagmi/experimental'
function App() {
const { data: capabilities } = useCapabilities()
// Returns capability object per chain:
// {
// 84532: {
// atomicBatch: {
// supported: true,
// },
// }
// }
// Check if atomic batching is supported in the chain we want to interact with
const isAtomicBatchSupported = capabilities?.[84532]?.atomicBatch?.supported
return (
{isAtomicBatchSupported ? (
) : (
)}
)
}
```
- Import required hooks: `useAccount` and `useWriteContracts` from Wagmi
- Define your smart contract ABI
- Initialize the `useWriteContracts` hook for batch transactions
- Create a transaction handling function that can process multiple contract calls
Important: Make sure your contract ABIs are correctly typed for better development experience.
```typescript app.tsx
import { useAccount } from 'wagmi'
import { useWriteContracts } from 'wagmi/experimental'
// Define your contract ABI
const abi = [
{
stateMutability: 'nonpayable',
type: 'function',
inputs: [{ name: 'to', type: 'address' }],
name: 'safeMint',
outputs: [],
}
] as const
function BatchTransactionComponent() {
const account = useAccount()
const { writeContracts } = useWriteContracts()
const handleBatchTransaction = () => {
writeContracts({
contracts: [
{
address: "0x119Ea671030FBf79AB93b436D2E20af6ea469a19",
abi,
functionName: "safeMint",
args: [account.address],
},
// Add more contract interactions as needed
{
address: "0x119Ea671030FBf79AB93b436D2E20af6ea469a19",
abi,
functionName: "safeMint",
args: [account.address],
}
],
})
}
return (
)
}
```
- Add the `useCallsStatus` hook to track transaction status
- Configure polling interval for status updates
- Display transaction status to users
- Handle transaction completion and errors
Pro tip: The polling interval can be adjusted based on your needs, but 1 second is a good default.
```typescript app.tsx
import { useCallsStatus } from 'wagmi/experimental'
function BatchTransactionComponent() {
const { data: id, writeContracts } = useWriteContracts()
const { data: callsStatus } = useCallsStatus({
id: id as string,
query: {
enabled: !!id,
// Poll every second until confirmed
refetchInterval: (data) =>
data.state.data?.status === "CONFIRMED" ? false : 1000,
},
})
// Example response structure:
// {
// status: 'CONFIRMED',
// receipts: [
// {
// logs: [{
// address: '0x...',
// topics: ['0x...'],
// data: '0x...'
// }],
// status: 'success',
// blockHash: '0x...',
// blockNumber: 122414523n,
// gasUsed: 390000n,
// transactionHash: '0x...'
// }
// ]
// }
return (
{callsStatus && (
Status: {callsStatus.status}
{callsStatus.status === 'CONFIRMED' && (
Transaction confirmed! Hash: {callsStatus.receipts[0].transactionHash}
)}
)}
)
}
```
export const Page = ({ children }) => {children}
export default Page
---
File: /pages/products/cross-app-wallet/usage/create-wallet-button.mdx
---
import Layout from '@/layouts/DefaultGuideLayout'
import { IconCheck } from '@/components/ui'
import StepHikeCompact from '@/components/StepHikeCompact'
export const meta = {
title: 'Create a "Create Wallet" button',
description: 'Add a create wallet button to your app for fast onboarding and seamless integration with Openfort ecosystem wallets.',
subtitle: 'Streamline user onboarding with a dedicated wallet creation button.',
}
For the best onboarding experience, we recommend adding a highly visible 'Create' or 'Create Wallet' button to your app's homepage. Adding this button streamlines the onboarding experience for new users and gets them ready to use your app in a few seconds.
Here is an example of how the button looks:
## Implementation with Wagmi
To make these instructions concrete, we have created a sample ecosystem wallet called **Rapidfire ID**. To interact with it, you can find its SDK in the NPM package directory: [@rapidfire/id](https://www.npmjs.com/package/@rapidfire/id).
You can check out the GitHub [repository for Rapidfire Wallet](https://github.com/openfort-xyz/ecosystem-sample) to learn how to create your own wallet.
Using Wagmi offers a balanced approach that combines flexibility with developer convenience. By integrating the ecosystem wallet with Wagmi, you get access to a comprehensive set of React hooks that handle common wallet operations, state management, and chain interactions. This approach requires both `@rapidfire/id` and `Wagmi` dependencies, along with React Query, but provides a more structured development experience. While you'll still need to build your own UI components, Wagmi's hooks significantly reduce the complexity of handling wallet connections, transactions, and chain switching.
First, set up your Wagmi configuration with the required chain and connector settings.
```ts wagmi.ts
import { http, createConfig } from 'wagmi';
import { polygonAmoy } from 'wagmi/chains';
import { injected } from 'wagmi/connectors';
export const config = createConfig({
chains: [polygonAmoy],
connectors: [
injected(),
],
transports: {
[polygonAmoy.id]: http(),
},
});
declare module 'wagmi' {
interface Register {
config: typeof config;
}
}
```
Create a reusable wallet logo component that will be used in the button.
```tsx WalletLogo.tsx
import React from 'react';
const defaultContainerStyles = {
paddingTop: 2,
display: 'flex',
alignItems: 'center',
};
export function WalletLogo({
size = 24,
containerStyles = defaultContainerStyles,
}) {
return (
);
}
```
Create the main button component using Wagmi's useConnect hook.
```tsx CreateWalletButton.tsx
import React, { useCallback } from 'react';
import { useConnect } from 'wagmi';
import { WalletLogo } from './WalletLogo';
const buttonStyles = {
background: 'linear-gradient(135deg, #2D3436 0%, #000000 100%)',
border: '1px solid rgba(255, 255, 255, 0.1)',
boxSizing: 'border-box' as const,
display: 'flex',
alignItems: 'center',
gap: '12px',
width: 'auto',
minWidth: '200px',
fontFamily: 'Inter, system-ui, sans-serif',
fontWeight: '600',
fontSize: '16px',
color: '#FFFFFF',
padding: '12px 20px',
borderRadius: '12px',
cursor: 'pointer',
transition: 'all 0.2s ease-in-out',
boxShadow: '0 4px 6px -1px rgba(0, 0, 0, 0.1), 0 2px 4px -1px rgba(0, 0, 0, 0.06)',
':hover': {
transform: 'translateY(-1px)',
boxShadow: '0 6px 8px -1px rgba(0, 0, 0, 0.1), 0 4px 6px -1px rgba(0, 0, 0, 0.06)',
},
};
export function CreateWalletButton() {
const { connectors, connect, data } = useConnect();
const createWallet = useCallback(() => {
const injectedConnector = connectors.find(
// Here you'd write your own connector ID as per the one you configured in the wallet SDK
(connector) => connector.id === 'com.rapidfire.id'
);
if (injectedConnector) {
connect({ connector: injectedConnector });
}
}, [connectors, connect]);
return (
);
}
```
For more detail, view the [`useConnect` documentation](https://wagmi.sh/react/api/hooks/useConnect).
Upon successful connection, account information can be accessed via [data](https://wagmi.sh/react/api/hooks/useConnect#data) returned from `useConnect`, or via [`useAccount`](https://wagmi.sh/react/api/hooks/useAccount).
## Implementation with EIP-1193 Provider
The EIP-1193 Provider approach gives you the most granular control over your ecosystem wallet integration by directly using the SDK's Ethereum provider. This method requires only the `@rapidfire/id` package and allows you to build everything from scratch. You'll handle all wallet interactions through the standard `EIP-1193` provider interface, giving you complete flexibility in implementing wallet creation, connection flows, and transaction handling. While this approach requires more custom development work, it's ideal for applications that need specialized wallet interactions or want to minimize dependencies.
To make these instructions concrete, we have created a sample ecosystem wallet called **Rapidfire ID**. To interact with it, you can find its SDK in the NPM package directory: [@rapidfire/id](https://www.npmjs.com/package/@rapidfire/id).
You can check out the GitHub [repository for Rapidfire Wallet](https://github.com/openfort-xyz/ecosystem-sample) to learn how to create your own wallet.
Create a new SDK instance with your application configuration.
```ts sdk.ts
import EcosystemWallet from '@rapidfire/id';
// Initialize the SDK with required parameters
export const sdk = new EcosystemWallet({
appChainIds: [80002],
appLogoUrl: 'https://a.rgbimg.com/users/b/ba/barunpatro/600/mf6B5Gq.jpg',
appName: 'Example App',
});
```
Configure the Ethereum provider with chain and policy settings.
Make sure to set up your `NEXT_PUBLIC_POLICY_ID` in your environment variables.
```ts provider.ts
import { sdk } from './sdk';
// Configure the provider with chain and policy
export const provider = sdk.getEthereumProvider({
policy: process.env.NEXT_PUBLIC_POLICY_ID
});
```
Create the button component that uses the configured provider.
```tsx CreateWalletButton.tsx
import React, { useCallback } from 'react';
import { WalletLogo } from './WalletLogo';
import { provider } from './provider';
const buttonStyles = {
background: 'linear-gradient(135deg, #2D3436 0%, #000000 100%)',
border: '1px solid rgba(255, 255, 255, 0.1)',
boxSizing: 'border-box' as const,
display: 'flex',
alignItems: 'center',
gap: '12px',
width: 'auto',
minWidth: '200px',
fontFamily: 'Inter, system-ui, sans-serif',
fontWeight: '600',
fontSize: '16px',
color: '#FFFFFF',
padding: '12px 20px',
borderRadius: '12px',
cursor: 'pointer',
transition: 'all 0.2s ease-in-out',
boxShadow: '0 4px 6px -1px rgba(0, 0, 0, 0.1), 0 2px 4px -1px rgba(0, 0, 0, 0.06)',
':hover': {
transform: 'translateY(-1px)',
boxShadow: '0 6px 8px -1px rgba(0, 0, 0, 0.1), 0 4px 6px -1px rgba(0, 0, 0, 0.06)',
},
};
export function CreateWalletButton({ handleSuccess, handleError }) {
const createWallet = useCallback(async () => {
try {
const [address] = await provider.request({
method: 'eth_requestAccounts',
});
handleSuccess(address);
} catch (error) {
handleError(error);
}
}, [handleSuccess, handleError]);
return (
);
}
```
export const Page = ({ children }) =>
export default Page
---
File: /pages/products/cross-app-wallet/usage/gas-policies.mdx
---
import Layout from '@/layouts/DefaultGuideLayout'
import { IconCheck } from '@/components/ui'
export const meta = {
title: 'Sponsor transactions',
description: "Learn how to sponsor your users' transactions using gas policies in Openfort ecosystem wallets for a seamless UX.",
subtitle: 'Enable gas sponsorship for your users with smart accounts.',
}
One of the biggest UX enhancements unlocked by smart accounts is the ability for app developers to sponsor their users' transactions. If your ecosystem has a gas policy enabled, you can start sponsorship your user's transactions by using the `policy` in your [dashboard](https://dashboard.openfort.io/policies).
To make these instructions concrete, we have created a sample ecosystem wallet called **Rapidfire ID**. To interact with it, you can find its SDK in the NPM package directory: [@rapidfire/id](https://www.npmjs.com/package/@rapidfire/id).
You can check out the GitHub [repository for Rapidfire Wallet](https://github.com/openfort-xyz/ecosystem-sample) to learn how to create your own wallet.
### Use a policy when injecting your provider
Sponsor all transactions that will be made with the injected provider.
```tsx app.tsx
import { sdk } from './sdk'
function App() {
useEffect(() => {
sdk.getEthereumProvider({policy: 'pol_...'});
}, []);
return (
)
}
```
```ts sdk.ts
import EcosystemWallet from '@rapidfire/id'
// Initialize the SDK with required parameters
export const sdk = new EcosystemWallet({
appChainIds: [80002],
appLogoUrl: 'https://a.rgbimg.com/users/b/ba/barunpatro/600/mf6B5Gq.jpg',
appName: 'Example App',
});
```
### Updating the policy
Updating your policy is useful if you change chain and need to specify a different policy ID.
```tsx app.tsx
import { sdk } from './sdk'
function App() {
useEffect(() => {
sdk.setPolicy({policy: 'pol_...'});
}, []);
return (
)
}
```
```ts sdk.ts
import EcosystemWallet from '@rapidfire/id'
// Initialize the SDK with required parameters
export const sdk = new EcosystemWallet({
appChainIds: [80002],
appLogoUrl: 'https://a.rgbimg.com/users/b/ba/barunpatro/600/mf6B5Gq.jpg',
appName: 'Example App',
});
```
-----
You can also configure your own app level policy. Check the details in the [dashboard section](/docs/configuration/gas-sponsorship).
- Using an [**external paymaster** setup.](/docs/configuration/gas-sponsorship#optional-using-external-paymasters)
- Learn how to [use **erc20 tokens**](/docs/configuration/gas-erc20) to pay for gas fees.
export const Page = ({ children }) =>
export default Page
---
File: /pages/products/cross-app-wallet/usage/libraries.mdx
---
import Layout from '@/layouts/DefaultGuideLayout'
import { IconCheck } from '@/components/ui'
export const meta = {
title: 'Integrating with wallet connectors',
description: 'Integrate Openfort ecosystem wallets with wallet connector libraries for streamlined UI, pre-built components, and seamless user experience.',
subtitle: 'Leverage wallet libraries for quick and robust integration.',
}
Using a **wallet library** provides the most streamlined path to implementing a wallet UI, offering a complete solution with pre-built UI components and a polished user experience out of the box. This approach builds on top of Wagmi and includes additional UI components like the `ConnectButton`, ready-to-use themes, and built-in transaction interfaces. While it requires the most dependencies (`@rapidfire/id`, `Wagmi`, `React Query`, and `RainbowKit` -for example), it significantly reduces development time by providing a complete wallet interface solution.
To make these instructions concrete, we have created a sample ecosystem wallet called **Rapidfire ID**. To interact with it, you can find its SDK in the NPM package directory: [@rapidfire/id](https://www.npmjs.com/package/@rapidfire/id).
You can check out the GitHub [repository for Rapidfire Wallet](https://github.com/openfort-xyz/ecosystem-sample) to learn how to create your own wallet.
## Getting an EIP-1193 provider
All of Ecosystem SDK wallets can export a standard [EIP-1193 provider](https://eips.ethereum.org/EIPS/eip-1193) object. This allows your app to request signatures and transactions from the wallet, using familiar JSON-RPC requests like `personal_sign` or `eth_sendTransaction`.
[EIP-1193](https://eips.ethereum.org/EIPS/eip-1193), also known as the Ethereum JavaScript API, is a standardized interface for how applications can request information, signatures, and transactions from a connected wallet.
To get a wallet's EIP-1193 provider, use the `getEthereumProvider` method:
```tsx main.tsx
import { ecosystemWalletInstance } from "./rapidfireConfig"
// This example assumes you have already checked that Openfort 'embeddedState' is
// `ready` and the user is `authenticated`
const provider = await ecosystemWalletInstance.getEthereumProvider();
```
```ts rapidfireConfig.ts
import EcosystemWallet from '@rapidfire/id';
export const ecosystemWalletInstance = new EcosystemWallet({
appChainIds: [80002],
appLogoUrl: 'https://a.rgbimg.com/users/b/ba/barunpatro/600/mf6B5Gq.jpg',
appName: 'Example App',
});
```
When requesting signatures and transactions from the wallet, you can either choose to interface with the **EIP-1193** provider directly, or to pass it to a library like `wagmi` or `viem`.
If you want to check out the sample using the `@rapidfire/id` directly, you can find it in the [Rapidfire SDK repository](https://github.com/openfort-xyz/ecosystem-sample/tree/main/usage-examples/wagmi-nextjs). You will see it includes examples using [ethers](https://docs.ethers.org/v5/), [connectKit](https://docs.family.co/connectkit), [rainbowKit](https://www.rainbowkit.com/) and [wagmi](https://wagmi.sh/).
## Implementation with RainbowKit
### 1. Install dependencies
Install the `@rapidfire/id` SDK and its peer dependencies:
```bash
npm i @rapidfire/id @rainbow-me/rainbowkit @tanstack/react-query
```
### 2. Create the connector
```ts config.ts
import EcosystemWallet from '@rapidfire/id';
export const identityInstance = new EcosystemWallet({
appChainIds: [80002],
appLogoUrl: 'https://a.rgbimg.com/users/b/ba/barunpatro/600/mf6B5Gq.jpg',
appName: 'Example App',
});
```
### 3. Wrap app with providers
At the highest level of your applications, wrap the component with the wagmi, QueryClient, and RainbowKit providers. Pass the configuration you created in step 2 to the wagmi provider.
All of **ecosystem wallets** can export a standard [EIP-1193 provider](https://eips.ethereum.org/EIPS/eip-1193) object. This allows your app to request signatures and transactions from the wallet, using familiar JSON-RPC requests like `personal_sign` or `eth_sendTransaction`.
[EIP-1193](https://eips.ethereum.org/EIPS/eip-1193), also known as the Ethereum JavaScript API, is a standardized interface for how applications can request information, signatures, and transactions from a connected wallet.
To get a wallet's EIP-1193 provider, use the `getEthereumProvider` method:
```tsx _app.tsx
import {QueryClient, QueryClientProvider} from '@tanstack/react-query';
import {WagmiProvider} from 'wagmi';
import {polygonAmoy} from 'wagmi/chains';
import {useEffect} from 'react';
import {config} from './wagmiConfig';
import {identityInstance} from './config';
const queryClient = new QueryClient();
export default function App() {
useEffect(() => {
if (!identityInstance) return;
identityInstance.getEthereumProvider();
}, []);
return (
);
}
```
```ts wagmiConfig.ts
import {http, createConfig} from 'wagmi';
import {polygonAmoy} from 'wagmi/chains';
import {injected} from 'wagmi/connectors';
export const config = createConfig({
chains: [polygonAmoy],
connectors: [injected()],
ssr: true,
transports: {
[polygonAmoy.id]: http(),
},
});
```
```ts config.ts
import EcosystemWallet from '@rapidfire/id';
export const identityInstance = new EcosystemWallet({
appChainIds: [80002],
appLogoUrl: 'https://a.rgbimg.com/users/b/ba/barunpatro/600/mf6B5Gq.jpg',
appName: 'Example App',
});
```
### 4. Use the `ConnectButton`
Import the `ConnectButton` and use to prompt users to connect to their provider **ecosystem wallet**.
```tsx
import {ConnectButton} from '@rainbow-me/rainbowkit';
function Page() {
return (
My app
...
);
}
```
Thats it! You can now use any wagmi hook in your application to interact with the connected wallet. When users connect and transact with their wallet, Openfort will open a pop-up for users to authorize any actions.
export const Page = ({ children }) =>
export default Page
---
File: /pages/products/cross-app-wallet/usage/react-native.mdx
---
import Layout from '@/layouts/DefaultGuideLayout'
import { IconCheck } from '@/components/ui'
export const meta = {
title: 'Create a React Native App',
}
To make these instructions concrete, we have created a sample ecosystem wallet called **Rapidfire ID**. To interact with it, you can find its SDK in the NPM package directory: [@rapidfire/id](https://www.npmjs.com/package/@rapidfire/id).
You can check out the GitHub [repository for Rapidfire Wallet](https://github.com/openfort-xyz/ecosystem-sample) to learn how to create your own wallet.
This guide will walk you through adding support for any **ecosystem wallet** into a React Native app by integrating the [Mobile Wallet Protocol Client](https://www.npmjs.com/package/@mobile-wallet-protocol/client).
If you need a template or scaffold to start with, you can check out the [Ecosystem Wallet Expo Example](https://github.com/openfort-xyz/ecosystem-wallet-expo-example).
## Prerequisites
### Install peer dependencies
The Mobile Wallet Protocol Client library requires the [Expo WebBrowser](https://docs.expo.dev/versions/latest/sdk/webbrowser/) and [Async Storage](https://react-native-async-storage.github.io/async-storage/docs/install) packages to be installed.
Follow the instructions on the respective pages for any additional setup.
```zsh [npm]
npm i expo expo-web-browser @react-native-async-storage/async-storage
```
```zsh [yarn]
yarn add expo expo-web-browser @react-native-async-storage/async-storage
```
### Polyfills
Mobile Wallet Protocol Client requires `crypto.randomUUID`, `crypto.getRandomValues`, and `URL` to be polyfilled globally since they are not available in the React Native environment.
Below is an example of how to polyfill these functions in your app using the [expo-crypto](https://docs.expo.dev/versions/latest/sdk/crypto/) and [expo-standard-web-crypto](https://github.com/expo/expo/tree/master/packages/expo-standard-web-crypto/) packages.
```zsh [npm]
npm i expo-crypto expo-standard-web-crypto react-native-url-polyfill
```
```zsh [yarn]
yarn add expo-crypto expo-standard-web-crypto react-native-url-polyfill
```
```js [polyfills.js]
import "react-native-url-polyfill/auto";
import { polyfillWebCrypto } from "expo-standard-web-crypto";
import { randomUUID } from "expo-crypto";
polyfillWebCrypto();
crypto.randomUUID = randomUUID;
```
```tsx [App.tsx]
import "./polyfills"; // import before @mobile-wallet-protocol/client
/// ...
```
## Setup
### Install Mobile Wallet Protocol Client
Add the latest version of Mobile Wallet Protocol Client to your project.
```zsh [npm]
npm i @mobile-wallet-protocol/client@latest
```
```zsh [yarn]
yarn add @mobile-wallet-protocol/client@latest
```
## Usage
Mobile Wallet Protocol Client provides 2 interfaces for mobile app to interact with the Ecosystem Wallet, an EIP-1193 compliant provider interface and a wagmi connector.
If your app is using wallet aggregator, go straight to **Option 2: Wagmi Connector** for 1-line integration. :)
### Option 1: EIP-1193 Provider
Create a new `EIP1193Provider` instance, which is EIP-1193 compliant.
```tsx [App.tsx]
import { EIP1193Provider } from "@mobile-wallet-protocol/client";
// Step 1. Initialize provider with your dapp's metadata and target wallet
const metadata = {
name: "My App Name",
customScheme: "myapp://", // only custom scheme (e.g. `myapp://`) is supported in v1.0.0
chainIds: [8453],
logoUrl: "https://example.com/logo.png",
};
const provider = new EIP1193Provider({
metadata,
wallet: {
type: 'web',
name: "Rapid fire wallet",
// The scheme should be the target wallet's URL
scheme: 'https://id.sample.openfort.xyz',
iconUrl: 'https://purple-magnificent-bat-958.mypinata.cloud/ipfs/QmfQrh2BiCzugFauYF9Weu9SFddsVh9qV82uw43cxH8UDV',
},
});
// ...
// 2. Use the provider
const addresses = await provider.request({ method: "eth_requestAccounts" });
const signedData = await provider.request({
method: "personal_sign",
params: ["0x48656c6c6f20776f726c6421", addresses[0]],
});
```
### Option 2: Wagmi Connector
Add the latest verion of Mobile Wallet Protocol wagmi-connectors to your project.
```zsh [npm]
npm i @mobile-wallet-protocol/wagmi-connectors@latest
```
```zsh [yarn]
yarn add @mobile-wallet-protocol/wagmi-connectors@latest
```
Simply import the `createConnectorFromWallet` function and pass in the wallet you want to use to wagmi config.
```ts [config.ts]
import {
createConnectorFromWallet,
Wallets,
} from "@mobile-wallet-protocol/wagmi-connectors";
const metadata = {
name: "My App Name",
customScheme: "myapp://", // only custom scheme (e.g. `myapp://`) is supported in v1.0.0
chainIds: [8453],
logoUrl: "https://example.com/logo.png",
};
export const config = createConfig({
chains: [base],
connectors: [
createConnectorFromWallet({
metadata,
wallet: {
type: 'web',
name: "Rapid fire wallet",
scheme: 'https://id.sample.openfort.xyz',
iconUrl: 'https://purple-magnificent-bat-958.mypinata.cloud/ipfs/QmfQrh2BiCzugFauYF9Weu9SFddsVh9qV82uw43cxH8UDV',
},
}),
],
transports: {
[base.id]: http(),
},
});
```
Then you can use wagmi's react interface to interact with the Smart Wallet.
```tsx [App.tsx]
import { useConnect } from "wagmi";
// ...
const { connect, connectors } = useConnect();
return (